Followers

Thursday 30 April 2020

'Snow Sparkling like a Million Little Suns.'

Hello Everyone,

Hope you are all staying safe and well and are coping with the lock down.   Thank you once again for your visits and lovely comments on my last blog post,  I realise the time it takes to read and comment, so they mean even more, thanks again.

Today I would like to share a card with you which I made for Imagination Crafts for their shows on the Create & Craft T.V. Channel in June 2019, using the very beautiful 'Snow Queen' Collection.   I just adore this collection, right up my street so to speak lol!    Once again, bear with me, there are lots of photos but not much reading you'll be pleased to here  lol!

  
Using the silver embossing pad, the scrolls and snowflakes from the stamp set, stamp and heat emboss them around the four edges of the 7" x 7" white base card, using the silver embossing powder.


Cut a square of purple card, smaller than the base card but do not matt this onto the base card at the moment.

Using some hammered white card,  just smaller than the purple,  blend the stormy sky and the milled lavender distress inks over the card, using a blending tool. 

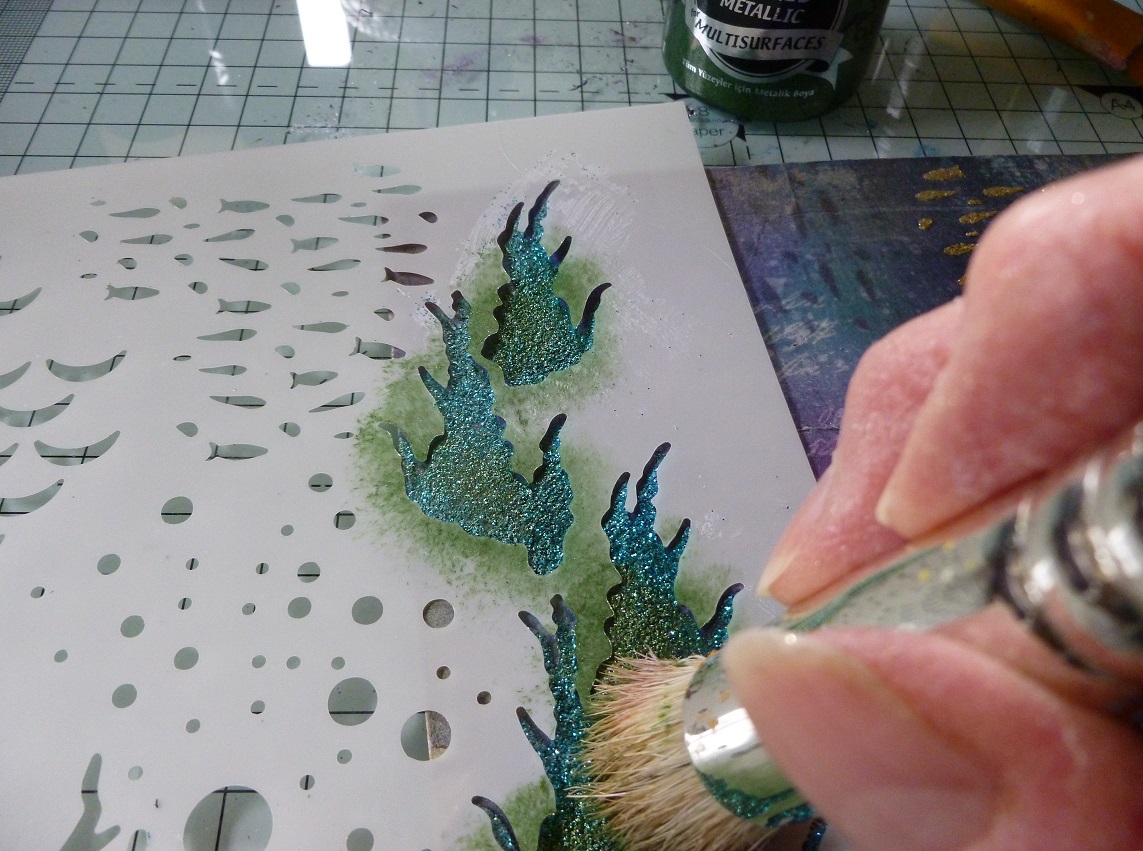
Lay the clearing stencil (which is not part of this collection but is an Imagination 6"x6" stencil from some time ago...one of my favourites and is so useful, I use this a lot) onto it and using a metal spatula, spread the diamond Sparkle Medium over the design.   Remove the stencil and leave the image to dry.

  
When dry, cut this in two making the inside edges 'wavy.'

Take some heatproof acetate and stamp the snowflakes onto it, using the silver embossing pad and heat emboss with silver embossing powder.   Attach the acetate to the back of the Sparkle Mediumed card, leaving a 'gap' between the two pieces of card.   I have laid this onto a piece of black card so it can be seen better.  .


Matt this onto the piece of purple card.


Next matt this onto the white base card.


Stamp the smaller image of the snow queen onto some spare white card, using a black ink pad, six times.    Colour with the Perga Liner pencils ( from Pergamano), then cut out and 3D them onto the first image, using silicone glue.


Base image with second 3D image on top.


Third image on top of base and second image.


Fourth image 3D.


Fifth image 3D.


Sixth 3D image and she is finished.


Glue the snow queen to the left- hand side of the base card.

   
Stamp 'Snow is Sparkling.......' onto a piece  of white card, using the lavender Brilliance pigment pad.

   
Trim the sentiment and matt onto a slightly larger piece of purple card.


Glue this to the bottom right corner using sticky foam pads, to add some dimension to the card 


                             Add a little Diamond  Sparkle Medium  to the fur around her hood.                                                                                                                                                                         
       
Phew! well that's this card finished, hope you're all still with me lol!   if you are...thanks a lot for your patience, hope you have enjoyed your visit.   I do hope you will pop back again soon.   Thanks for your time.

                                                                 Love and rainbows, 

                                                                    Happy Crafting ,

                                                                 Hugs   Jennifer xx,    


Monday 27 April 2020

'With Deepest Sympathy.'

Hello Lovelies,

Hope you are all staying safe and well.   Thank you so much for your lovely comments on my last post and for all your visits, so very much appreciated.   Here the  sun is shinning,  there are blue skies and big fluffy white clouds although a chilly breeze keeps the temperature down a little but we mustn't complain, just so pleased the sun has got his hat on and has come out to play lol.   This kind of weather lifts our spirits, especially at the moment.

Today I would like to share a card I made, using some decoupage designs  I have had in my craft stash for some time, sorry I cannot remember where I purchased it.   I have used an Imagination Craft's stencil for the background along with some T.H. Distress inks.   I always find lilies are just perfect for this sad  occasion. 

  
Take an A4 piece of white linen effect card and trim half an inch from one of the long sides, then fold in half portrait style, making a base card on which to work. 
Cut another piece of the white card  approximately one quarter of an inch smaller than the base card.   Colour this piece of card with the peeled paint, Victorian velvet and a little vintage photo distress inks, using a blending tool.

     
Lay the tree bark design from the Imagination Craft's 'Secret Garden' Collection stencil, onto the coloured card and rub the vintage photo distress ink through the design, moving the stencil each time until all the edges of the card are covered.

  
Remove the stencil and  using a blending tool, lightly blend some brushed corduroy distress ink around the edges, about an inch in from the edges,  getting lighter as you near the centre of the card but not covering the green and pink distress inks completely.

  
Add some vintage photo D. ink  around the very edges of the card.   This has the effect of drawing your eyes to the central image.

   
Matt this onto the base card.

Cut another piece of white card three and a quarter inches by five inches.   Tear the two long edges of the lily decoupage paper, leaving the top and bottom straight.

         
Fix this to the piece of white card and decoupage the image using silicone glue.


When dry, matt this onto the base card,   Add the silver peel-offs -  'With Deepest'  to the top of the card and the 'Sympathy' to the bottom right corner.


The card is now finished.   Thanks for stopping by to read my blog post, stay safe, stay well and stay home.   Look after yourselves until my next blog post.    Happy Crafting.

                                                                 Love and rainbows,

                                                                 Hugs   Jennifer xx.


Thursday 23 April 2020

'Hidden Treasures of the Deep.'

Hello Lovelies,

Here we are once again, halfway through  yet another week.    Even though we are all staying at home because of the Coronavirus lock down,  I am finding that  the days are just flying by ever so quickly.   We are spending quite a lot of time tidying up the garden after a very wet winter.   I am spending some time each day in my happy place - my craft room lol!   I have another card to share with you, which was made using the very magical 'Atlantis' collection by Imagination Crafts and teamed with the Cadence fabulous paints, makes a good combination, plus one of my favourite products - Sparkle and Twinkle.


Take a  6"square of white card and using the Cadence  decoupage glue,  fix the chosen square of rice paper from the collection, onto the 6" square, using a flat brush.  

Lay the small shoal of fish from the stencil onto the top right corner of the rice paper and spread the gold Sparkle and Twinkle over the design, using a metal spatula.    Remove the stencil and wash it.


Lay the underwater plant image from the stencil, down the left hand side of the rice paper and spread the turquoise Sparkle & Twinkle over the design, using a metal spatula.


When this is dry, lay the cleaned stencil back in position and stipple some green  Dora metallic paint onto each leaf.


Then, spread small amounts of the gold Sparkle & Twinkle  on top of the green paint using a metal spatula.

   
Tone down the background colours by painting with the purple marble effect paint, mixed with a little water.


Rub some Inca Gold Finger Wax around all four edges of the card, using your finger.
 

Using the seahorse die from the collection, die-cut 3 seahorses from white card.


Paint the seahorses with the 3 acrylic paints - Amber, Ultramarine & Turquoise, mixing with a little water to lighten the colours, adding a touch of the green shimmer spray,  again mixed with a little water.


Take the seahorse stamp and lay it face up on your worktop and ink it up with a Versamark pad.   Lay the seahorse face down onto the inked stamp and gently press down on the die-cut.


Remove the seahorse die-cut from the stamp and cover with black embossing powder.   Remove the excess powder and heat emboss.


Repeat the above, making a total of 3 seahorses.

Lay the stencil onto the rice paper once more and spread some white structure paste through the 'ripples' image, using a metal spatula.   Remove the stencil and leave the image to dry.


Fix the seahorses in position on the card front using silicone glue to add some dimension to the card.


Add some air bubbles using the clear Just Pearls.   Matt this onto a slightly larger square of light blue card, then onto a slightly larger square of gold mirror card.   Fix this to the base card.   Using a cocktail stick, add tiny dots of the Dark Orchid metallic paint to the swirls on the seahorses bodies and eyes.


Paint a piece of white card with the purple marble effect paint and when that is dry, paint over it with well watered down silver metallic paint.


Stamp the oyster shell onto this piece of card using a black ink pad.   Cut  out and glue it to the bottom right of the base card.

   
Using the pearl  'Just Pearls,'  add a pearl drop to the inside of the oyster shell and leave to dry.


Well, that's it from me for the moment my Lovelies.   Take care, stay safe and keep well and I will be back quite soon.       Happy Crafting.

                                                           Love and rainbows,

                                                           Hugs   Jennifer xx