Followers

Saturday 29 October 2022

'Little Red Robin.'

Hello Lovelies,  hoping this finds you all well.   The weather here today is overcast but dry,  Autumn is definitely here,  leaves  falling all the time lol!   but looking on the positive side, Autumn is one of my favourite seasons, such a  beautiful array of colours, the other being the Spring when new life begins all over once again, nature is wonderful.

Thank you all for your comments and visits, as always, very much appreciated.   Today I have another of my Christmas cards to share with you.   I have used stamps by Stampendous - 'Cling snowbird,'  and  'Christmas Wishes.' which I have in my craft stash,  Imagination Craft's Magic Glamour Dust,  Promarker alcohol Pens and one of a set of corner dies  by Sizzix, Tim Holtz Alterations.


Make a five and three quarter inch square base card from white cardstock.   Onto this matt and layer a square of matt silver card five and a quarter inches square.   Cut a piece of red pearl card just slightly smaller than the silver card.   Die-cut the broken dots in each corner of the red card, using the corner die, rotating the die for each corner.


Matt and layer this onto the silver card on the front of the white base card.

Die-cut a four and a quarter inch diameter circle from white card and using a black ink pad, stamp the Robin on the branch, onto it.


Colour the image with Promarker alcohol pens.


Add some dots of Quickie glue to the snowy parts and sprinkle some Glamour glitter glue onto it.   Shake off the excess glitter.


Glue this circle to the centre of the red pearl card using tacky glue.   Glue three red dots  (left over after die cutting the corners)  to the top right of the circle.


Stamp the Christmas sentiment onto some white card using a black ink pad.   Trim the card to size and edge with the crimson Promarker pen.


Glue the sentiment to the bottom of the circle using tacky glue.


There we have it, the finished card.   I do hope you like it.   Below are a couple more close ups.


Thank you so much for stopping by my blog, I hope you have enjoyed your visit.   I will be back again soon with another Christmas card.   In the meanwhile, please stay safe and well.

                                                           Love and rainbows,

                                                           Hugs   Jennifer xx.


Sunday 16 October 2022

'Merry and Bright.'

Hi there Lovelies,

Hope all is well with you and you have had an enjoyable weekend.    Thank you for your comments and visits to my last blog, each and everyone much appreciated.

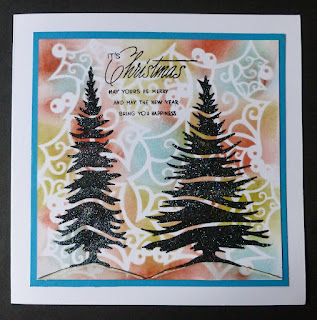
Tonight I have one of the  Christmas cards I have been making over the last few weeks, using different products from my craft stash.   This card I made using two stencils from Imagination Crafts and their Sparkle and Twinkle glitter medium,  a  Christmas sentiment stamp from Stampendous and Tim Holtz distress inks.


Cut a piece of white card five and three quarter inches square and lay the holly stencil on top, secure in place  with some low tack masking tape.

Using a blending tool or brush, blend the Tumbled glass, fired brick and Peeled paint distress inks through the stencil.

Remove the tape and stencil.   Stamp the Christmas sentiment at the top of this piece of card, using a black ink pad, making sure that when you use the 'Fir Tree' stencil the trees will not cover over the sentiment.   The black ink will show up well against the coloured background

.


Lay the 'Fir Tree' stencil in position on the coloured card and secure once again with low tack masking tape.   Using a metal spatula, spread the black stars Sparkle & Twinkle glitter medium over the design, returning the excess to the jar.


Carefully remove the tape and the stencil and leave the images to dry.   Wash the spatula and the stencil,as soon as possible as the glitter medium will dry on.


.When this is dry, matt and layer this onto a slightly larger piece of deep turquoise card.  


Finally, matt this onto a 7" square white base card and the card is finished   Below are a few more close up photographs..


Well that is all from me for the moment, I will be back again with another Christmas card to share with you all.   In the meantime, have a good week.   Stay safe and well.

                                                            Love and rainbows,

                                                            Hugs   Jennifer xx.


Sunday 9 October 2022

'Autumn Blessings.'

 Hi there Lovelies,

Apologies for the long time between my posts but I don't know where the time has gone !!!   Never mind, I have a card for you today.   This isn't exactly a Christmas card as I said in my last post but it is an Autumnal  'thank you' card.   The stamp design could very well be used as a Christmas card.   This was one of my most favourite stamp designs by Imagination Crafts and is now many years old, hope you like it.


Using some white card, stamp the main image onto it, using a copper embossing pad, then add some copper embossing powder.   Remove the excess powder and heat emboss with a heat gun.    Trim the image to a three and a half inch square and matt it onto a slightly larger black square.

Make a white base card from a piece of A4 card approximately just under 6" square and stamp 'Autumn Blessing' at the centre top and 'Thank you So Much' to the centre bottom of the white base card, using a black ink pad.


Matt the main image onto the centre of the white base card and using some spare black card, die-cut two corner flourishes, using the corner die. (This die I purchased some time ago).   then the two leaves from the  'Crafter's Companion'  set, given free with a craft magazine some time ago (sorry not sure which magazine it was)   Take some copper finger wax and rub gently over the corner flourishes, leaving some black showing.

Take the two die-cut black leaves and using the corresponding leaf stamps, stamp the leaf veins etc., onto the 2 black leaves, using the copper embossing pad.   Then heat emboss using the copper embossing powder (as done previously for the main deer image).   Shape the leaves with your fingers, then glue to the card front, along with the corner flourishes.


Well  that is this card finished, I do hope you like it, I just love cards which have deer in their design.   Thank you so much for visiting my blog and I'll try  not to leave it so long next time lol!!   Take good care of yourselves and stay safe.   Cheerio for now.

                                                                      Love and Rainbows,

                                                                      Hugs   Jennifer xx.