Followers

Sunday, 16 October 2016

Creepy Halloween card.

Hello there,  hope you have all enjoyed your weekend, whatever yo were doing.   Saturday here was very wet and today (Sunday), began wet then the sun appeared and it ended a lovely evening.

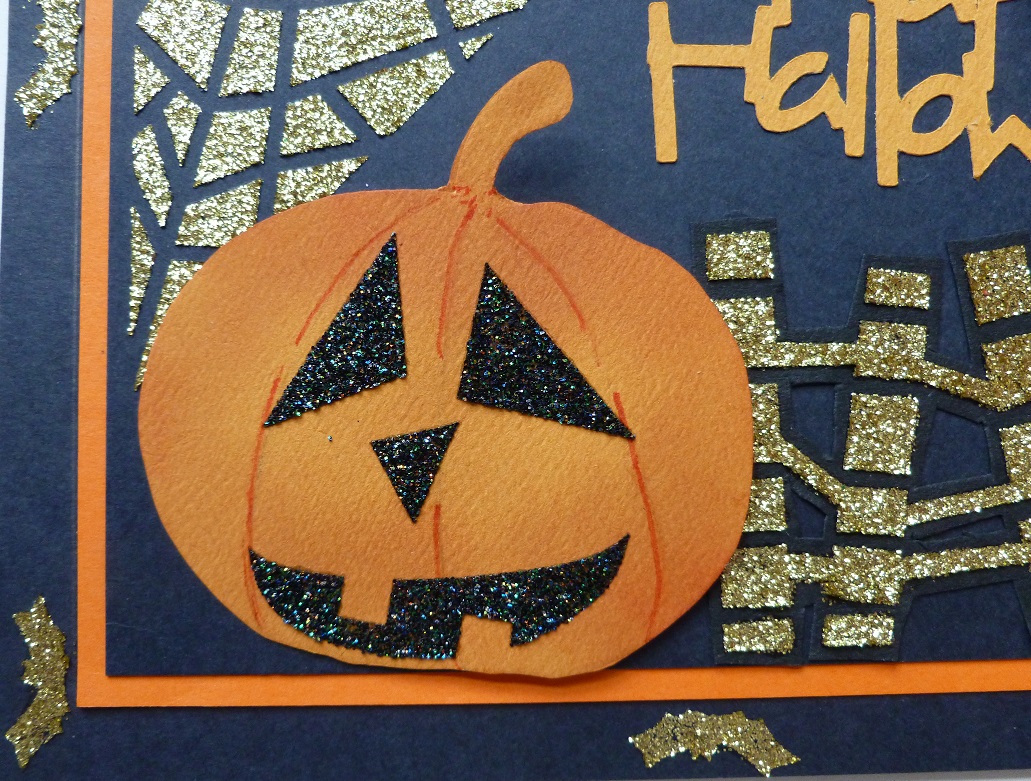
As we are nearing Halloween, I thought I would share one of my cards which I made for Imagination Crafts for their show on the  QVC T.V channel,  in September 2013.   Some of you may have also seen this on  the Imagination Craft's blog in 2013.    I have used elements from two of Imagination's stencils - 'Pumpkin'  & 'Spooky Scene'  plus Sparkle Medium.

   
Begin by making a 6"x6" black base card and spread Gold Shine Sparkle Medium through the stencil, making small bats around the card edges.   Matt a smaller piece of orange card onto the black base card.

Using the spider's web corner on the stencil, lay the stencil on another piece of black card and spread the Gold Shine Sparkle Medium  using a metal spatula, over the web on the top left hand corner of the black card.      Do the same with the crooked fence in the bottom right corner.   Cut out the fence and glue to the bottom right.

Using more black card, spread the gold shine over the spider.   When dry, cut out the spider and glue onto a narrow strip of acetate.   Glue the acetate onto the back of the black card at the top right, so the spider hangs over the front of the card and  moves when the card is moved.

    
Matt this onto the orange card.    Using the Cricut machine, cut out 'Happy Halloween' from orange card and glue to the base card, just below the hanging spider.

Using the stencil and orange card, trace around  the pumpkin and cut out.   Spread the Black Stars Sparkle Medium over the eyes, nose and mouth onto some white card.   When dry, cut them out and glue them onto the pumpkin.   Glue the pumpkin to the left of the base card using silicone glue to give a little dimension to the card.
    
As it is nearly midnight once again lol!   I just don't seem able to make it to bed before bewitching hour !   I will wish you all a goodnight.   I shall be back again very soon, so catch you all then.

                                                                Love and rainbows,

                                                                 Hugs   Jennifer xx.


Friday, 14 October 2016

The Clearing wih an Acetate Wrap.

Good evening,  hope you are ready for  a great weekend whatever you have planned.   Tonight I thought I would share a card I made for Sue & Harvey of Imagination Crafts way back in 2011, gosh!  where have the years gone !!!    I used 'The Clearing stencil stamp range.      I'm not sure if the stamp is still available but the Clearing stencil is.

Colour a 6" piece of cream card around the edges, using the Broken china & Weathered wood distress inks using  a piece of cut'n'dry foam.   Cut a piece of blue card and punch two of the corners only ,one at the top and one on the bottom on the same side, using the Martha Stewart  'Rings' punch.   Fix this to the right hand side of the cream card.


Using a black ink pad, stamp the 'Christmas Greetings' on the top left and  two  trees below the greetings.      Stamp another tree on the blue  blue card on the right-hand side of the base card.


Die-cut 2 large labels, one from  deep yellow card and one from blue card.   Fix the yellow label to the blue one, leaving a small blue border showing on the left edge.   Fix this to the 6" square cream base card.

Cut another label, next size down from the large one, using white card.   Colour this  with cut'n'dry foam and the  Pumpkin, Buttercup yellow & Warm skies, Glitzies.      When dry, stamp the tree branches around the edges with  a black ink pad.   Fix this label to the yellow label.   Place the stencil onto some white card and
trace around the stag, using the fine liner black pen.   Remove the stencil.   Draw some wavy lines onto the stag, then fill in each section with a pattern of your choice.   Cut out the stag and colour him with the Glitzies     Fix him onto the now  coloured  smaller label using sticky foam pads


Cut out some acetate to fit around the card but leaving enough acetate to create a slightly bowed  front.      Stamp two trees on the left side and one on the right hand side of the acetate, using a black Stazon pad.


Fix the acetate to the  cream card securing the acetate at the back of the cream card, using double sided sticky tape.    Fix this to the front of the  6" square cream base card, thus hiding the stuck down acetate edges.

     
Die-cut a smaller label, colour it using the same method as the larger one, ie; Glitzies.   Stamp 'Silent Night' onto the label, using a black ink pad.   Punch a hole in the label and in the acetate, then thread the gold cord through the holes so it is fixed to the top of the acetate.

Well that's it for tonight, hope you like it.   Have a wonderful weekend.   Catch you all again very soon.

                                                                 Love and Rainbows,

                                                                   Hugs    Jennifer xx.  


Wednesday, 12 October 2016

A Letter to Santa Claus.

Good evening Friends,

Hope you are all well and happy.   The weather is definitely Autumnal now,  cold and damp in the mornings and the birds are very busy eating the berries from our trees.     Tonight  I would like to share a card I made for Sue ans Harvey of Imagination Crafts in September 2015, for one of their shows on Hochanda T.V.

    
Fold the white ready creased card down the centre crease line, making a 7"x7" base card.   Place the front of the card inside the snowflake embossing folder and emboss.   Cut a smaller piece of black card and put it in the same folder and emboss.   Punch each corner with the EK Success corner punch.

       
Gently rub the Alchemy waxes over the outside edges of the black card.

  
Next take some white card and lay the Christmas List stencil onto it and using the Black, Antique gold, Red, Green, Orange oxidized & White gold  Starlight paints, dab the colours through the design.   Remove the stencil and leave to dry.    Then, replace the stencil back on the dry card and draw around the design with a black pen.   Remove the stencil and cut out each piece.   Using the stencil as a guide, glue each piece in the correct positions on the snowflake patterned card,

   
Cut out the signs for the post box from white card and colour them with the pebble shore  MDF paint, to dull down the bright white of the card.   Add  the days and times the post will be collected, using a black fine liner pen.


Add an address and stamp on the letter.   Cut two pieces of white card to represent snow drifts add some detail sparkle to the snow and glue to the bottom  left and right of the snowflake card, then fix  the snowflake card  behind  the four  punched, black corners.   


Add some Detail Sparkle to the  post box and the lamp.   Add a flame and some rays of light from the lamp, using the gold, red and orange Starlight paints.

That's all folks, have a good Thursday and I will be back soon with another card.

                                                                  Love and rainbows,

                                                                    Hugs   Jennifer xx.


Monday, 10 October 2016

Antique Flower Tag.

Good evening,  hope you have all had a good day.   Tonight   I would like to share another tag with you, which I made for Sue & Harvey of Imagination Craft's in September 2015.

Cut out a large tag shape from white card.   Punch a hole in the centre top of the tag.   Paint the front of the tag with the Peanut MDF paint.   Lay the stencil  onto the tag and spread some White stencil Medium over the design, using the metal spatula.   Remove the stencil and dry with a heat gun until it 'bubbles up' a little.

   
Paint over the front of the tag with Antique Gold Starlight paint.   Rub over with a piece of cut'n'dry foam and some Black Soot distress ink.   Next use all four colours of Alchemy Wax, rubbing lightly over the surface.   When dry, go over again with the Black Soot distress ink.   Using a black ink pad, randomly stamp the hessian stamp over the tag.   Glue a piece of gold ribbon around the bottom of the tag, securing it with some sticky tape, on the reverse of the tag, adding a ribbon bow to the bottom right.

   
Cut another tag exactly the same as the first one and glue this to the back of the original tag to hide the cut  ends of the ribbon.   Make a stand from more white card and colour this roughly with Black Soot distress ink

    
                                                    Glue a gold heart to the front of the tag.

    
Die-cut two of the smaller flowers and  then die-cut two of the larger flowers, using the Tim Holtz dies.   Paint the flowers with the Orange Oxidized and  Blue Starlight paints.   Punch out  four circles and paint the with the orange Starlight paint.   Shape the circles from the back, making them a slightly dished shape, then glue them to the flower centres using silicone glue.   Glue the flowers to the tag front.  

Using some of the gold ribbon, make four loops and glue between the flowers, using Magi-bond glue.   Lastly add some ribbon to the top of the tag.


Hope you like this and you enjoy your visit.   Thanks for taking the time to stop and read my blog and if you leave me a comment, thanks again.     I will be back again soon with another project, until then be happy and keep smiling, it is good for the soul lol!

                                                                 Love and rainbows,

                                                                  Hugs   Jennifer xx.


Sunday, 9 October 2016

Butterflies and Poppies.

Hi there Everyone,

Hope you are all enjoying your Sunday.   Today I would like to share a card I made for Imagination Craft's back in February 2013.    I have used the same stamp as my previous post - 'My Poppy Tag.'    As I only took one main photo of this card and I no longer have the card,  I have taken more photos from my photocopy,  which are quite good,  I'm relieved to say, so here we go!   hope you like it.  

    
Make a base card 6"x6" from turquoise card.   Matt a piece of shiny black card onto the turquoise card, slightly smaller than the base card.

Cut a piece of white card slightly smaller than the black.   Stamp the poppies  twice down the left hand side of the white card.   Put the card and  'vine leaves' stencil  into an embossing machine and emboss.   Leaving the stencil in position, colour the design with distress inks.   Colour the poppies with distress inks.


Spread some bright red Sparkle Medium through the stencil, down the right hand side of the card, spreading the Sparkle Medium out  to practically nothing, using the metal spatula.


When dry, fix a ribbon down the card, securing on the reverse of the card.   Glue this to the black card.   Cut out and emboss the label from white card.    Colour the inside of the label with distress inks.      Cover the outer edge of the label with Imagination Craft's gilding glue and cover with their red gilt gilding flakes.    Stamp 'Hi' and leaf stems to the centre of the label using a black ink pad and fix to the card using sticky foam pads.


Stamp the butterfly 3 times onto white card and colour with distress inks, cut out and glue to the card front.   Finally add a  ribbon bow to the top of the label.


That's all for the moment, I will be back soon.

                                                                  Love and rainbows,

                                                                     Hugs   Jennifer xx.


Saturday, 8 October 2016

My Poppy Tag

Hi there Followers, Friends and Visitors,

A very happy Saturday afternoon to you all.   I just thought I would post my blog earlier today, just for a change.

Today I would like to share a tag with you all which I made for Imagination Crafts back in February 2013.   For this tag, I used Imagination's beautiful Poppy gilding stamp set.

Make a tag shape.   Colour with the Victorian velvet and scattered straw distress inks.   Stamp the poppy stamp in black onto the tag at the top and bottom.    Add a little black soot  DI around the edges.

    
Stamp the corner stamp from the same set in all four corners, using a black ink pad.     Stamp the same corner stamp again but this time in Versamark, stamping slightly to to one side of the original image, then heat emboss with gold embossing powder.

Stamp the dotted swirl  (from my stash, sorry not sure of the make)  in black on the left side of the tag.   Stamp 'LOVE' onto some green ribbon in black, (from the dove decoupage stamp set).  Tie the ribbon around the centre of the tag and colour with some red mica powder.   Thread ribbon through the hole in the top of the tag.

      
Cut out and emboss the Memory Box corner die and cover with Versamark and heat emboss with gold embossing powder.   Glue this to the tag.   Punch out a flower and colour with mica powder, then rub some Versamark on the edges of the petals and heat emboss with gold embossing powder.

Make a black centre, using the Martha Stewart cornflower punch and glue to the centre of the flower.   Glue some tiny gold seed beads in the flower centre.   Glue the flower to the bottom right of the tag.

Stamp the butterflies onto acetate with Versamark and heat emboss with gold powder.   Cover the backs of the butterflies with the Diamond Sparkle Medium and when dry, glue them to the top left of the tag.

Well that's all from me for today, I do hope you all have a relaxing Sunday, catch you all again soon.

                                                               Love and rainbows,

                                                                 Hugs   Jennifer xx


Tuesday, 4 October 2016

Snow Globe.

Hi there,

Hope everyone has had a good day, the weather here has been sunny and warm and the grass is still growing!  Each time we have cut it recently, we have said that this will be the last cut this year lol!  but it just keeps on growing !!!   Our trees and shrubs have put on an amazing amount of new growth this year,

Tonight I would like to share my no. 10 card, (the last of my cards for my friend Jane's MacMillan Nurses coffee morning.)     This was made with a lovely set of stamps given free  with the Creative Stamping Magazine just recently.

(1)    Cover a 6"x6" white scalloped card with some green patterned Christmas paper, leaving a small
         amount of the white scallops showing.

(2)    Die-cut the fancy border from white card, using the Tonic die.

  
(3)    Brayer some diamond Sparkle Medium over the surface of the die-cut, using Imagination Craft's
         2" brayer.   When dry, glue this to the patterned paper.

(4)    Take some white card, then stamp the snow globe onto a post it note, in order to make a mask and
         cut it out;   Stamp the globe onto the white card,   then cover this with the stamped, cut out mask.

(5)    Colour the card with red, green and yellow distress inks.   When dry, stamp around the globe with
         the snowflakes stamp, using a Versamark pad and heat emboss with white embossing powder.

(6)    Remove the mask and matt this square image onto some black card, then a slightly larger piece of red
         card and fix this to the base card.

(7)    Dab a small amount of Diamond Sparkle Medium all over the empty snow globe with your finger.
         When this is dry, stamp the deer in the centre of the globe using a   black ink pad.

(8)    Stamp the deer again onto white card and colour with watered down Topaz Starlight paint.    Add
         some white pen to the front of the deer, their tails and markings on their backs, then cut them out.
         Glue these on top of the original stamped images.

   
(9)    Add a dot of green Sparkle Medium to the hanging bauble.

(10)   Colour a piece of white card with  the white gold Starlight paint.

(11)  Stamp the base of the snow globe only, onto the gold card and cut out.

(12)   Glue this to the original base, using a couple of sticky foam pads in the centre, to give some dimension
          to the base card.

   
(13)   Stamp 'Let it Snow' onto a piece of white card using a black ink pad, cut out and glue to the base
          of the globe, adding a sticky foam pad to the centre.

(14)   Last of all, glue a small red ribbon bow to the top left of the snow globe.


That's all from me tonight folks, I will be back again soon, so catch you all then.

                                                          love and rainbows,

                                                      Crafty Hugs   Jennifer xx.