Followers

Friday, 8 April 2016

Gorgeous in Gold. A 'Sneaky Peek.'

Hello there,

Time again for another 'sneaky peek' a one of my cards for Imagination Craft's show on the Hochanda  TV Channel, being broadcast live from the Alexandra Palace in London on Saturday 9th April at 3pm.  

For this card I have used the 'folk flower swirl' stencil.   This is another of my many favourites lol!   so unusual.    The gold shine Sparkle Medium really sparkles when the light catches it, unfortunately it does not show up on this photo.

     
Take a piece of smooth white card, cut slightly smaller than the ready creased, white base card.   Paint around all four edges of this card with the white gold Starlight paint.   There is no need to paint the centre of the card, as only the edges will be visible.    Heat the edges with a heat gun until the card and paint, begin to 'bleb up' then stop.   Matt this onto the base card.

     
Cut a piece of matte black card, smaller than the gold edged card and lay the folk flower swirls stencil onto it.   Spread the gold shine Sparkle Medium over the design, using the metal spatula.    Remove the stencil and leave the image to dry.

     
Matt this onto the gold edged card.   Colour a piece of white card with the fuschia and yellow Mixed Media Spray inks and when dry, die-cut one medium and four small roses from it, using the Sizzix dies.

   
Roll up the die-cuts and glue to keep closed.   Then glue to the small flowers on the Sparkle Mediumed images.
   
Well that's all for tonight my friends.    Please pop back tomorrow when I will have another 'sneaky peek' made,  using one of Imagination Craft's beautiful rice papers.    See you all then.   Thanks so much for taking the time to stop by my blog, I really do appreciate it.    Please don't forget to tune in or record Sue from Imagination Craft's on the Hochanda TV Channel at 3pm. tomorrow (Saturday).

                                                                  love and rainbows,

                                                               Crafty Hugs  Jennifer xx.


Thursday, 7 April 2016

Peacock Perfection. A'Sneaky Peek.'

Good evening,
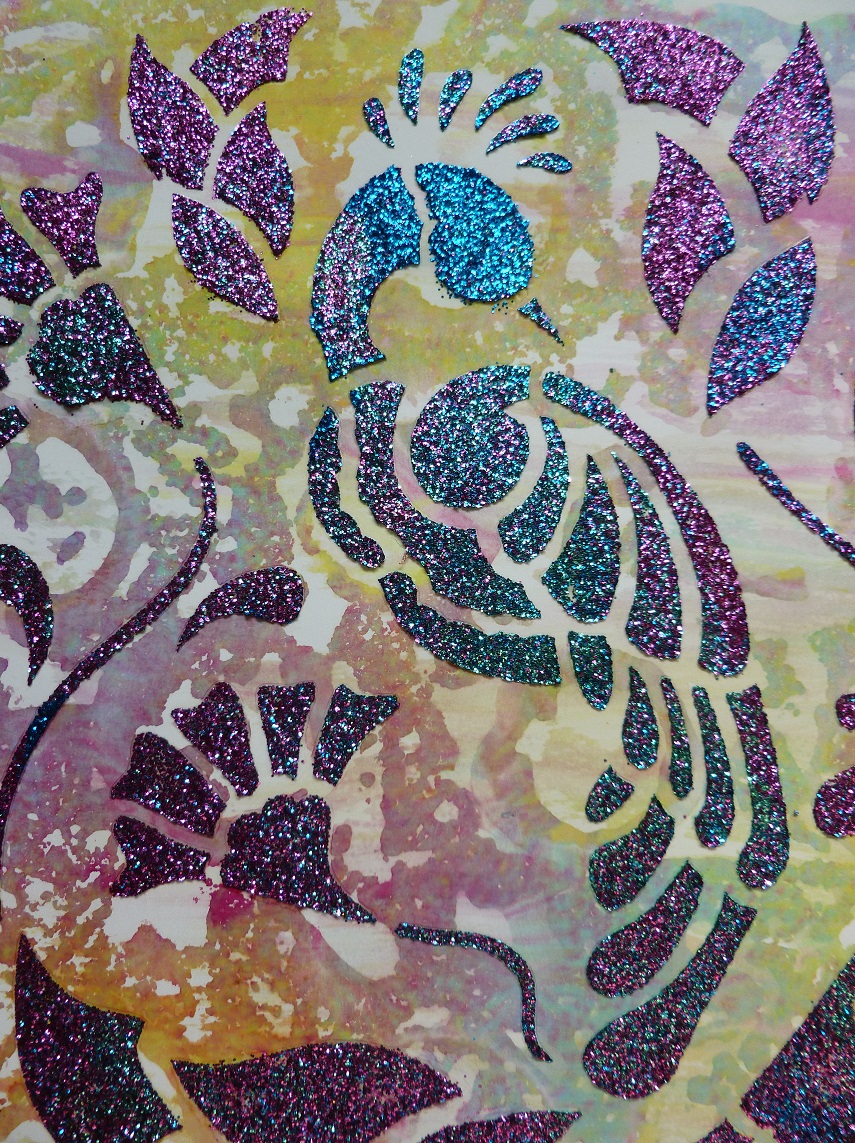
Hope you are all well and have had a good day.    If not, I  hope tomorrow will be  a better day for you.   My 'sneaky peek' for tonight is a card which I've made for  Imagination Craft's show  which will be broadcast live via the Hochanda TV Channel at 3pm on Saturday from the Alexandra Palace, where Sue and Lisa will be demonstrating on the B.J. Crafts stand in the  Great Hall.   If you are going, why not pop in and say 'hello' to them.    The stencil I have used tonight is one of my favourites,   I know !!   I have many favourites lol!   but I think this one in particular is stunning and looks wonderful coloured with Imagination's Sparkle Mediums.   Hope you like it too.

   
I have used  a ready creased 7"x7" white card, onto this matt a piece of bright blue card, leaving a small border of white showing.

Using a plastic container, spray some cheap shaving foam into it.   Spray some of the Mixed Media Spray Inks onto the foam and mix the inks around, using a cocktail stick until you are satisfied with the pattern.

       
Lay a square of white card on top of the foam and press gently and evenly.   Leave for a few seconds, then lift off the card and the colours should have transferred to the white card.    Scrape off the excess foam and leave to dry.

     
When dry, lay the stencil onto the coloured card and spread both colours of Sparkle Medium over the design,  using the metal spatula.      Remove the stencil and leave the image to dry.

  
When dry, trim the card to size and matt onto the bright blue card,  leaving a larger border of the blue showing.    Matt this  onto the base card.   That's the card finished.  


Thank you so much for stopping by  my blog,  I do  hope you have enjoyed your visit.   Please feel free to leave me a comment if you would like to,  I do love to read your comments.    Catch you all again with another 'sneaky peek' tomorrow.    Happy crafting.   Have a good Friday.

                                                               Love and rainbows,

                                                               Big Hugs   Jennifer xx.


Wednesday, 6 April 2016

Flower Power. 'Sneaky Peek.'

Hello  Followers, Friends and Visitors,

Another dull day here with rain, sleet and a few flakes of snow !   my Grandma always used to say, ' never cast a clout until May'  is out and she was right lol!   My next box  of  samples for Imagination Crafts are winging their way to Sue and Harvey as I write this.   Hopefully they will receive them in the morning.   These are for Imagination's show on the Hochanda TV Craft Channel which is being broadcast live from the Alexandra Palace this coming Saturday the  9th April at 3pm.    Sue will also be demoing on the BJ Craft's stand in the great Hall.   Do pop in and say hello to Sue and Jean if you are going.

The card I want to share with you tonight is a very quick and easy card to make.   I have used one of Imagination's new stencils, Sparkle Medium and their new Mixed Media Spray Inks.   Hopefully tonight's card will bring a little brightness and sunshine  which we are short of at the moment.

   
Spread some cheap shaving foam into a square plastic container and spray the fuschia and yellow inks onto it.   Mix the colours around on the foam, using a cocktail stick.   Lay a square of white card on top of the coloured foam and gently press down for a couple of seconds, then lift the card  away.   Clear off the excess foam from the card.   The colours will have transferred from the foam to the card.   leave to dry.

  
When dry, lay the flower stencil onto it and spread the Sparkle Medium over the design, using the metal spatula.   Remove the stencil and leave the image to dry.

   
Matt this onto a slightly larger piece of white card and then onto a larger piece of red card.   Matt this onto the white base card.

   
Last of all glue a red satin ribbon bow to the top left corner.   Well that's it finished folks.   Hope you like it.   I will be back again very soon with another 'sneaky peek.'    See you all soon.

                                                                    Love and rainbows,

                                                                 Big Hugs,      Jennifer xx


Tuesday, 5 April 2016

'Daisy Daisy.'

Hello everyone,

The card I have to share with you tonight was made for Imagination Craft's latest shows on the Hochanda TV Channel last Friday and Saturday.    I have used their lovely 'Open Daisy'  Art Stamp.   There are quite a few ways this stamp can be used  once you get your head around the positive/negative image.   This stamp has been revamped from a stamp Imagination Crafts brought out way back in 2006.   I am so pleased  Sue  has decided to bring  it back, as I always loved using this particular stamp.    Hope you like what I have done with it.

     
Using a ready made cream, 7"x7" card, matt a piece of red card onto the cream base card, leaving a small border of the cream showing.   Matt a smaller piece of cream card onto the red.   Die-cut 4 corners from red card, using the Tattered Lace corner die and glue one in each corner of the cream matt. 


Die-cut a large hexagon from red card and glue to the centre of the base card.   Die-cut a smaller hexagon from cream card and matt onto the red hexagon.      Colour a piece of cream card with the Mixed Media Spray Inks and when dry, lay the leafy swirls stencil onto it.   Spread the Platinum Sparkle Medium over the design, using the metal spatula, adding a touch of the Gold Shine Sparkle Medium.

     
Remove the stencil and leave the image to dry.   Die-cut this now coloured, stencilled card, using the next smallest hexagon and matt onto the larger cream hexagon.  

Colour a piece if white card using  the Media Inks,   then stamp the daisy image onto it, using a black ink pad. Add some Platinum and Gold shine  Sparkle Mediums to the flower centre.   When dry,  cut out the flower head and stem only.  

   
Lay the flower head  onto some cream card and draw around the shape, leaving a small border of cream, then cut out.   Using Magi-bond glue, glue the coloured flower head to the cream flower shape.   Lift the petals by using silicone glue.   Glue the flower head to the leafy swirls hexagon.   Cut out the stem, again  from  card coloured with the inks and glue below the flower head.   Add some white highlights to one side of the stem, using a white gel pen.

That's all for tonight my friends, please pop back again tomorrow, when I will be sharing one  of my 'sneaky peeks'  I have made for Imagination Craft's TV Show on Hochanda, which is being filmed live from the Alexandra Palace, this coming weekend.

Take care of yourselves, see you all soon.

                                                                 Love and rainbows, 

                                                             Crafty Hugs   Jennifer xx.  


Sunday, 3 April 2016

'Woodland Magic.'

Hello everyone,

Well that's another weekend over lol, where do they go ?    Hope you've all had an enjoyable one, whatever you have been doing.   Did you manage to tune in to Hochanda today, to see Sue and Lisa with some great new products and fabulous demonstrations?  I do hope so.   Before I get started, I would like to welcome my newest follower,  Kate, hope you enjoy your visits and thanks for following.

Tonight my card, features the Birch Trees stencil and the gorgeous new Mixed Media Spray Inks.  Not sure if this card got an airing, as I did not see the programmes, as freeview is off air at the moment.   Missing Hochanda already lol!  roll on 6 weeks time, when hopefully they will be back on air.

    
Using a 7"x7" white base card, matt a piece of lavender paper onto it, leaving a  quarter of an inch border of the white base card showing.   Next, matt a smaller piece of light green paper onto the lavender, again leaving a small border of the lavender showing.  

Cut a piece of white card, smaller than the green and colour with the Mixed Media Spray inks :- Fuschia, yellow, green and light blue and leave to dry.   When dry,  die- cut a circle from theis coloured card, just to the right of the centre  and fix a piece of holographic card behind it.   Fix this card to the base card.

    
Take a piece of white card and colour it as before, with the inks and when dry, lay the trees stencil onto it, fix your card and stencil to your worktop with masking tape.   Spread the stencil medium over the card, using the metal spatula.    Remove the stencil and leave the image to dry.   As the medium dries, the trees soak up the colours from the ink, which colours the trees!   

    
When the trees are dry, cut out the trees and fix to the base card, using silicone glue or sticky foam pads,  to add some dimension to your card.

   
Add highlights down the sides of the trees, using silver Starlight paint.    Hope you have enjoyed your visit, thanks for taking the time to pop by my blog.   Take care of yourselves until next time.

                                                                  Love and rainbows,

                                                               Big hugs,   Jennifer xx.


Saturday, 2 April 2016

Dainty Daisies.

Hi there everyone,

Hope you are all enjoying your weekend so far.  I have spent most of the afternoon making samples for Imagination Craft's next show for Hochanda, which is live from the Alexandra Palace  next Saturday.
I have another card to share with you which I made for the Hochanda show this evening.  I have used Imagination's  lovely daisies Art stamp.   I thought I would choose some bright colours for this card and as I am becoming addicted to Imagination's new Mixed Media Ink Sprays lol !! thought I 'd use the yellow and fuschia which, when mixed, create an orange colour.

Using   a 7"x7" white base card on which to work,    matt a smaller piece of black card onto the base card.

   
Take another piece of white card, slightly smaller than the black and colour with the yellow spray ink.   Using the 'Ripe Persimmon distress ink, stamp the daisies around the edges of the yellow card.   When dry, wrap some red/white gingham ribbon  across the centre of the card, securing on the reverse with sticky tape.   Matt this onto the black card.

     
Take another piece of white card, large enough to stamp the daisy image onto and colour with the fuschia and yellow spray inks.

Stamp the daisy image onto the coloured card, using a Versamark pad and heat emboss with black embossing powder.   Trim around the image, leaving a small border around the image.   Matt this onto a square of black card, then onto the base card.

    
Tie  a piece of ribbon  to the left of the image and glue two red gem hearts to the bottom left and two to the top right  of the base card..   Well there we have it folks, card finished.   If you watched the show tonight, I do hope you enjoyed it.   Sue and Lisa are back on Hochanda again tomorrow (Sunday 3rd, April 2016) at   9am.   12 noon.   4pm.  and again at 7pm.  hope you can tune in.

See you all again soon, with more 'sneaky peeks'  for the next Hochanda show in a weeks time.

                                                                  Love and rainbows,

                                                                    Hugs   Jennifer xx.


Friday, 1 April 2016

Flower Frenzy. A 'Sneaky Peek' at a Card for the Hochanda Show.

Hi there Followers, Friends and Visitors,

A rather dull day here today,  very windy and bitterly cold.    The windows are actually rattling at times lol!   Pleased I'm sitting in front of our lovely log fire tonight.     Had some happy post sent today from Imagination Crafts, so I'm busy making more samples for their Hochanda show, live from the Alexandra Palace a week tomorrow, so make a date in your diaries.

Now onto something a little brighter than the weather lol!   My 'sneaky peek' tonight was made using one of Imagination Craft's newest products,   Mixed Media Spray Inks.   These vivid coloured inks are really growing on me lol!   as you may know, I love pastel colours, so this is a big change for me but I'm loving the challenge.

For this card I have used a 7"x7" white base card.    Matt a smaller piece of yellow card onto the base card.     Then matt a smaller piece of dark green card onto the yellow card.    Then  take a square of white card and lay the 'lacy swirls' stencil onto it and dab some Versamark through the design, using a piece of cut n' dry foam.   Remove the stencil and heat emboss, using detail white embossing powder.

   
Using the spray inks, colour over the embossing, until card is covered, then rub away the excess paint , using a piece of kitchen paper, then you are left with a coloured background and a white embossed pattern.  (This is known as the resist technique,  the white embossing resists the paints).


Using the smaller of the square dies from Sizzix, cut out an aperture from the centre of the design.   Use the larger square die, die-cut a larger square from yellow card.   Stamp the text onto this using a black ink pad.   Glue this to the centre of the green card.

     
Tear the edges of the coloured, embossed card and curl up the corners and glue this to the base card..   The text should now be showing through the aperture,   Glue three gems to the top right and bottom left corners of the sentiment.


Die-cut lots of flowers, using the different sized flower dies from Sizzix.   For these flowers I used a piece of copy paper which I used to protect my work surface from the inks, this makes great flowers, lots of  colours mixed together!! - waste not want not lol!!   Add a little lime green stickles to each flower centre, then glue the flowers around the edge of the aperture.


Well that's it folks, hope you like it.    Please don't forget to tune in to Hochanda tomorrow 2nd. April 2016 at 8pm and again on Sunday 3rd. April 2016 at 12 noon.   4pm.   and   7pm.    See you again tomorrow with another 'sneaky peek.'      Thanks for stopping by my blog.   Have a good weekend all.

                                                                  Love and rainbows,

                                                                    Hugs   Jennifer xx.