Followers

Wednesday 29 October 2014

Peacock Perfection.

Hi there Lovelies,

Hope your week is going well so far, not long now until the weekend.   Today I would like to share a card with you I made for Sue and Harvey of Imagination Craft's for their show on Create and Craft in January this year.   I have used their gorgeous peacock stencil, an acetate wrap and of course, the fabulous sparkle medium.   Hope you like it

Begin by making a base card from gold satin card and  take a  piece of black shiny card,  slightly smaller than the gold and put it through an embossing machine, along with the trellis stencil and emboss.  
Matt this onto the gold card.   Using the Memory Box corner die,  die-cut four corners from another piece of gold satin card.   Glue one in each corner of the black card.


Take a piece of acetate and lay the peacock stencil onto it and spread the sage green sparkle medium over the design, using the metal spatula.   Remove stencil and leave the image to dry.  

      
Cut the acetate to fit the base card and make a wrap, securing on the back of the card. 


Die-cut  the flower and leaf stem from gold satin card, using the Memory Box die and a die-cutting machine.   Glue these to the bottom right corner of the acetate wrap.


Apologies for the flash  spot on the card but, this card was very difficult to photograph, as the flash is reflected on the shiny card and the acetate.   That's all for today my Friends, hope you like it.   Many thanks for visiting my blog,  hope you have found it of interest and if you would like to leave a comment, I would be delighted.   See you all soon with my project for the Imagination Craft's Challenge Blog on the 1st. November.   See you then.


                                                                 Love and Rainbows,

                                                                   Hugs   Jennifer xx.

Sunday 26 October 2014

Christmas in the Forest.

Good morning Followers, Friends and Visitors,

Hope you are all well.   Autumn is definitely here,  our driveway is covered in Autumn leaves!   a job just waiting to be done.

Today I would like to share with you, a card I made for Sue and Harvey of Imagination Crafts   in October 2013.   Another idea for your Christmas card making.   There is still time.

Make a base card from navy card.   Take a piece of white card and die cut a deer using the Memory Box die, next lay the negative on the white card and dab distress ink through the image.   Do this twice.   Make 2 masks of the deer, using post it notes and put over the images you have just made of the deer.

Lay the Christmas swirl tree stencil over the masks and dab the distress ink through the stencil.

      
Add some gold shine sparkle medium to the swirls on the trees with your finger.   Put a piece of white card, along with the trees stencil into an embossing machine and emboss.   Then die cut two deer from the embossed card using the Memory Box die.   Colour these with distress inks and fix to the base card using silicone glue, as though they were leaping through the woodland.

  
Colour around the trees with distress inks and add some gold shine stars, using a stencil with stars on it.   Use the negative after die cutting a Spellbinders large labels die, from light blue card and fix it over the white card, to act as a frame.

Well that is it folks.   Many thanks for visiting my blog, hope you have enjoyed seeing my creations.    See
you all soon.

                                                              Love and Rainbows,

                                                                Hugs   Jennifer xx.


Thursday 23 October 2014

A Little Bit of Sparkle.

Hi there Peeps,

Hope you are all well and above all, happy.   Today I would like to share a card with you, that was made for Sue and Harvey of Imagination Crafts    for their Create and Craft show in July of this year.   I decided to make a set of six cards,   all made from cream hammered card, gold shine sparkle medium and black card.  This is one of the set of six.

Make a base card from the cream hammered card.   Die cut a three inch black square and fix to the centre of the cream card.

Take another piece of cream card and lay the mini flower stencil on it and spread the gold sparkle medium over the flower, using the metal spatula.    Remove stencil amd leave image to dry.

When dry, die cut this using s smaller square die and glue to the black square.

  
Make two more gold shine  flowers in the same manner, using spare cream card, spatula and sparkle medium.

    
When dry, cut out and 3D onto the original flower.   Cut out eight petals and glue to the corners of the black square.


                                   Cut out sixteen of the small circles and glue to the card front.

     
That's it finished, I do hope you like it.   Thank you for stopping by my blog and I hope you have enjoyed your visit.   I will be back again soon, in the meanwhile, have fun and stay safe and well.

                                                               Love and rainbows,

                                                                 Hugs   Jennifer xx.

Wednesday 22 October 2014

A Sneaky Peek at my Project for the Imagination Craft's Blog.

Hello Followers, Friends and Visitors,

Well here we are again, time for my project for the Imagination Craft's Blog.  Where have these months gone to!     Autumn is definitely here and the weather the last few days has ensured many of the leaves have fallen.   Another job waiting to be done alas, not my most favourite job lol!  

This morning I would like to share with you, a sneaky peek at my project for the Imagination Craft's Blog.   If you would like to see the full  picture, please pop across  to the Imagination Craft's Blog     where I  give you a step by step with photos and where I explain how I made this card and which Imagination Craft's  products I used.

   
Hope you like it.   See you all very soon,  have a good day.

                                                                   Love and rainbows,

                                                                    Hugs   Jennifer xx.

Saturday 18 October 2014

Stargazing.

Good evening Followers, Friends and Visitors,

I have some very exciting news for you tonight,   today saw the launch of the gorgeous, gorgeous new dies
called 'Celtic Dream,' which has been designed by the very talented Tracey Dutton from Lavinia Stamps for Sue and Harvey of Imagination Crafts.   They are just so beautiful, you're going to love them!   Anyone who knows me, knows that anything to do with fairies, pixies etc., is right up my street lol.   There are 23 dies in this collection, every one is stunning.

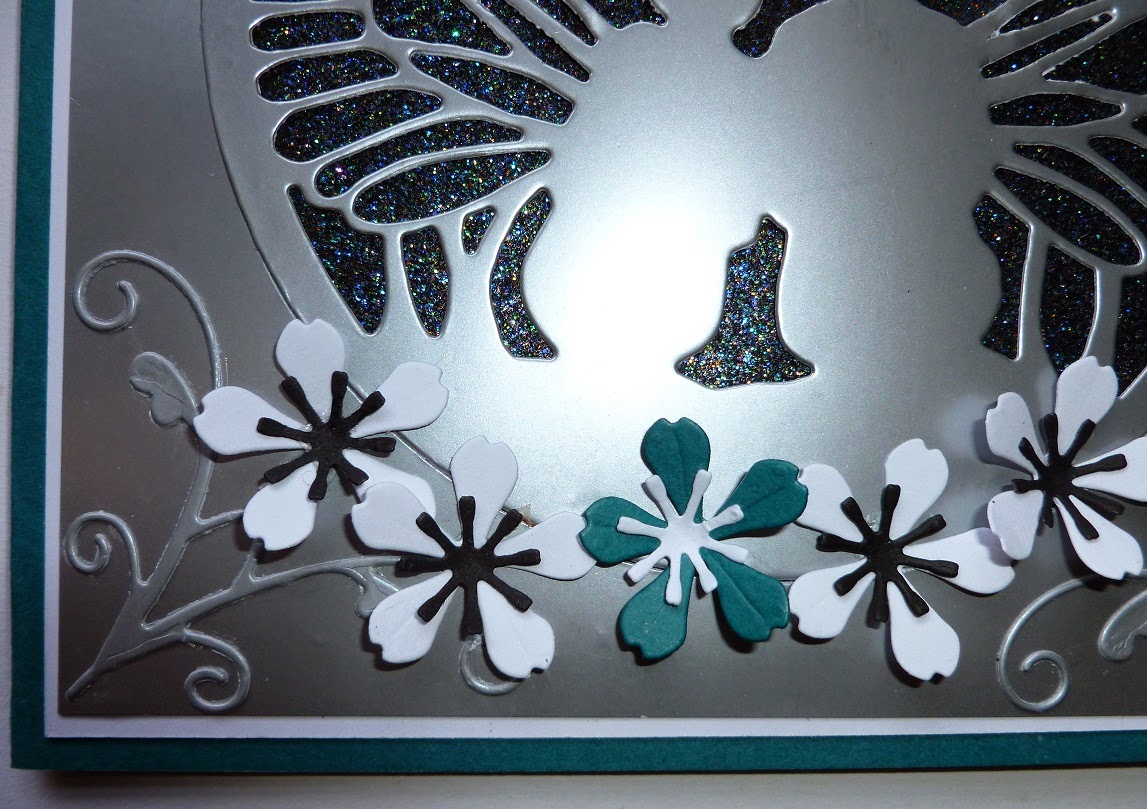
For my post tonight I am sharing a card I have made with the 'stargazing' die which I just adore,  two little pixies, sitting on top of a hill, contemplating the stars and the universe..   I do hope you like it.

Make a base card from some deep turquoise card stock.   Matt a slightly smaller piece of white card onto the turquoise.

Die-cut the stargazing die from satin silver card and put to one side for the moment.   Cover another piece of card with some black stars sparkle medium and leave to dry.

 
When dry, fix to the white card on the base card.   Matt the apperture, (left over after die-cutting the pixies) onto the white card, leaving a tiny border of white card showing.

Glue the pixies on top of the sparkle medium, inside the apperture, so that the sparkle medium is behind the die-cut.   

    
Die-cut four corners from silver card and glue one in each corner.    Last of all, die-cut the flowers and stamen from white, black and turquoise card.

 
Glue three flowers to the top right corner and five to the bottom of the card.

 
Well that's it finished folks.   Iwould really love to know what you think of this gorgeous new die.   Thank you so much for visiting my blog.   Hope my card has inspired you to purchase this new die and give it  a try.   Card making is such a fantastic, relaxing hobby.

See you all soon.  Take care of yourselves until next time.

                                                                Love and rainbows,

                                                                Big Hugs   Jennifer xx.


Wednesday 15 October 2014

In the Pink.

Good morning  Followers, Friends and Visitors,

Well here we are again, time for my mid month inspiration piece for the Imagination Craft's Challenge Blog.   The theme this month is 'Anything goes.'  

Please don't forget, If you enter using Imagination Craft's products, you could win a £40 voucher to spend at Imagination Craft's,  a prize not to be sneezed at lol!   so many lovely goodies to choose from!   I would like to mention that only entries using Imagination Craft's products are eligible for the £40 prize but, non Imagination Craft makes can still get top 3 spots and there is a super badge for your blog. 

                             Ok  time to get started,  here is my October mid inspiration project.

    
Make a base card from white A4 card stock and fold in half, portrait style.   Matt a piece of pink/white spotted paper onto the base card, leaving a small border of white showing.

Matt a piece of green patterned paper on top of the pink,  leaving a small border  of the pink showing.

Take another piece of the pink paper and lay the panel stencil on top and, with a pencil, draw around the design.   Remove the stencil and fussy cut the flower petals, leaves and stem.   Glue these pieces onto the green background paper, using Magi-Bond glue, in the same positions as on the stencil.


Glue three sets of three pink gem stones down the stem.   Cut three narrow strips of pink paper, each a different length and glue down the right-hand edge of the base card.   Glue three gem stones to the inner strip.

        
Die- cut two corners from white card, using the T.Lace corner die and glue one in the top right and one in the bottom right corners.....the 'happy birthday' is already printed on the green background paper.


Die - cut a white butterfly, using the MB butterfly die and glue to the left side of the card.   Well there we have it, one finished card!    I do hope my project has inspired you to get out those crafting goodies and join  in the challenge with us.   Should you need any more information about the challenge, please pop over to the Imagination Craft's Challenge Blog.  


Many thanks for stopping by my blog and don't forget, if you would like more inspiration, pop over to the Imagination Craft's Challenge Blog and you will see the other design team members have been very busy and have created some beautiful projects.

   
That's all from me for the moment, see you all soon.   Happy crafting.

                               
                                                             Love and rainbows,

         
                                                              Hugs   Jennifer   xx.

Sunday 12 October 2014

Come fly with me!

Hi there Peeps,

The weekend is at an end, hope you've all had a good one.   No crafting time for me lol!  had fun with our Grandson.   As we are nearing Halloween, I would like to share a Halloween card with you tonight.   This card  was on my blog some time ago and some of my lovely followers may have seen it before, my newer followers and friends may not have seen it, so here it is, hope it inspires you to make some Halloween cards.   I have used Imagination Craft's  stencils - Pumpkin, Spooky Scene and Witche's Broom and of course one of my favourite  Imagination Craft's  products - Sparkle medium, Black Stars.   I would also like to welcome my newest Follower, Anja, welcome, thanks for following my blog, hope you enjoy your visits.

Take a piece of yellow card for the background and colour with distress inks, adding some hills to the base of the card, using a piece of torn paper in the shape of hills.

Using more yellow card spread the sparkle medium over the fence and  the castle and leave to dry.  Cut them out  and fix to the yellow card with Imagination Craft's  Magi-Bond Glue. 

    
Spread sparkle medium over the lightening flash  and the bats, onto the yellow card and leave to dry.   Next cut out a circle for the moon and colour it and glue just beneath the lightening.

Place the witch stencil onto another piece of yellow card and spread the sparkle medium over it and leave to dry.   When dry, cut her out and fix her to a strip of acetate.   Fix the acetate to the back of the yellow card.   Matt the yellow card onto some black card and then onto a piece of red A4 card, which has been folded in half, landscape style.

      
This photo shows how the witch looks as though she is flying, as the acetate bobs about,   Using spare white card, lay the stencil with the cat on it and spread the sparkle medium over it and leave to dry... Cut out the cat and fix it to the back of the broom.

    
Using some yellow card and the pumpkin stencil, trace around the pumpkin and cut out and colour the pumpkin with some spiced marmalade distress ink      Fix this to the bottom right-hand corner of the base card, using silicone glue to give the card more dimension.

 
Spread sparkle medium over the small bat and the corner bat, leave to dry, then cut them out and glue to the top right-hand corner of the red card.

Lastly, using the stencil with the word 'BOO' on it,  spread the sparkle medium over it and leave to dry.  When dry, cut out the letters and glue onto the pumpkin.

Well that's it folks, card finished.   Thank you for stopping by my blog, I do hope you have enjoyed your visit.   Please pop back again and leave me a comment and I will visit your blog  in return.   See you all in a couple of days.   Have a good week.

                                                                Love and rainbows,

                                                                 Hugs   Jennifer xx.


Thursday 9 October 2014

Autumn Trees in the Sunset.

Good evening, Followers, Friends and Visitors,

Thank you so much for visiting my blog, I do hope you enjoy your visit.  I would love it if you were to leave me a comment and I will pop over to your blog too.  Tonight's card was made for Sue  and Harvey of Imagination Crafts   in October 2013.   For this card I have used their three trees stencil.   This stencil is very versatile as it can be used for a spring, summer, autumn or a winter tree.   I have also used their lovely  vine leaf trellis stencil which is great for backgrounds, some gold leaf and of course the fabulous sparkle medium.

Make a card from black card stock and matt a piece of gold card onto the black, leaving a narrow border of black showing.   Take a smaller piece of white card and put through an embossing machine along with the vine trellis stencil.   Lay the stencil back onto the embossed card and spread the black stars sparkle medium over the bottom half of the card only, using the metal spatula.

   
When dry, fix a ribbon across the centre and fix three brads to the top left of the card.   Fix this card to the gold card.

Colour a piece of smooth white card to make a background scene.   Lay the trees stencil onto it and spread the ruby gold sparkle medium over it.   Stamp the birds in the sky   (a Lavinia stamp)   using a black Stazon pad.   Add some Imagination Craft's  gilding glue to a piece of cut n' dry foam and dab onto a small flower stamp and  stamp this flower around the base of the trees and cover with  red gilt gilding flakes.    Add small dots of red stickles glue to the background bushes to look like red berries.

    
Cut this out using the Spellbinder's Nestability die and matt it onto a piece of black card, then onto some gold.   Fix this to the centre of the base card.

Well that's this card completed.   Hope you like it.   Take care of yourselves until my next post.

                                                               Love and rainbows,

                                                                 Hugs   Jennifer xx


Tuesday 7 October 2014

Let it Snow, Let it Snow, Let it Snow!

Hi there everyone,

Boy was it cold this morning!  a hard white frost.   The sun eventually popped out for a while, then disappeared and it began to rain, ah well, a good day for crafting lol!

It's time for me to share another creation with you all.    Tonight I have chosen to share another Christmas card.   For this card I used Imagination Craft's cute snowman decoupage stamp which I love, he's just the cutest little snowman.    I made this card for  Sue and Harvey of Imagination Craft's in October 2013.

Make a base card from white card stock.   Onto this, matt a piece  of red patterned paper, leaving a small border of white showing.

Stamp two snowflakes, one on the bottom left and one on the bottom right, using a Versamark pad  and heat emboss with white embossing powder.  

   
Stamp 'let it snow' at the top and the two sides of the card, using Versamark and heat emboss with white embossing powder.

Take some white card and stamp the main image using a Versamark pad and heat emboss using claret embossing powder.   Colour the image with the vintage pearly palette paints.   Trim around the edge.   Cut out and emboss the square shape using white card, and the X Cut die and glue the image to it.   Matt this onto some green card, then onto some white and glue to the base card.

    
Stamp the image a further three times using a Versamark pad and heat emboss with black embossing powder.   Colour, cut out and 3d onto the original image.

Add a star and two snowflake squares, one green and one gold, to the top left.   Cut out and emboss the Spellbinder's label and colour, then stamp the greeting using a versamark pad and heat emboss with claret embossing powder.   Add two rhinestones to each end of the label.   Glue label to base card.

Well that's it finished, I do hope you like it and that it may encourage you to get out your crafting goodies and have a go.    Well that's all from me for now, take good care of yourself and many thanks for visiting my blog.

                                                                    Love and rainbows,

                                                                     Hugs   Jennifer xx.

Saturday 4 October 2014

Christmas Baubles, Wall Hanging Decoration.

Hi there Followers, Friends and Visitors,

My word, the weather has suddenly turned very Autumnal! wet and windy here today, with the sun popping through the dark clouds every now and again.    Had a lovely cosy night in front of the log fire this evening.

Tonight I would like to share a Christmas, wall hanging   decoration.    To make this I used Imagination Craft's  Merry Christmas MDF Charm Kit,  Tree Stencil, Baubles Decoupage Stamp Set and Sparkle Medium to name a few products.   I do hope you like it.

I only used two backing boards and the bauble charm from the set, leaving the other charms   for another project, two for the price of one lol!  as you may know,   I like to get as much as I can for my money!   Paint the back and  front  boards using the Jet MDF paint.   When dry, colour with distress inks.

    
Using a black Stazon ink pad, stamp the baubles decoupage stamp image onto the front of  board.   Stamp the baubles image again onto heatproof acetate using a Versamark pad and heat emboss with black embossing powder.

Spread the sparkle mediums on the reverse of the stamped acetate.   Colour the leaves and berries with alcohol pens.   Next cut out the acetate baubles and glue to the original image.   Add gold cord to the top of the baubles and a bow.

Spread sparkle mediums around the edges of the board using your finger.   Lay the Merry Christmas stencil onto the board and spread the gold shine sparkle medium over it, using the metal spatula.   When this is dry, lay the tree stencil  onto the board and spread the green sparkle medium  over the holly tree.   Leave to dry.

    
Add a ribbon hanger to the reverse of the front board.   Next, take the bauble MDF charm from the kit and cover with Versamark and Magi-Boss Chunky and heat emboss.   Repeat this a second time.

Cover the surface of the bauble with sparkle mediums and leave to dry.  Add a ribbon and bow to the bauble and glue to the bottom of the board on the reverse, so the bauble hangs from the bottom of the board.   Glue the front board to the back.   Well there we have it, one finished hanging Christmas decoration.


I would just like to say a big 'thank you' for all your visits and lovely comments on my blog,  they mean a great deal to me.   I would love it if you were to be a follower of my blog, just click on 'join this site' and I will reciprocate and visit your blog too.  I love to see what you have all been making.

Take care of yourselves, I'll be back soon.

                                                                   Love and rainbows,

                                                                     Hugs   Jennifer xx. 


Wednesday 1 October 2014

Orchid Trio. My October 2014 Imagination Craft's Challenge Blog Project.

Hi Folks,

Today sees the beginning of another new month and the start of a new challenge over at  the Imagination Craft's Challenge Blog.     Our theme this month is 'anything goes,'  so come on, give it a go!  we would love you to join   us in this month's challenge.

You could win a voucher worth £40 to spend on fabulous Imagination Craft's products.  NB.  only projects using Imagination Craft's products are eligible for the top prize   £40   but you could still win top 3 and there is a lovely badge for your blog.  Well it's time to share my inspiration for this month's challenge, hope you like it.

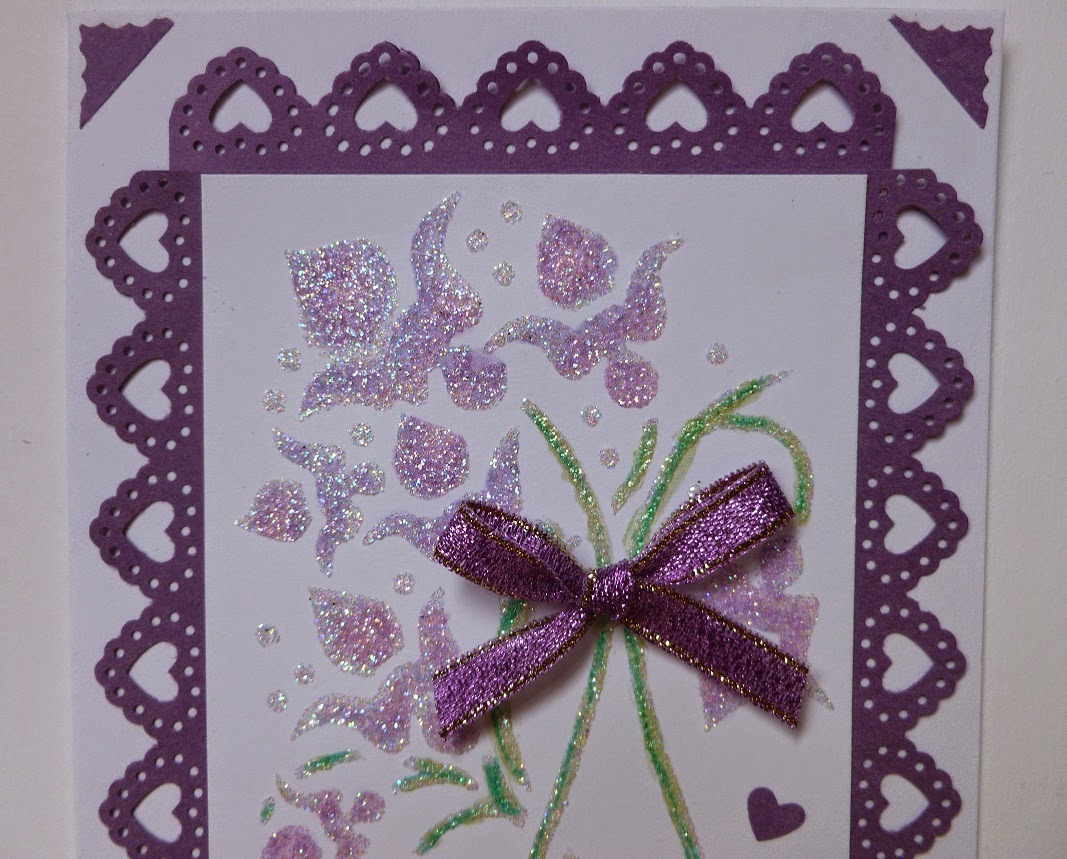
Make a base card fron white card, approximately 41/4" x 8".   Cut another piece of white card approx.
3" x 61/2" and lay the panel stencil on top and spread the diamond Sparkle Medium over the design.

    
Carefully remove the stencil and leave to dry.   Cut a border using the Martha Stewart heart punch  and fix to a  purple paper panel and glue the white stencilled card, onto the purple panel,   then fix this to the base card.  

   
Paint over the stencilled design using the Silkies - lilac mist and lavender lace for the flowers and apple lace and emerald gold for the stems.

  
Glue three of the purple hearts, left over after punching out the heart border, onto the card front.


Add a ribbon bow to the  top of the orchid stems.   Lastly, glue 4 purple triangles, one to each corner of the base card.

             
I do hope my card has inspired you to join in the challenge  with us, we do love to see your entries.

Please pop over to the rest of the Design Team for more inspiration as they have all been very busy making some beautiful projects.

That's all from me for now folks.  Enjoy the rest of your week and take good care of yourselves and many thanks for visiting my blog and leaving some lovely comments, they are all appreciated.

                                                                Love and Rainbows,

                                                                  Hugs   Jennifer xx.