Followers

Tuesday 16 February 2021

'Just Hanging Around.'

 Hi there Lovelies,

Hope you are enjoyed your weekend, despite the freezing temperatures.      Thank you for your visits and comments on my last blog post.   Today I have another card to share with you, which was made for the Imagination Craft's  show on the Create & Craft T.V. Channel on the 11th. Feb. 2021 and was made using Imagination's new  'Into the Wild' collection.   Such a cute image, I understand  it is a red panda.


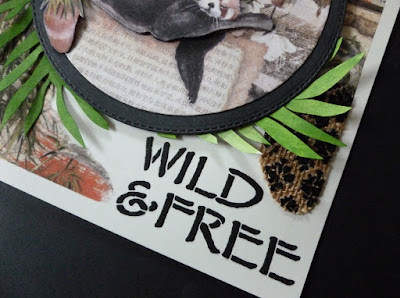
 Die-cut a six inch black circle.   Next die-cut a five and a half inch circle from white card.   Lay the stencil from the collection on the bottom right corner of an 8" ivory base card and spread the black Structure Paste through the words 'Wild & Free.'


Remove the stencil and leave the images to dry.


From the first sheet of rice paper, cut out a five and three quarter inch circle with the red panda in the centre.


Fix this rice paper circle to the white die-cut circle, using the Cadence Decoupage Glue, bending the excess rice paper to the back of the card circle, using the decoupage glue, put this to one side for the moment.


From the left-over rice paper after cutting out the main image of the panda, keeping the top and left-hand edges straight, feather the rest by wetting the edge with a little water and gently pulling, which will feather the edge.


Fix this to the top and left-hand sides of the 8" ivory base card, using the decoupage glue and leave to dry.


Roughly cut out the red panda from the second sheet of rice paper and using the decoupage glue, fix the panda to a spare piece of white card and leave to dry.


Cut out the panda, trimming away any excess white card.   Cut off the panda's left arm and fix the panda to the original image on the circle, using silicone glue.   Fix the circle to the larger black circle using Imagination's Mixed Media Glue.


Lay the smaller pot design from the stencil onto a piece of hessian and using a metal spatula, spread the  Cadence  Textile Crackle - step 1. through the design and dry with a hairdryer.   Next re-lay the stencil back in position and spread the step 2 crackle paste.   Remove the stencil and heat with a hairdryer as previously and it will begin to crackle.   Have one edge rounded and the other edge straight and glue to the right-hand side of the base card, using Imagination Craft's Mixed Media Glue.

Lay the bamboo leaf  design from the stencil on to some spare white card and stipple the light sage and the clover green acrylic paints over the design.  Stencil 2 of these leaves.  Remove stencil and leave image to dry.    Cut out and   colour any white areas with the green paint.


Glue these leaves to the base of the card and fix the circle (main image) in the centre of the base card, near to the top using Sticky foam pads or silicone glue.


Below are a couple of photos showing the dimensions of the card.


Well that's this card finished, hope you like it and thank you for stopping by my blog.   I hope you have enjoyed your visit.   I will be back again soon.   In the meantime, please stay safe and keep well.

                                                                  Love and Rainbows,

                                                                    Hugs  Jennifer xx.


Thursday 11 February 2021

'The Paw Prints of Tme.'

 Good afternoon Lovelies,

Well today the sun was shinning but.....it has been is so....cold Brr..   Let's hope the weather forecasters are right and the weather is going to warm up a little over the weekend.   I do hope you managed to tune in to Create & Craft T.V. at noon today, to see Mandy demonstrating the great products for the launch of the new - 'Into the Wild' collection from Imagination Craft's, beautiful bright and cheery colours....just what we need lol!    I am sharing one of my cards made for the show, using this  fabulous collection.


Matt a seven and a half inch square of deep turquoise card onto an 8" square ivory base card.

Take a 7" square of white card and cover this with the rice paper from the collection, using the Cadence decoupage glue., turning the edges to the back of the card and securing with the glue.


From the second sheet of the same design rice paper, roughly cut out the tribal pattern, the roof and side walls of the hut and the leopards.   Glue these to some spare white card using decoupage glue, as above.   When dry, cut out, trimming away any excess white card.   Fix the 7" square onto the turquoise matt.

Glue the other images onto the original images on the base card, using silicone glue.


 Glue the hut and the leopards to the original images, fixing the largest leopard, just off the main image, using silicone glue and leave to dry.


That's all from me for the moment.   I will be back again soon with another of my cards made using this beautiful collection.   In the meantime, thank you for your visits and comments....as always....very much appreciated.   Please take care of yourselves and be safe.

                                                                Love and rainbows,

                                                                Hugs   Jennifer xx.


Tuesday 9 February 2021

'Wonders of the Deep.'

 Good evening  All,

Tonight I have a card to share with you which I made for one of Imagination Craft's shows on the Create & Craft T.V.  Channel in January 2020.   I do like seahorses, they are such pretty little creatures, that I fell in love with this stamp.   My card is made using the stamps from Imagination Craft's 'Modernista'  Collection.   I decided to stick to black,  blue and white only for this card, instead of a variety of colours.


 Take a piece of white card six and a half inches square and using the Cadence  light sage and ultramarine Hybrid Acrylic paints and the sapphire metallic paint, colour this card, painting across the card from left to right.

Lay the stencil onto the top left of the coloured card and spread the white structure paste through the bubble  design, using a metal spatula.     Remove the stencil and then,  lay the stencil on the bottom right corner and spread the structure paste through the design.  Remove the stencil and leave both these images to dry. 


Using a black ink pad, stamp the border stamp around the top, bottom and right-hand  outer edges of this now coloured card.   Stamp the sentiment in the top right corner. 
            
Stamp the shoal of fish at the top, just left of centre, the waves and the larger fish to the right and the plant to the left-hand side of the card, again using a black ink pad.  


Stamp the seahorse, the plant, the shoal of fish and the larger fish onto a spare piece of white card, using a black ink pad.   Cut these out and glue in position on top of the original stamped images, using silicone glue for the larger fish and the seahorse.   
   
Die-cut the plant stem from the 'Contemporary Nature'  die set, from white card and glue to the card front.


Using a white pen,colour the dots around the border and the waves.   Add small amounts of blue Sparkle and Twinkle with your fingers or a piece of cut 'n' dry foam, across the water to add a glistening effect.


 All that remains to be done is to fix this card to a 7" square white base card.   That's all from me for the moment but please pop back again soon, as I will be sharing another card  with you, which I have made for Imagination Craft's show later this week on the Create & Craft T.V. Channel,   when Mandy will be launching another stunning collection.   This one is called 'Into the Wild.'      Will catch you later this week.      Hope you can tune in to Create & Craft T.V.  on Thursday 11th. February at 12pm.
 
Take care of yourselves and stay safe and well.
 
                                                                    Love and rainbows,
 
                                                                    Hugs  Jennifer xx.