Followers

Monday 28 November 2016

Dahlia.

Good evening,

Well it has been a much better day here today I'm pleased to say, the sun even shone for a short period but still quite chilly.   I spent some time in my crafty space this afternoon, playing with my new Lavinia stamps, which I adore, they are so beautifully designed, as you well know by now lol! my love of anything to do with the fairy realm.    I will share these cards with you  at a later, I need to photograph them first lol!

Well onto tonight's card which was made for Sue & Harvey from Imagination Crafts.   This was made for their One Day Special shows on the Hochanda T.V. Channel last Friday.   I have used the 'Dahlia'  and 'Leaf Vein' stencils and  Starlight paints,

    
Cut a square of brown card, approximately a quarter of an inch smaller than the  7"x7" ivory base card.   Lay the 'Leaf Vein' stencil onto it and dab the Emerald and Rich Gold Starlight paints through the design, using a piece of cut 'n' dry foam.   Put this to one side for the moment.

   
Take some spare brown card and lay the large Dahlia stencil onto it and dab the Orange Oxidised Starlight paint through the design, adding a little Rich Gold paint.


Repeat this three  more times.   Cut out, leaving a small edge of brown around the edges of the petals.   3D, using silicone glue and fix to  the centre of the  brown card, with the stencilled leaf background on it.   Glue this to the centre of the base card.

   
Using the Spellbinder's tag,  die cut one tag in ivory and another from brown card.    Cut out the oval from the brown card and glue to the ivory tag.

    
Stamp 'Love You' using the Rich Gold Starlight paint onto the brown oval.   (Just a little tip, lightly spray your stamp with water  before dabbing the Starlight paint onto it, using a piece of cut 'n' dry foam.)   Glue the tag to the bottom centre of the base card, just below the Dahlia.

Well that's all from me for tonight.   Take care of yourselves and I will be back again quite soon.

                                                                Love and rainbows,

                                                           Crafty Hugs   Jennifer xx,


Sunday 27 November 2016

Dynamic Dahlia.

Happy Sunday to you all,

hoping you are having a great weekend whatever you are doing.   We have had a quiet one, so thought I would do an early post for a change.   This card was made for Sue & Harvey of Imagination Crafts, for their shows on the Hochanda T.V. Channel last Friday.

I have used an Imagination stencil called 'Dahlia'    and one of the new colours of Sparkle Medium called 'Merlot..   I have also used  Rusty Patinas and  Starlight paints for the background.

  
Matt a square of orange card onto the 7"x7" ivory coloured base card, leaving a small border of the ivory showing.

Cut a slightly smaller piece of white card and paint with the 'Soot' Rusty Patina and then add some 'Cafe Creme Rusty Patina on top of the soot but not covering over the soot completely.

  
When dry, lay the 'Dahlia' stencil on top.   Mix some 'Orange Oxidised' Starlight paint with some 'Merlot' Sparkle Medium, then spread over the Dahlia using a metal spatula.

   
Remove the stencil and leave the image to dry.   Add some Sparkle Medium,  'Rich gold'  and 'Orange Oxidised' Starlight paints  around the edges of this piece of card, I used my finger to do this but you could use a piece of cut 'n' dry foam.

  
Fix a piece of peach coloured satin ribbon across the bottom right corner, then fix this card onto the base card.    Glue a peach ribbon bow to the bottom right corner.

 
That's all from me for now, enjoy the rest of your Sunday.   See you all again very soon.

                                                                 Love and rainbows,

                                                                   Hugs   Jennifer xx.


Friday 25 November 2016

A Tropical Paradise.

Hi there, I'm back again as promised,

Hope you've all had a good day, although we have had a little sunshine today, the hard frost and crispy snow has not melted at all!      Jack Frost has certainly been a busy boy lol!   My card tonight  I hope will make you think of warmer climates!    I have used Imagination  Craft's gorgeous 'Peacock  Paradise' stencil and four of the fabulous new Sparkle Medium colours.   These colours are different to the previous ones and I have to say my favourites are Iced plum, Blue Lagoon,  Blackberry and Crushed bilberry.


Matt a piece of purple card onto the white  7"x7" base card, leaving a small border of the white showing.   Tale a slightly smaller piece of white card and paint with the Pebble Shore MDF paint, adding some Duck Egg Rusty Patina.   Add a little white Gesso on top of the Rusty Patina.


When dry, lay the 'Foliage'' stencil onto the coloured card, then spread the 'Vine Leaf ' Sparkle Medium over the stencil, using the metal spatula.   Remove the stencil and leave the image to dry.

    
Next, lay the 'Peacock Paradise' stencil onto a piece of white card.   Mask off all but the peacock with masking tape.   Spread the 'Silver Dollar,'   'Iced Plum' and 'Blue Lagoon' Sparkle Mediums over the bird, again using the metal spatula.   Remove the stencil and leave the image to dry.


Cut out the bird, leaving a tiny border of white around the edges.


Glue the bird to the left-hand side of the coloured card  using silicone glue.   Matt this onto the base card.

   
Glue a purple/white spotted ribbon bow to the top right corner and your card is finished.   Hope you all enjoyed Imagination Craft's shows on Hochanda today.   Unfortunately I could not watch any of today's programmes as we had no digital signal today, which was most annoying, the one day I wanted to watch lol!
just  my luck lol!  never mind, there will always be other times.

I will be back quite soon, so until then take care of yourselves and enjoy your weekend.

                                                                 Love and rainbows,

                                                                Big Hugs   Jennifer xx.


Thursday 24 November 2016

Happiness is Found in a Butterfly. Another 'Sneaky Peek.'

Good evening Everyone,

 What a cold day it has been here! what snow is left on the ground,  has been crunchy under foot all day.   I just couldn't seem to get warm today!   although the sun did appear it was still bitterly cold, roll on the Spring is all I can say lol!!

I would like to welcome my newest Follower Darlene Solem, thank you so much for following me, I do hope you enjoy your visits and please feel free to leave me a comment good or bad lol!

I hope you managed to tune in to Hochanda T.V. tonight at 8pm. to see our lovely Sue and Kerri-Ann from Imagination Crafts demonstrating the fabulous new colours of Sparkle Medium.   My favourites are the Iced Plum, Blackcurrant, Blue Lagoon and Crushed Bilberry, they are just fabulous.   The card I am about to show you was shown on tonight's programme.


I have used the Iced Plum, Blue Lagoon and Silver Dollar Sparkle Mediums, Mixed Media Spray inks and Rich Gold Starlight paint.


The above photo is taken at an angle to show the beautiful golden sheen of the Starlight paint on the background.

 
This photo is also taken on an angle  and  shows the background colours behind the golden sheen.   Fold the ivory card down the centre crease line, making a 7"x7" base card on which to work.   Matt a smaller piece of dark pink paper onto the base card, leaving a border of the ivory showing.

   
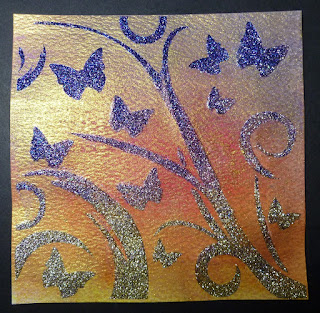
Next matt some ivory card onto the pink paper, again leaving a border of pink showing.    Cut a smaller piece of white watercolour paper and colour with the Fuschia, Yellow and Light purple Mixed Media Spray Inks.   When this is dry, add a well watered down layer of Rich gold Starlight paint to give a subtle sheen over the inks but which still keeps the ink colours visible.

  
When this is dry, lay the butterfly stencil on top and spread the Sparkle Mediums over the design, beginning at the bottom with the Silver dollar, then the Iced plum and lastly, the Blue lagoon, using a metal spatula.   The colours will blend together giving a seamless finish. 


Remove the masking tape and the stencil and leave the image to dry.

 
This photo shows the design with the sheen and the photo below shows the card at an angle, to show the colours behind the sheen. 


Matt this onto the base card.   Stamp 'Happiness is found in a butterfly' onto a piece of ivory card, using the Amethyst Starlight paint.   (One little tip lol - lighlty spray your stamp with water using  a mister, then add the Starlight paint, using a piece of cut 'n' dry foam.)


Trim around the stamped  sentiment in a 'wavy' shape.   Matt this onto some pink paper  and trim in the same manner, keeping a small pink border, then matt this onto a slightly larger piece of ivory card, again trimming the edge.

     Glue the sentiment to the bottom right corner of the base card.   Glue a gemstone to the top right of the sentiment.     Well that's all from me for now,  I will be back again tomorrow with another sneaky peek.   Please don't forget to tune in tomorrow to Hochanda T.V. at 9am.  12 noon. 4pm. anf 7pm.   Thanks for taking the time to read my rather long blog tonight  lol,    nuch appreciated.   See you again tomorrow.

                                                                 Love and rainbows,

                                                                   Hugs   Jennifer xx.


Wednesday 23 November 2016

Peacock Paradise, Another Sneaky Peek.

Hello Friends, Followers and Visitors,

Hope all is well with you and yours.   This week is going by as quickly as ever lol!   Tomorrow evening Sue from Imagination Crafts will be on Hochanda T.V. for a One Day Special launching at 8pm.   then again on Friday 25th. at 9am.  12 noon.   4pm. and 7pm.  so not long to wait now.   There will be some gorgeous new colours of Sparkle Medium  for those of you who just have to have every colour lol!    My sneaky peek for the T.V. show  has been made using the 'Peacock  Paradise' stencil, the luscious Starlight paints and Sparkle Mediums.

    
Begin by matting a 6" square piece of orange paper onto the front of your 7"x7"  white base card, followed by a matt of white card, leaving a narrow border of the orange showing.  


Cut a slightly smaller piece of grey card, which will leave a tiny border of the previous white matt.   Lay the Peacock Paradise stencil on top of the grey card and spread the green Sparkle Medium over the leaves and stems, including the caylx of the flowers.   (I prefer to mask off all  but the leaves, stems and caylx with masking tape.)    Remove the masking tape and stencil and leave  the images to dry.

    
Next I masked off everything close to the flower petals, then I spread the Iced Plum Sparkle Medium over the  petals, adding a small amount of the Blue Lagoon Sparkle Medium to the base of each petal.   Remove the masking tape and stencil and leave the images to dry.   When dry add a small amount of  the Orange Oxidised Starlight paint to the base of each petal, which helps to bring the colour on the card together

Using a piece of white card,  a piece of cut 'n' dry foam and the Peacock Paradise stencil, dab the Emerald, Orange and Antique Gold Starlight paints through the bird only on the stencil.

            
Cut out the bird, leaving a tiny white border around the bird.   Repeat again but this time, only colouring the next set of feathers and glue to the bird using silicone glue to add dimension.   Do the same for the upper set of wing and glue to the original bird.     Glue the whole bird to the centre of the base card, adding silicone glue under the bird's head.

   
This photo shows  the wings from an angle,   lifted up using silicone glue.   That is this card finished, I do hope you will pop back tomorrow when I will have another 'sneaky peek' to share with you.   Have a good
Thursday and please don't forget to tune in at 8pm. tomorrow evening.   Catch you all again  tomorrow.

                                                                       Love and rainbows,

                                                                        Hugs   Jennifer xx.


Tuesday 22 November 2016

Pink Poinsettia - Another Sneaky Peek.

Hello,

Hope you are all well and not flooded out after the recent  dreadful weather,  the good news is that it is on its way out and better weather is due, thank goodness.    We have been extremely lucky here.   Tonight I have another 'sneaky peek' for you,  a card made with the gorgeous poinsettia stencil.   I have decoupaged the poinsettia but it can of course be used  flat as a background.    I have also used one of Imagination Craft's decoupage stamp sets to create the centre of the large poinsettia, along with the fabulous Starlight Paints.

   
Once again the light was not good for taking photographs, so apologies, the beautiful shimmer of the Starlight Paints have caught the light.

Begin by matting a piece of pink paper onto a 7"x7" white base card, leaving a small white border showing.   Next matt a piece of green paper onto the pink,  leaving a border of the  pink showing.  

Cut a smaller square of white card and lay the large poinsettia stencil onto it, then dab some Starlight paints - Antique pink, Emerald and Antique gold, through the design on the stencil, using pieces of cut 'n' dry foam.   Remove the stencil and wash it as soon as you can,  or it will be more difficult to get clean.

   
Using the Martha Stewart corner punch, punch all four corners of the white card.   Glue this onto the green paper on the base card.   Make another poinsettia  in the same way, using the Antique pink  Starlight Paint, colouring the bracts only.   Cut out the individual bracts, leaving a tiny border of white, then glue them to the original poinsettia, using silicone glue, to add dimension to your card.

    
Cover a piece of white card with Diamond Sparkle Medium using a spatula or an Imagination Craft's brayer.    When this is dry, stamp the decoupage  poinsettia stamp onto the Sparkle Mediumed card  using a black ink pad.    Cut this out and glue to the centre of the large poinsettia.

   
Glue five gold beads to the centre of the poinsettia and a pink ribbon bow to the top right corner of the card.

  
That is this card finished, I do hope you like it.    Please do not forget to tune in to Hochanda T.V. on Thursday 24th. November 2016 at 8pm.   and then on Friday 25th. November at  9am.  12 noon, 4pm and 7pm. to see Imagination Craft's One Day Special shows.    I will be back again tomorrow with another 'sneaky peek' for you.   Catch you all then.

                                                               Love and rainbows,

                                                             Crafty Hugs   Jennifer xx.


Monday 21 November 2016

Butterflies and Flowers. A 'Sneaky Peek.'

Good evening all,

Hope your are all safe and well after the very wet weather we are having at the moment.   We have been lucky here, no rain, snow or strong winds, although it has been bitterly cold again.   We woke up to a heavy frost, any snow that was left was frozen.    If you have been flooded as some places have been, my thoughts are with you and I do hope you get things back to normal very soon.

Tonight I would like to share one of my sample cards, made for Sue and Harvey of Imagination Crafts.   They have a one day special  show on Hochanda T.V. launching on Thursday  24th. November at 8pm,  I do hope you will be able to tune in and if not, set your recorders so you can catch up later.   I have used their very pretty  'Folk Butterfly Flower' stencil and two of the fabulous new Sparkle Medium colours.   I must apologise for the photographs, as I had to photograph them on a very dull day, so I used my daylight lamp  and the colours are a little paler than they should be.   Hopefully you may see this card in the flesh so to speak lol! on the T.V. where the colours will look brighter.

     
Matt a piece of green card onto the 7"x7" ivory base card, leaving a border of the ivory showing.   Next take the  'Daisy' patterned background card and lay the stencil on top.   Masking  out the three butterflies and around the stencil edges, in order to stop the stencil moving on your card.

Spread the Hazelnut' Sparkle Medium over the flowers and leaves, using the metal spatula.      Remove the stencil  and leave the image to dry.

  
Take a spare piece of ivory card and lay one of the butterflies from the stencil onto it, masking off any flowers or leaves near it.   Mix a small amount of 'Hazelnut' and 'Silver Dollar' Sparkle Medium together, then spread over the butterfly, again using the metal spatula.   Remove stencil and leave butterfly to dry.

   
Repeat this process for the other two butterflies on the stencil.   When dry, cut them out leaving a tiny border of ivory showing  around the edges.

 
Gently bend up their wings and glue the butterflies in the correct positions (ie: as on the stencil.)    I used Imagination's Magi-bond glue to stick them to the card and silicone glue under their wings.   Glue this to the base card.

   
Well, that's all for tonight my Friends, I will be back again tomorrow evening with another 'sneaky peek,'   so
please pop back for a visit.    Thank you so much for visiting, I do appreciate your interest and comments.
See you all  soon!

                                                               Love and rainbows,

                                                                 Hugs   Jennifer xx.


Friday 18 November 2016

A Bird's Eye View.

Hello everyone,

How fast has this week gone again lol!   where do these days go!   one minute it is Sunday, the next it is the weekend once again!   We woke up to a layer of snow this morning, it looked really pretty but boy was it chilly lol!     It hasn't really snowed again today but it will be below freezing during the night, so I think it is time to put our winter duvet on the bed lol!

My samples for Imagination Craft's next shows on the Hochanda T.V. Channel later this month were posted yesterday and have been received by Sue today, so I can relax a little until my next challenge lol.   I will let you all know the dates and times of their shows  nearer the time and I will of course be sharing some sneaky peeks of my samples closer to the date.


My card tonight was made back in September 2012.   I will be showing you the die-cuts etc., and how you can make more than one card by just changing the positions of the different components.   This blog will be rather heavy on photographs, so please forgive me for that lol!


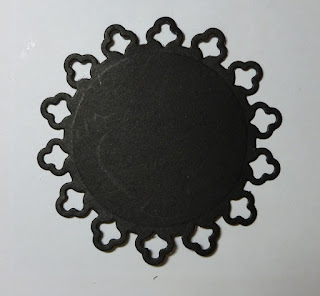
Above are the component parts used to make this card.   Now on how to make it.

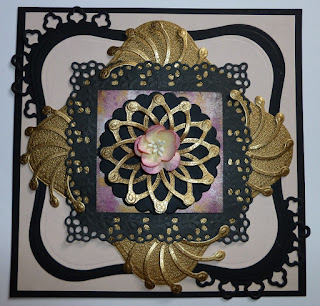
Make a base card from black card stock.   Matt a piece of pink paper onto the black card, leaving a small border showing.    From a piece of black card, die-cut and emboss the labels one (the large square in the second photo).   Using black card again, die-cut the ironwork accents circle.   Cut this in half and glue one half to the back  top left of the black labels one and the other to the back of the bottom right.
Glue the black label to the pink  paper on the base card.

Cut out and emboss another labels one die but this time from gold card and fix this to the base card in a diamond fashion.

  Next cut out and emboss four snowflakes from gold card.   Cut out and emboss the black fancy square and glue the snowflakes to the back, then glue this to the gold labels one die on the base card.  
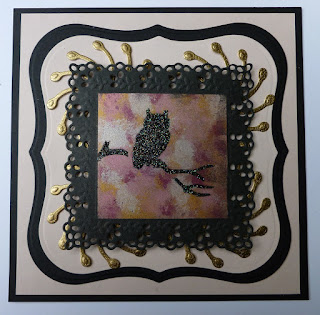
Take a small piece of acetate, cut to fit the centre of the fancy black square and cover with Versamark and brush with pink, deep pink, peach and gold mica powders.

Lay the acetate with powdered side down and lay the owl and the branch  from Imagination Craft's  'dusk til dawn' stencil
onto it and spread the black stars Sparkle Medium over the design, using a metal spatula.      Remove the stencil and leave the image to dry.   Fix this to the centre of the black fancy square.  Punch out some tiny black circles and glue to the pink paper, next to each corner of the black square.   Glue a rose to the bottom right corner of the acetate.   Glue a small black circle to each corner of the acetate.   Phew!   well that is this card finished.    Below are more cards which can be made using the same components, just putting them in different positions.


I feel sure if I thought about it a bit more, there are more ways in which to re-arrange these parts to make more cards.   Thanks for stopping by my blog.   I shall be back very soon, until then have a great weekend.

                                                                 Love and rainbows,

                                                                    Hugs   Jennifer xx.