Followers

Thursday 30 August 2018

Sneak Peek at my 'Lady & Dragonfly' 10" x 12" Canvas.

Good afternoon Friends, Followers and Visitors,

Today I would like to share a 'sneaky peek' at  one of my canvases, made for Imagination Craft's One Day Special shows on the Hochanda T.V. Channel being launched this Friday  31st. August 2018  at 6pm.    I do hope you can tune in this weekend, there will be lots of demos and some beautiful samples made by the Imagination Craft's design team.   All the Imagination Craft's products used in the making of my canvas can be purchased by clicking on this link   www.crafterscompanion.co.uk  then look under Brands and click on Imagination Crafts.


The canvas was sprayed with the navy blue, pink and white Fashion sprays and a spritz or two of water, followed by a small amount of the Shabby Chic Ashy Rose Relief paste painted onto it, mainly down the right-hand side.

The lady from the rice paper was added to the right-hand corner of the canvas using decoupage glue.

 
The spatula was used to spread the white structure paste and the Shabby Chic Relief pastes through various parts of the stencil, onto the canvas.    I painted over the surface of the dot design on the left side of the canvas with some White gold Starlight paint.


The dragonfly was made by spreading the Shabby Chic Relief Pastes through the  dragonfly from the stencil, onto some spare white card.

  
When it was dry, I cut it out and stamped the wings using the white gold Starlight paint, using the 'crackle' stamp from the Distress Stamp Set 1.    I then glued the dragonfly in position on the canvas.


The Art Cutz cogs were painted with Cafe' Creme Rusty Patina to add some texture, then when dry, they were painted with the Ashy Rose and Sage Relief pastes.

    
These were then given a light coat of the gold Starlight paint and glued to the top right and a small cog to the bottom left on top of the green dots.

  
I then die-cut 2 large, 4 medium and 8 small flowers, using the Crafter's Companion DS-E-Flow 3. flower dies, painted them with the Dried Rose Starlight Paint.   Small flowers were glued to the centres of the large and medium flowers.


They were then glued in position to the bottom right corner.   Seven leaves were die-cut using  C. C. die  DS-C-DF3DF and painted with the Green Starlight paint and glued in between the flowers.    I die-cut some flower centres  and painted them with the Sage Shabby Chic paste then   glued  them  to the flower centres.    One medium flower was added to the top left corner.

 
That's all from me for the moment my friends, please don't forget to tune in to the Hochanda T.V. this weekend,  the show times are :-    Fri. 31st. August  @ 6pm. & 8pm.     Sat. 1st. Sept. @  9am.  1pm. & 5pm.     I'm sure you won't be disappointed, especially if you like mixed media work.  

                                                                 Love and rainbows,

                                                                  Hugs   Jennifer xx.


Saturday 25 August 2018

'Butterfly Trio' Card.

Hello Everyone,

Hope your holiday weekend has got off to a good start.   The weather here today has been beautiful, really sunny but not too hot, perfect for gardening.   We've been dead-heading and cutting down plants which have finished flowering plus  general tidying up,  so feeling quite pleased with what  we have got  done.

Tonight I have a card to share with you that I made using a stamp set which was given free with the Craft's Beautiful Magazine May 2018.   I have also used an A4 Imagination Craft's Art stencil for the crackle effect background and White gold Starlight paint.


From a piece of white A4 card, make a  six inch square card.   Matt a smaller square of black card onto the base card.   Take a smaller piece of white card and colour with the Tattered Rose Distress ink and the Adirondak Stream pad, using a blending tool.

Lay the crackle stencil onto the coloured card and blend the black ink through the design, down the centre of the card.   When dry, lay the stencil back onto the design but off-setting the stencil slightly.   Using a stencil brush, stipple the White Gold Starlight paint from Imagination  Crafts, over the design once again, giving a shadow effect.


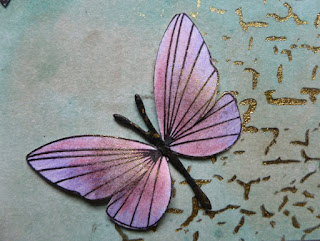
 Stamp 4 flowers, Happy Birthday and three butterflies, onto a spare piece of white card.      Colour with the lilac, pink and lemon colouring pencils, adding a small amount of watered down White Gold Starlight paint  to the wings.


                     Glue one flower in each corner and the three butterflies to the coloured card.

 
        Cut out the greeting and edge with a little black ink and glue to the centre of the card.


 Add a little silicone glue under each of the butterflies  wings and the card is finished.

That's all from me for the moment, enjoy the rest of your Bank Holiday weekend, whatever you have planned.   I will be back again soon.

                                                                 Love and rainbows,

                                                                  Hugs   Jennifer xx.


Tuesday 21 August 2018

A Warm Hello Card.

Good evening Lovelies,

Hope this post finds you all well, if not, I'm sending a big hug to those who for whatever reason, feels under the weather,   I hope my card will cheer you up.    This is something  a little different from me tonight lol.   I decided to get out my Brusho paints for a change, I do love the effects you can get with these paints.   I used the black, yellow and orange.   Hope you like it.

   
Make a white card approximately five & three quarter inches square.   Matt a smaller square of black card onto the white base card.  

Take another smaller square of white card and colour it with the Brusho paints and leave to dry.

    
                                                            Fix this onto the black matt.


Cut a rectangle of black card approximately one and three quarters by five and a quarter inches and die-cut 5 cogs from it using the X-Cut dies.   Save the cogs for another project and use the left-over negative.

   
Glue this approximately half an inch in from the left- hand side of the card.   Using a black ink pad, stamp the greeting in the centre of the largest cog hole.

   
The flowers were made by using the negatives left-over after die-cutting 3 small and 1 large flowers, stippling the 3 shades of Starlight paints - Passion flower, Bright orange and Orange oxidized, through the negative ( using it  like a stencil), using a stencil brush and cut out.

    
Glue 1 small flower to the top and one to the left of the card.  Glue one small flower on top of the large and glue this to the bottom right.

Glue a copper dome to the centre of the three flowers and that's this card finished, another quick card to make.

   
That's all for now my lovelies, I'll be back again soon.   Enjoy your week, the sun is shinning here as I write this post.

                                                               Love and rainbows,

                                                           Crafty Hugs   Jennifer xx.


Friday 17 August 2018

'Blue Sparkle Noel' card.

 Good evening Followers, Friends and Visitors,

Thank you so much for visiting my last post, I do appreciate each and every visit and comment.   Tonight I would like to share a card I made for Imagination Craft's  One Day Special shows on the Hochanda T.V. Channel at the end of June and is a Christmas card.   I know lol! we don't really want to think of Christmas yet! but those  who make their own cards, need to get started as it will be here before we know it!!!    I have used Imagination's lovely  'hanging snowflakes' and 'Christmas Greetings'  6" x 6"  stencils,  Starlight paint and Sparkle Medium.   This is another quick but quite effective card to make.

      
Matt a smaller square of navy card onto the 7" x 7" white base card.   Add a smaller square of light blue card onto the navy matt, then a smaller navy square onto the light blue matt.


Take a smaller square of white card and lay the 'hanging snowflakes' stencil onto it.   Using a stencil brush, stipple the Sax Blue Starlight paint through the design.


   Remove the stencil and wash and dry it, then lay it back in position, just off-setting it slightly to the right and using masking tape or  Crafter's Companion 'Stick and Spray.' to stop the card and stencil from moving.


 Spread the Diamond Sparkle Medium over the design, using a metal spatula.   Remove the stencil and leave the image to dry.

    
Glue this to the base card.   Take a spare piece of white card and lay the word 'Noel' from the 'Seasons Greetings' stencil onto it and stipple some Sax Blue Starlight through the  letters, using the stencil brush.   Remove the stencil and wash and dry it, then lay back in position and as before, off-setting it slightly, then spread the Diamond Sparkle Medium over the design, using the metal spatula.

   
When dry, cut out each individual letter, then glue them to the base card.   This technique gives a shadow effect.


                 Glue three small navy bows to the tops of the hanging snowflakes.


Well that's all from me for the moment, thank you for stopping by my blog.   Hope you all have a wonderful weekend.   I'll be back soon.

                                                               Love and rainbows,

                                                   Happy Crafting,   Hugs   Jennifer xx.


Monday 13 August 2018

A Touch of Romance.

Good afternoon, Followers, Friends and Visitors,

How are you all today,  good I hope after a chilled out weekend.   The weather here today is somewhat dull and rainy, with the odd bright moments of beautiful sunshine, can't complain lol!   at least the temperature is much more bearable thank goodness.   I do like sunny days but just not quite so hot as it has been.

Thank you for your comments and visits to my last blog post, much appreciated.   Today I would like to share a card I made for Sue & Harvey of Imagination Crafts.   This was made for their One Day Special shows  on the Hochanda T.V. Channel at the end of June 2018.   The products used can be found on the Crafter's Companion website www.crafterscompanion.co.uk,  under Imagination Crafts.

I have used one of the gorgeous  romantic rice papers called gaurdian angel no. -A4521,  leafy stencil, Starlight paint, Acrylic fabric paints and a Crafter's Companion corner die.

     
Cut out (feather) the part of the design you want from the rice paper and using decoupage glue, fix it to the front of the 7" x 7" white base card, leaving a border of white showing on the left.


Glue a piece of yellow ribbon down the left edge of the card and glue a ribbon bow about halfway up the ribbon.  

     
                                       Glue a purple heart gem to the top of the ribbon.

 
Colour a spare piece of white card with the Ashy Rose and a touch of Mulberry Purple acrylic fabric paints.   When dry, die-cut two corners using the Crafter's Companion beautiful corner die.   Glue these to the top and bottom right corners of the base card.

   
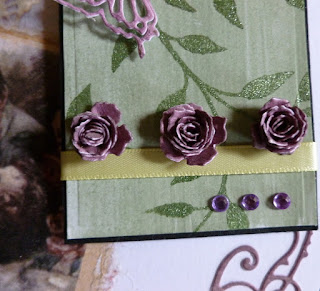
From the same piece of card die-cut a butterfly using the Miricut die and three roses using the Sizzix rose die.

Die-cut a medium tag using the Tim Holtz tag die set, from white card and colour with the sage green acrylic paint.   Lay the leaf stencil onto the green tag and stipple the green Starlight paint through the design.

  
Matt this onto a slightly larger tag, cut from black card.   Glue a piece of yellow ribbon across the bottom of the tag, adding the three die-cut roses and three purple round gems.   Tie  some yellow ribbon through the hole in the top of the tag.

Fix this tag to the card front on a slight angle using silicone glue or sticky foam pads.   Cut out three butterflies from the rice paper and glue onto some white card.   Cut out the butterflies adding two to the card front, and  the die-cut butterfly plus  the other rice paper butterfly,  to the tag

 
That's this card finished folks, a very quick card to make.    Thanks once again for stopping by my blog, I do hope you find some inspiration from my creations for your card making.   Catch you all again soon.

                                                                 Love and rainbows,

                                                        Happy crafting, Hugs   Jennifer xx.


Friday 10 August 2018

' Pink Christmas Sparkle.'

Good evening All,

Well here we are again, yet another weekend on the horizon, time to relax and chill out for some of us.   Hope you've all had a good week.  Nothing much to report from my end lol!   I have spent some time of course in my craft room, making samples for Imagination Craft's next T.V. One Day Special shows on the Hochanda Channel, coming up  near the end of this month, so I'd better get a wiggle on lol!

Tonight I would like to share a card with you which was made for Imagination's last ODS shows at the end of June.   I was thrilled when Sue actually  demonstrated the making of this card on the show.   Hope you like it.


Matt a smaller square of pink card onto a 7" square white base card, then a smaller square of black onto the pink.

Cut a smaller square of white card, then die-cut or hand cut a large circle from white paper and lay this on the centre of the piece of card, closer to the bottom than the top.   Whilst holding the paper circle down, shade all around the outer edge using the Victorian velvet distress ink, using a blending tool or a piece of cut 'n' dry foam.   Remove the circle mask.

Lay the wreath stencil onto this circle and spread the Sugar Mouse Sparkle Medium over the design, using the metal spatula.   Remove the stencil and leave the image to dry.   Matt this onto the base card. 

         
Lay the stencil onto a spare piece of white card and cover the star on the top right of the design, twice more with the Sparkle Medium.   When dry,  cut out the large star and fix to the original image, also the smaller star and 3D onto the larger star using silicone glue.


Stamp the 'JOY' stamp (which was given free with a craft magazine)  onto pink card using a black ink pad.   Cut out the letters and glue to the circle.

 
Die-cut a poinsettia and pine branch (both Marianne Design dies I've had in my stash for many years), from pink card and cover with some of the sugar mouse Sparkle Medium, I used my finger to do this.   3D the poinsettia and glue both the pine branch and the poinsettia to the bottom left of the card..

   
                                     Glue a  small black circle to each of the stamen.


Glue various sized black dots  to the top left and bottom right corners .  (I keep any  small  dots etc.,  from the negatives when die-cutting various dies, as I find  they do come in handy  from time to time),

    
Die-cut four corners from pink card using the Crafter's Companion die and add a small piece of black card just inside the die-cut corner, (again these were some negative pieces left-over after die-cutting, that I had kept.).   Glue one in each corner of the base card and the card is finished.

     
The photo below shows the 3D aspect of the card.    Thank you so much for your comments and visits on my last blog, I really do appreciate each one.


Enjoy your weekend whatever you have planned and I'll be back again soon with another creation.   Take good care of yourselves and 'Happy Crafting.'

                                                                  Love and rainbows,

                                                                   Hugs   Jennifer xx.