Followers

Wednesday 30 May 2018

Rainbow Butterfly.

Good afternoon My Lovelies,

How are you all today?   quite dull here again   but thank fully , no rain, although as I say that, the garden needs some rain very soon lol!  not a breath of air to be had ! but is definitely a little cooler.

Thank you once again for taking the time to stop and read my blog.   I do hope you are enjoying your visits and that you find some inspiration for your own craft work.

Before I begin with my next project, I would like to welcome my newest Follower.   Thanks for following and I would love to hear your thoughts on my creations, so please feel free to leave me a comment.

O.k  here we go.   Today I am sharing a card I made for Sue  Harvey of Imagination Crafts, which was made for their One Day Special shows on the Hochanda TV Channel last weekend.   For this card as you will see, I have used Mixed Media Spray Inks, one of  their fabulous designs of  rice papers,   Starlight Textile paint and the fabulous Shake & Gilt spray.


Matt a square of green card slightly smaller than  the white 7" x 7" base card, onto the base card.   Take a smaller square of white card and colour with the red and yellow Mixed Media Spray Inks.

When dry, cut out or feather the edges of the rice paper,   (for those of you who may not have used rice paper, by feathering, I mean, wet the outer edges of the part of the rice paper you would like to use with a paintbrush, then just gently pull the excess rice paper away from the design,  using your fingers,  once the rest has dried it can be used on another project, quite a few cards can be made using just one sheet of paper.)


On this card I have used  the butterfly with some of the surrounding script.     I have used 2 sheets of the same design - no. MA-010.  from the second sheet I only used the butterfly.

Glue the first piece of rice paper with the script background onto the  card, using decoupage glue and leave to dry.   Next give it a quick spray with the Gold Shake & Gilt, this leaves a fabulous golden sheen which, unfortunately does not show on my photographs!     I need some photography lessons I think lol!   Then glue this card onto the base card.


Roughly cut out the large butterfly from the second sheet using scissors, again keeping the rest of the rice paper, for other projects.   Glue this onto some thin white card, using the decoupage glue.   When dry, paint it  using the red, sunshine and green  Mixed Media Spray Inks and a paintbrush.


When dry, fussy cut around the butterfly, cutting away any excess rice paper and white card.

 
Add some Rich Gold Starlight Textile paint to the yellow parts of the butterfly's  wings and the stripes on the body and head.


Glue this painted butterfly to the original image on the base card, using silicone glue to give a little dimension to the card.

That's all from me for now my friends,  I'll be back soon.   Enjoy the rest of your day.

                                                                  Love and rainbows,

                                                                    Hugs   Jennifer xx.


Tuesday 29 May 2018

My 'Unicorn' 10" x 12" canvas.

 Good afternoon Lovelies,

Well a change in the weather for us today, not much sun and cloudy skies but at least it is not raining lol!   I do hope you are not flooded out with the recent downpours we have had, my heart goes out to you if you have been, must be dreadful to have water in your house.   We're having a quiet day here today, doing what we want, when we want lol!   I do like those sort of days when nothing definite has been planned.   Well, onto my post for today.   I would like to share another of my canvases, made for Imagination Crafts One Day Special shows on Hochanda TV channel last weekend.   although the products I have used appear to be for use on fabric, they can also be used on other surfaces which is brilliant, means you don't have to buy different products for different projects !!    In this case I have used them on a canvas.


Begin by painting the canvas with black Gesso.  Dry brush with white Gesso.   Lay the MA-44 stencil  portrait style onto the painted canvas and stipple the Antique Pink  and Menthol Textile Starlight Paints through the design.   Remove the stencil and wash  it.

  
Lay the MA-68 stencil (with the diamonds on) onto the canvas and, using the metal spatula, spread the white Structure paste over the canvas but, not covering the centre of the canvas.   Remove the stencil and leave the image to dry.


This structure paste is quite quick to dry compared other pastes.
Fussy-cut the transfer, then lay it with the rough side facing down onto some white card.   Lay a piece of greaseproof paper or parchment on top, then iron with a hot iron  (most importantly, do not use any steam)  Keep the iron moving in circular movements for about 2 minutes.   Test to see if the design has transferred to the card, by lifting a tiny corner of the release paper.   It is most important that the transfer is cool before removing the release paper. 

                    
Fussy-cut once again to remove any excess white card which shows beyond the edges of the transfer design.   Glue this to the canvas, using Magi-bond glue.   Add a few dabs of white Gesso in the odd place with your finger or a wine cork.

Glue some flowers to the head of the unicorn    Die-cut the flourish from white card using the Memory Box die,  and two leaves   using the Tattered Lace die,  then paint them  with the gold Textile Starlight paint.    Glue these to the unicorn's head.

         
Glue a white feather and two small pearl drops  and a gold wire with small pearls beads on it, to the flowers so it is hanging down the unicorn's mane.


Add some black soot distress ink around the outer edges of the canvas, then rub some of the Textile gold Starlight paint over the edges and a small amount over the surface of the script and diamonds in the background.

Thie canvas is now finished.   There are quite a few elements and layers to this canvas but worth the time taken I think.

Thanks for your visits and comments on my last blog, they are very much appreciated.   Take care of yourselves and enjoy the rest of your week.   Cheerio until next time.

                                                               Love and rainbows,

                                                                Hugs   Jennifer xx.  


Monday 28 May 2018

'Peace and Quiet' card.

Good evening Followers, Friends and Visitors,

How are you all today, well I hope.   I do hope you the torrential rain has not affected you all.   Gosh! one month's rain in just one hour !!    I feel so sorry for those who have been flooded out, it must be horrendous, my thoughts are with those people.

On a brighter note, I would like to share one of my cards, which was made for Imagination Craft's One Day Special shows on the 26t th. & 27th. May 2018.   Their new Fabric acrylic paints, Textile Sparkle Mediums and Just Pearls can also be used on fabric, canvas and card, to mention a few, which makes them very versatile.   They are also washable, another plus lol.


Begin by matting a slightly smaller square of black card onto a 7" x 7" white base card.   Next, matt a smaller white linen card square onto the black matt.

Take a smaller square of white card and paint with the sage green, Lavender blue and White Fabric Acrylic  paints.   When dry lay the A4 Art stencil no. MA-69  on top of the coloured card and spread the silver Textile Sparkle Medium over the bottom of the stencil, ie; the sea.   Remove the stencil and leave to dry.

  
Mix a tiny amount of the black Fabric Acrylic paint with the White to make a light grey colour.
Stipple this through the stencil - birds only, using a stencil brush.   Remove the stencil.   Glue this to the base card.   Using a white pen, add some highlights to the tops of the waves, the birds and the horizon.


Using a piece of white card, lay the word stencil no.HDM-54 onto it.   Stipple some of the black fabric paint through the letters  'PEACE.'   Remove the stencil and wash it.   Lay the stencil back in position over the word 'PEACE' and just off-set the word slightly.   This will create a shadow effect.   Spread some of the silver Sparkle Medium Textile over the stencil, using a metal spatula.  Remove the stencil and leave the image to dry.

  
When dry, fussy-cut each letter and glue to the card front using silicone glue, to add some dimension to the card.

 
Colour a small piece of white card with the lavender blue fabric paint and when dry, add some of the silver Sparkle Medium Textile over the card.   Die-cut a circle from this card and glue it to the card front.

My card is now finished.   I hope, when you look at my card, you can 'feel' the peace and tranquility of the scene.    Thanks so much for your lovely comments on my last blog and for taking the time to read my blog, which is much appreciated.   See you all again quite soon.   In the meantime, enjoy the rest of your week.   Take care of yourselves.

                                                             Love and rainbows,

                                                             Hugs   Jennifer xx.


Sunday 27 May 2018

My 'Magnolia Oval Canvas Tote Bag'

Happy Sunday afternoon Lovelies,

Hope you are enjoying your weekend.   The sun is shinning here today, once again and it is very hot.   Today I would like to share another of my canvas tote bags with you all.   As you may remember, my last post was another canvas bag.   On that bag I used only the loose magnolia flowers from the transfer, so my bag today, uses the main magnolia branch from the transfer.  (This means I have made two bags using only one transfer, which makes the transfers very economical).   Ok then, let's get started.

   
To get the oval shape, I have used a large scalloped oval die by Spellbinders.   Lay the oval die onto the centre of the bag.   Mask off around the edges with masking tape to stop any paint going outside the edge of the die.     Then, using a fine spray bottle,  spray a little water inside the oval shape.   Next paint the inside of the  oval with the Mulberry Purple Fabric  acrylic paint.   Remove the masking tape and the die.

Cut roughly around the fabric transfer with a pair of scissors.   Next lay the iron-on fabric transfer over the oval, making sure the 'furry side' is facing down onto your bag, then lay a piece of greaseproof paper or bakewell paper over the transfer.   Using a hot iron (definitely no steam, this is important) then iron over the design, keeping the iron moving in a circular movement for approximately 2-3 minutes.   Leave it to cool right down and test to see if it has transferred to the bag, by lifting a tiny corner.    Then gently peel back the release paper and see the beautiful image before your eyes lol!   I do not like ironing but this I don't mind lol!   How lovely is that and all so easy!


Lay the smaller scalloped oval die in position and mask off any of the large oval or flowers which may end up in the small oval, with paper cut to shape.   Next secure the small oval in position with masking tape, as previously done with the large oval.   Using a stencil brush stipple the Menthol Starlight Textile paint on the inside of the oval.

   
Remove the masking tape, the mask s and the oval die.   Repeat this technique once again at the bottom right of the large oval.


Lay the Art stencil no. MA-68 onto the bottom five inches of the bag and once again, mask off any ovals or flowers which will be in the way, (as we do not want the design over the ovals or flowers).
Stipple the Antique Pink Starlight Textile paint through the design, using a large stencil brush, adding a little of the menthol paint over the diamonds only.   Remove the stencil and masks.   Voila! your bag is now finished.


I do hope you like my bag, I did enjoy decorating it.   This could become a very addictive hobby lol!!
All the products used in the making of this bag (with the exception of the oval dies) can be purchased from Imagination Crafts or on this evening's  show on the Hochanda T .V. Channel at 5pm. today...if they haven't all sold out lol!     Judging by the previous shows, people are just loving these new products.    Well that's me for now, I'm off to make a pot of tea before the next programme at 5pm.   See you all again soon.

                                                                 Love and rainbows,

                                                                  Hugs   Jennifer xx.


Saturday 26 May 2018

Green, Pink & Black trellis design card.

Hello again Lovelies,

Hope you enjoyed Sue and Mandy's shows tonight on the Hochanda T.V. Channel.   Some great demonstrations and WOW!" what fabulous samples from all the design team.

I thought I would share another of my samples with you tonight, as it was shown on the programme.   This card uses one of the lovely A4 stencils,  no. MA-44 and Starlight Textile paints.   These paints are so versatile and value for money, as they can be used on card as I have done on this sample, or on fabric, canvas and more surfaces.   When I receive a stencil to work with, I look at it to see what other ways I can use it.     Sometimes shapes can be put back to back, making a different design.   Hope you like what I have done with this stencil.

   
Using a black ink pad and the hessian stamp from the Rockfall Art stamp set and stamp around all four edges of the 7" x 7" ivory base card.

Take a smaller square of white card and colour all four outer edges with the Rich Gold Starlight Textile paint.   Matt this onto the base card.

   
Take a smaller square of black card and lay the A4 stencil onto it and, using a stencil brush, dab the Menthol and Antique Pink  Starlight Textile paints through the design.   Remove the stencil and wash it, as it will be needed again.   Matt this square onto the gold edged matt.

    
Lay the stencil onto a piece of white card and draw around the inner lines of the design using a pencil.   Cut out nine of these shapes and paint five of them with the pink and the other four with the Menthol.

Using the Black Just Pearls,  add five drops down the centre of each of the shapes.   When dry, glue them to the design on the front of the card, shaping them a little with your fingers.   Add some silicone glue under each 'wing' of the shapes.


Colour two small  pieces of card, one with the pink and the other with the green paints, then punch out six small six green and six pink circles and glue them to the card front.

The card is now finished.   Hope you've all enjoyed your day.   Please remember to tune in to Hochanda tomorrow to see Sue demonstrating more techniques at 9am. 1pm. and  5pm.

I'll be back again tomorrow with  another project, hope you will be too.   See you soon.

                                                               Love and rainbows,

                                                                Hugs   Jennifer xx.


My Silver and Magnolia Canvas Bag.

Hello Lovelies,

Well the Holiday weekend is here at last, time to relax and chill out.    Hope you enjoy your weekend whatever you have planned.   Today I would like to share a 'sneaky peek' at one of my samples made for Imagination Craft's One Day Special shows on the Hochanda T.V. Channel this weekend.   I do hope you can tune in, if not maybe you could set your recorders.   The times of the programmes are - Saturday 26th. May at 6pm. & 8pm. and again on Sunday 27th. May at 9am. 1pm. & 5pm.   These new products are just fabulous and I think they will sell out very quickly lol!     All these products can be used on fabric, canvases, cards etc.,   which I think is just brilliant.   Today I am sharing my very first  attempt at decorating a canvas bag.

   
Insert a piece of cardboard inside the bag, so the paint does not transfer through the bag to the other side of the bag.   Begin by masking off a rectangle, on the front of the bag using masking tape, leaving approximately two inches of the white bag showing.

Spray a little water on the inside of the masking tape, then using a flat paintbrush, colour inside the masking tape with the acrylic Mulberry Purple fabric paint.    I just love this colour, it looks a little like velvet when it is dry.     When this is done, remove the masking tape.

When dry, lay the MA-44 stencil on top of the purple rectangle and,  using a spatula, spread the silver fabric Sparkle Medium over the design.   Remove the stencil and leave the image to dry.


Roughly cut out the individual magnolia flowers and stems from the transfer.  Lay them in the position you want, lay a piece of greaseproof paper or bakewell paper over them, then,  (using your iron on hot but most importantly....no steam!!), iron over the transfers, using a circular movement.   Keep the iron moving.   You can gently lift up a corner of the release paper on the back of each transfer, to see if it has transferred to the fabric.   Let the transfers cool completely before removing all of the release paper.   That's when you get that WOW! effect lol!


Lay the clean stencil back on the bottom of the rectangle, masking off any parts of the magnolias
which may be covered by the design on the stencil, using paper cut to shape, then secure the stencil in position.   Once again, spread the silver fabric Sparkle Medium over the stencil on the bottom of the bag.   Carefully remove the masking tape and stencil and leave the image to dry.


Mask off the outside edge of the purple rectangle and another mask approximately half an inch from the purple edge.   Using a stencil brush, dab the Menthol Starlight Textile paint between the two pieces of masking tape, all around the rectangle.   


Remove the masking tape and the bag is now finished.   I have to admit, it was a wee bit daunting sitting with a blank white bag in front of me but once I had decided which stencil and which colours I would use, the ideas began to flow lol!   I'm pleased to say and I did enjoy decorating my first canvas bag.....and not the last I'm sure, it is addictive, so beware ha ha!   once you've done one, you will definitely want to do more!   Please don't forget to tune in.   See you all again very soon with another creation.

                                                                  Love and Rainbows.

                                                                   Hugs   Jennifer xx.


Thursday 24 May 2018

My 'Relax Create' 10" x 12" canvas Tutorial.

Good evening Followers, Friends & Visitors,

Thank you all so much for your comments and visits to my last blog.   Hope everyone is well and enjoying this fabulous spell of weather we are having.   I don't think it will last much longer lol!  that would be to good to be true!

Well, the time has come when I can  at last share some 'sneaky peeks' of the samples I have made for Sue & Harvey of Imagination Craft's shows on the Hochanda T.V. Channel this weekend.   The One Day Special shows are launched on Saturday 26th. May, with further shows throughout the day on Sunday 27th. May.   So why not tune in to see Sue and Mandy demonstrating some fabulous new products and techniques, you're just going to LOVE the new products lol!  I have had great fun making cards, canvases and using these fab new fabric paints!   Tonight I am sharing a canvas with you and for this I have used Imagination's fab new fabric paints.   These paints are not just for use on material, as you will see, I have used them on canvases and cards.

  
Using the canvas portrait style,  paint stripes of the Sage, Black, White and Mulberry Purple Textile paints, down the canvas, blending the colours as you go.   (If you want paler colours, try spraying a little water on the canvas before adding the colour.)

         
When dry, lay the fern stencil onto the centre of the canvas

.   
Spread the white Structure Paste over the design using a metal spatula.   Remove the stencil and leave the image to dry and wash and dry the stencil.


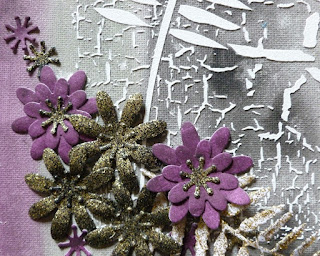
Paint some white card with the Mulberry Purple paint and when dry, die-cut 3 large and 1 small butterflies from it.

   
Next die-cut 2 large and  2 small flowers, plus  2 stamen from the same piece of coloured card.   Spread some of the Gold Textile Sparkle Medium  over a piece of black card and leave to dry.   From that, die-cut 3 large flowers and 6 stamen.

  
Glue the 2 smaller purple  flowers onto the larger ones and glue a gold stamen to the centre of each flower.   Arrange the flowers at the bottom of the fern and glue in place.

   
Glue the butterflies to the canvas and glue 2 small gold circles  (die-cut from spare black card left over after die-cutting the stamen,)  to the upper wings of the butterflies.   Take some white card and lay the Relax stencil onto it.   Dab the black soot distress ink through the design.

 
Move the stencil slightly to the right and secure to the worktop using masking tape.   Next spread the
gold textile Sparkle Medium over the stencil.   Remove the stencil and leave the image to dry.


When dry, fussy cut each letter and glue to the canvas.   Repeat the above for the other 2 words 'Create'   and  'Joy.'   Glue them in position on the canvas.


Die-cut a fern from white card and colour with the  gold textile Sparkle Medium and when dry, glue to the  bottom of the canvas, beside the flowers.

 
Well that is my canvas finished, I do hope you like it.   It is a wee bit daunting sitting with a blank white canvas in front of you I have to say but, once I decided which colour and which stencil I wanted to use and added the paint to the canvas, the design just evolved,  ideas began to flow lol!

I will be back again tomorrow with another sample, made for the Imagination Craft's ODS shows.   I do hope you will pop back.   Have a good Friday and I'll see you soon.

                                                              Love and rainbows,

                                                              Hugs   Jennifer xx,