Followers

Wednesday 30 October 2013

Steampunk Elegance

Hi there my Crafty Friends and Visitors,


The weather here is dry thank goodness but.....oh so cold lols !!   Hope everyone is well.  I am having a lovely day to myself in my craft room, no crafting as yet but I'm busy catching up with emails and computer work, whilst listening to my favourite singer, Andrea Bocelli.  So....relaxing lols  especially when he sings in Italian, very romantic voice and not bad looking either !!  Well  for today's card I have used an Imagination Craft's Steam Punk Stencil which was designed by Kath (Mucky Paws Halstead) and it is a lovely stencil.   Now, I'm not in my comfort zone with steam punk and haven't made any cards using this type of image before.     I'm afraid my' grungy steampunk' is more and 'elegant steam punk.'  lolls ! so  I'd be interested to hear your thoughts on my creation.


Make a base card from white card.   Onto this matt a smaller piece of black card.   Put an oblong of white card through an embossing machine along with the 'Time and Motion' stencil.   Glue this to the centre of the card.

Put a square of white card through the embossing machine along with the 'Time and Motion' stencil.   (The white card being slightly smaller than the black card).   Using the die, cut an aperture from the white stencilled card and glue this to the black card.

Take a piece of black card and the 'Cameo Cog' stencil and put through an embossing machine.   Cut out the lady and some og the cogs.   Glue the cogs around the edge of the white card and add two gold strips, one to the top left and one to the bottom right.     


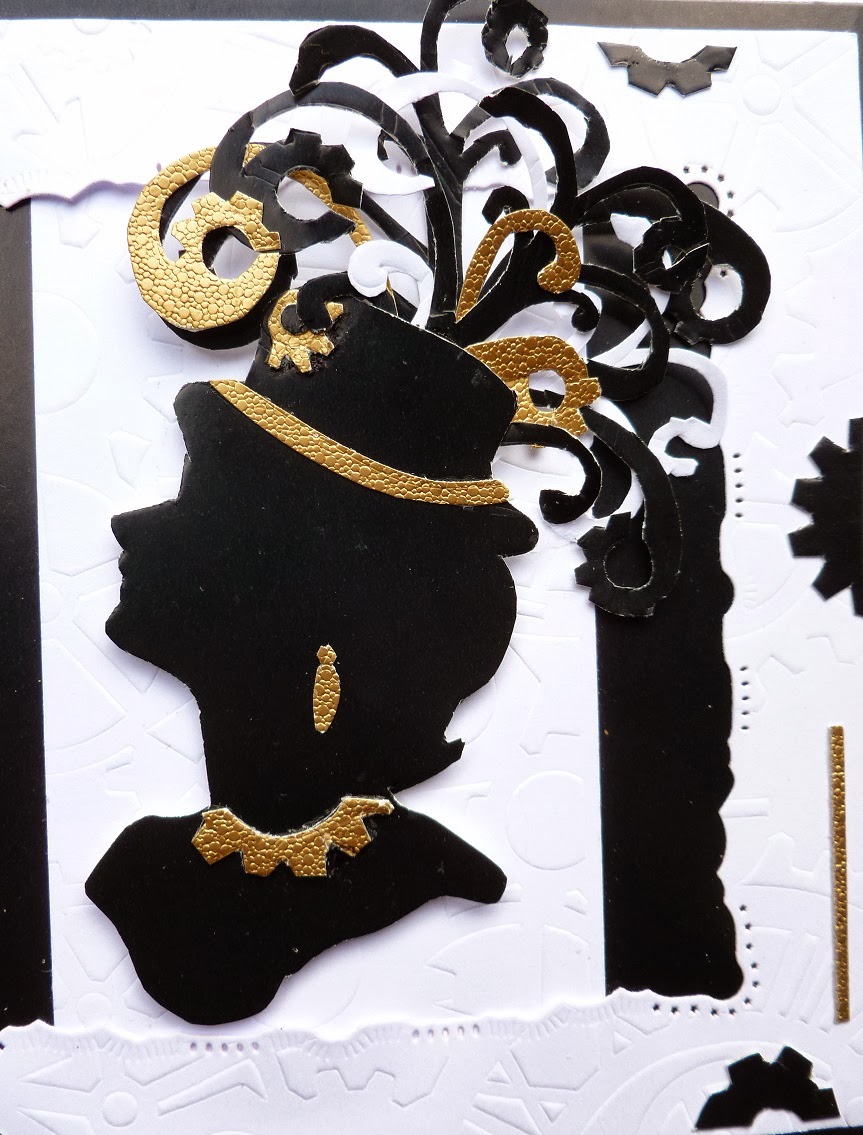
Cut out more cog feathers from her hat using gold card, white and black.   Glue these to the back of her hat.   Fix the lady to the centre of the card using sticky foam pads to give a little dimension.


Cut a gold band and fix to her hat.   Cut out and earring shape from gold card.   Use a piece of cog, cut from gold card for her necklace and her hat ornament.

Well that's it folks, until next time take care of yourselves and thank you for taking the time to visit my blog.

                                                                     Love and rainbows

                                                                          Jennifer xxx

Tuesday 29 October 2013

Water Lily Blues


Good afternoon Crafty Friends, Followers and Visitors,

Hope you are all enjoying your Bank Holiday despite the wet weather in many places.   We have been
extremely lucky in our neck of the woods,  no  rain but cloudy with a glimpse of the sun every now and
again.

The card I would like to share with you today I made for Sue and Harvey of Imagination Crafts and was shown on the January 2013 QVC show.  This is one of my most favourite stamps from Imagination
Crafts, it is just so......pretty and I decide to do it in shades of blue.
                                                                                                                                           

My base card was made using pale blue card and onto this I matted a piece of gold card and then matted
a piece of navy card onto that, each time leaving a small border showing.

Using the die cutting machine, blue card and the accents border, cut out and emboss the die cut.   Put this
border aside for a future project and use the negative.   Glue this across the card just below the centre.

Die cut and emboss eight of the corner dies.   Cover with the Versamark Pad and heat emboss using dark
blue and gold embossing powder.

Colour a piece of card with distress inks and stamp the main lily image onto this using versamark pad and
heat emboss using the blue and gold embossing powder.   Matt this onto some light blue card and trim
around the image leaving a tiny border of blue showing.   Paint with mica powders and water, and 3d.

Glue the eight die cut corners to the back of the 3d image.   Glue the lily image to the centre of the card
using sticky foam pads.

That is it finished, hope you like it.   Enjoy the rest of your  Bank Holiday weekend.  I'll be back soon.

Hugs Jennifer xx


Sunday 27 October 2013

Pink pearly Christmas.

Hi everyone,

Hope you have all had a good weekend and  everyone is looking forward to a whole new week.   The weather in our neck of the woods has not been too bad so far, I'm pleased to say.   Very dull,  dreary and very wet!   Stay safe in the coming stormy weather.   To cheer things up a bit, I would like to share another Christmas card with you all that I made for Sue and Harvey of Imagination Craft's in July 2012.   I can hear you saying, Christmas cards in July !!!  but we crafters like to get well ahead of the game and have our sample Christmas cards made in time for the Autumn shows.   Ok are you ready,  let's get started then.

Make a base card from black card, then onto this matt a smaller piece of white card and then another piece of black card.

Take a piece of pink card slightly smaller than the black and lay the embossable on it and spread the sparkle medium over it with a palette knife.  Remove the embossable and leave the image to dry.


When dry, stamp the greetings and the holly around the right - hand edge of the pink card, using the Versamark pad and heat emboss with black embossing powder.   Fix this pink card to the base card.

Take some white card and stamp the main image of the holly tree onto it using the Versamark pad and heat emboss with black embossing powder.   Stamp this image a further four times.  Colour using the Vintage Pearly Palette, water and a brush.

Cut out and 3D the image.   Fix this to a piece of white card then onto black card, each time leaving a small border.

Fix this to the centre of the pink card.   Add three stars to the right - hand edge of the card and one to the top left of the main image.  

That's it finished, quite quick and easy to do  really.    I know the colours are not traditional but I was quite pleased with the results.   Sometimes it pays to try something a little different to the norm lols!!!.

Hope everyone weathers tonights storm without too much trouble.   Until next time, happy crafting.   I would love to hear what you think of my non traditional  coloured Christmas card, leave me a comment.

                                                                 Love and rainbows,

                                                                 .  Hugs Jennifer xx

Thursday 24 October 2013

Come fly with me on a broomstick made for two.

Good evening everyone

Gosh this week is just flying by, here we are and it is Thursday in a few hours !   Been out shopping today and finished the day off with a lovely Chinese meal.   Hoping to get some crafting done tomorrow.   As  Halloween is nearly upon us, I thought I would show you a card I made for Sue and Harvey of Imagination Crafts a few weeks ago.   My Grandson has his pumpkin now and is going to enter it into the school pumpkin competition ! 1 hope he wins lols.   This card uses three really fun stencils.


Take some yellow card and colour with distress inks adding some hills to the bottom of the card.   Spread some Black  Stars Sparkle Medium through the stencil onto some spare yellow card for the moon with the bat,  when dry cut it out and glue to the top right of the yellow card..   Do the same for the witch and fix a piece of acetate to the back of her.   Fix the other end of the acetate to the back of the yellow card.   Spread the sparkle medium over the different elements of the stencils ie.,  the castle, lightening fence and bats.  Colour a large moon and glue behind the witch. 


Matt this onto a piece of black card, slightly larger than the yellow card and then onto an A4 folded red card, (landscape style).   Fix it to the left side of the red card.   Make another bat and moon with a bat across it  and fix to the top right of the red card.   Below is a side view of the card and because the witch is fixed to a piece of acetate, she is free to swing and  looks as though she is flying through the sky.


Trace around the pumpkin onto some yellow card using the stencil,  cut out and colour the pumpkin with distress inks.   Fix it to the bottom right corner using silicone glue to give the card some dimension.


To finish off the card, spread sparkle medium over the word Boo! using the stencil onto a spare piece of card.   When dry, cut out the letters and glue to the pumpkin.

Viola ! one fun Halloween card finished !   Hope you like it, I would love to know what you think of it..   Until next time, have a nice weekend and thanks for stopping by to visit.

Take care of yourselves, I'll be back soon and I hope you will too !

                                                              Love and rainbows,

                                                                Hugs Jennifer xx

Monday 21 October 2013

Winter Wonderland

Hi everyone, hope you all had a good weekend and managed to fit in some special crafting time.   I have had a really lazy weekend for a change lols !   but I did do a little bit of crafting as all my recent cards are packed up and in the post to Sue and Harvey for the Glasgow and Birmingham shows.  Today's card I made for them in September 2008.   At that time the stamp I used was my all time favourite stamp.   I just love the simplicity of the woodland scene with the deer.   One can just imagine the quiet  woodland, blanketed with snow and the sun going down.      Well enough of the poetic stuff from me, let's get started shall we ?

Fold a piece of A4 golden yellow card in half portrait style.   Colour some white card with chalk inkpads to make a winter sky.   Punch out a small circle from a piece of spare white card and use the negative like a stencil and colour in the setting sun on the top left of the card.

                        
Using a black inkpad, stamp the woodland scene onto the coloured card.   Matt this onto a piece of black card, leaving a narrow border of black showing.   Fix this panel to the top left of the base card with sticky foam pads.   Cut out an oblong piece of black card and cut out a semi - circle from the top left.   Fix three brads to the bottom right of this black card and glue in position on the base card.

Punch out five circles and colour the same as the main panel.   Stamp a snowflake onto each circle using a black inkpad.   Fix these down the right - hand side of the black panel with sticky foam pads.

Next, cut out a piece of white card and colour this in the same way as you did for the previous panel and the circles.   Using a black inkpad, stamp the Christmas greeting on to the centre .   Using the blender tool or  some cut n' dry,  rub some black ink around the edges of this piece of card.   Fix this to the left of the base card with  sticky foam pads.  Well that's all folks, one finished card.   Hope you like it.

Thanks for stopping by to visit my blog and thank you all for your lovely comments, they make me a very happy little bunny lols.   Until next time, take good care of yourselves.

                                                              Love and rainbows,

                                                                Hugs Jennifer xx

Friday 18 October 2013

MDF hanging Christmas Bauble.

Good morning Peeps,  not so good though is it lolls ?  Very dull here and I can see the rain coming in across the hills, never mind let's think of something nicer shall we? like crafting lolls!!   I thought I would just slip in another post today.   I would like to share this MDF board Charm Kit which I made for Sue and Harvey of Imagination Crafts in June of last year ready for the Christmas rounds of Craft shows around the country which they attend.   Ok let's get cracking shall we ? hope you will like it.   I did not put a ribbon hanger on this one but you could and make it into a hanging Christmas decoration.

           
I covered the front of the board with some red paper which I had coloured with Forest Moss Distress Ink.   I spread the Silver Gilt Sparkle Medium through the stencil.   I then put some green striped paper behind the aperture and added some small pieces of gold peel off borders.   I don't very often use peel offs but in this case they were just perfect for the job.   I then glued the MDF board to a piece of dark green card.   A border of silver peel offs were added to the edges of the board and a Merry Christmas, gold peel off was added to the bottom right.

    
I only used the MDF frame from the set for this creation, which means the other parts of the set can be used for another project !  two for the price of one lolls !  that can't be bad can it ?

The dove I covered with patterned paper and rubbed the distress ink around the edges, then covered with Magi-Glaze and glued it to the top right.

The bauble was covered with Versamark and Mica Powders.   I put the stencil over the centre of the bauble and spread the Sparkle Medium over it and left it to dry.   I then spread Magi-Glaze over the whole of the bauble.   When dry I decorated it with metal nail heads and gold peel offs.

A gold cord and ribbon were attached to the bauble but only attached at the top so the bauble can swing freely.   That's it folks, I do hope you like it.   Thank you for taking the time to visit my blog and I very much appreciate the comments you leave, they make me very happy, thank you.   Until next time.   Take care of yourselves and happy crafting !

                                                               Love and rainbow

                                                                Hugs Jennifer xx


Thursday 17 October 2013

Christmas Tree Decoupage

Good evening peeps,

Hope all is well with you.   Gosh ! time is flying by and we are nearly into November !   I hope you are all managing to fit in some crafting time to get your Christmas cards done.   I have done some baking today and I am aware I should be getting my Christmas cake made lols.   Maybe I'll make it at the weekend.

On the subject of Christmas I would like to share another Christmas card with you.   This one I made for Imagination Crafts last year.   I love this decoupage stamp as it has a modern feel to it.   OK let's get started.

                                           
The base card was made from black card.   A smaller piece of white card was stamped with the flourish stamp from the set around the edges of the white card using black ink.   I then  matted this onto the black card.

Take a piece of red shiny card and put through an embossing machine along with the Trees Embossable.   Sand gently over the trees until the white card shows through.   Paint the trees with the gold  from the Vintage pearly palatte.   Tear around all  four edges of the red card.   Fix a piece of ribbon across the centre and matt this onto a piece of black card then matt this onto the white stamped card.

Take some white card  and stamp the main tree image a total of five times using a Versamark pad and heat emboss using black embossing powder.   Colour with the Vintage Pearly Palette. cut out and 3D.   Fix the main image to the centre of the base card.

Add a ribbon bow to the right-hand edge of the card and two buttons, one on the top left and one on the bottom right-hand corners.

Well that's it finished.   Thank you so much for stopping by to visit my blog.   I hope I may have inspired you to get out your craft products and make some  Christmas cards lols !    Until next time, happy crafting.
See you soon.

                                                                   Love and rainbows,

                                                                    Hugs Jennifer xx

Monday 14 October 2013

Butterflies and Flowers Wall Hanging Tutorial

Good evening Fellow Crafter's Friends and Visitors,

The weather has certainly taken a turn for the worst.  It has been so.....wet all day and very dull with it !!  so let's try and cheer things up with a wall hanging I made for Imagination Craft's earlier this year,  which will remind us of those balmy, sunny, summer days with butterflies and flowers in abundance. Below is one of the many MDF Boards which includes push out charms and you can purchase these from the Imagination Craft's website.   This is what we will be working with tonight.   This is my first tutorial, hope you enjoy it.


In the pack you have a plain backing board, a frame with a cut out aperture and one sheet of laser cut charms, which just pop out.  These kits can be painted, decoupaged,stamped, embossed and of course can be  gilded and sparkle medium used on them, so.... many ways to use them lols.   So let' get started shall we, the photo below is what we will end up with.   This will make a lovely gift for someone you know.


The front and the back of the hanging are painted with the MDF limestone paint,  coloured and stamped
using distress inks and embossing powder.   Below is the back of the hanging.

   
The heart die-cuts on the front and back are Memory Box Dies and have been covered with gilding flakes.   Some Detail Sparkle has been rubbed onto the bottom left of the front board using my finger and a little added elsewhere on the board.    


The MDF flower was again painted, then coloured with distress inks and a touch of Detail Sparkle  added to the edges.


The MDF butterflies were painted then coloured with the distress inks.   The butterflies were then stamped onto acetate, cut out and some detail sparkle added to the reverse.   When dry, they were glued to the MDF butterflies.


The fiberous material I colured with distress ink.   The flowers I made from white card, which I coloured with distress inks and I added a touch of Detail Sparkle to the edges of the petals.


I made a flower from blue and purple paper and added it to the hanging heart die-cut, which was covered with gold and silver gilding flakes.   

         
A mixture of all the Detail Sparkle was spread over the swirly stencil onto the back of the hanging.   Then the Friends sentiment stamped onto the centre., along with another hanging heart covered with gilding flakes.


I painted the square from the centre of the frame with MDF paint and coloured it with distress ink.   I then put the butterfly curls stencil onto some acetate and spread some detail sparkle through one of the butterflies on the stencil, then when it was dry I cut it out and glued it onto the coloured square and glued it to the ribbon.

Phew !! well that's it folks, hope you have enjoyed this tutorial.   I really enjoyed making it.   You could choose your favourite colour to make yours.   Until next time, happy crafting.

                                                                Love and rainbows

                                                                  Hugs Jennifer xx


Saturday 12 October 2013

Joy at Christmas

                                           
Hi Everyone, hope you are all having a good weekend.   The weather here has been cold and wet so I decided to do some crafting  and I have had a lovely time getting messy and experimenting in my craft room.   Tonight I would like to share another Christmas Card with you all which I made in July of 2011 for Sue and Harvey of Imagination Crafts.   Are you all ready to get crafting ?  well let's get started.   This card takes a little more time than the previous card but I think it is worth it, as the end result looks very elegant.   Well, I think so and I hope you do too !   I would love to hear what you think, so if you have time, please let me know your thoughts and leave me a comment,  I would really appreciate that.

The base card is made from red card and onto this I matted a smaller piece of white card.   I stamped a piece of holly in each corner.   I then stamped the holly four more times, coloured them and glued them on top of the original holly, using silicone glue.   I stamped Joy at the top and bottom and a swirl on the left and on the right edges using black ink.

Take a piece of frosted shrink plastic and stamp all three main images onto it using a Stazon inkpad and colour with Promarker pens.   Cut out and heat shrink.   Fix them onto white squares and then onto slightly larger red squares.   Fix these to the base card.

Stamp 'Christmas Wishes' onto a square of white card and matt this onto a red square as you did for the other images and fix this to the top right of the base card.   Add a little red glitter glue to the holly berries and a red bow to the card centre.   There we have it, one finished Christmas card.

Enjoy the rest of your weekend, until next time, cheerio for now.

                                                            Love and rainbows

                                                              Hugs Jennifer xx

Thursday 10 October 2013

Silver Sparkle and White Poinsettias


Good evening Fellow Crafters, Friends and Visitors,

How are you all tonight ?  well I hope.   The weather here has been really quite cold but bright at times.   Autumn is definitely here lols.   Can't grumble, we had a wonderful Summer didn't we ?     I have had a lovely day today, my friend and I went out craft shopping !!!!   Well I did spend a little more than I meant too but I just cannot resist buying the odd die or two lols !!   I bought  a Tattered Lace snowflake die and a Spellbinders die, with a few other bits and pieces !!   an enjoyable day out, I'm at my happiest when in a craft shop lol !   Well  let's get started on tonight's card shall we ?

Make a base card from white cardstock.   Take the glossy green card and lay the stencil on top and spread the silver sparkle medium across it using a spatula.   Trim the green card to fit onto the white base card, leaving a border of white showing and  wrap some red ribbon down the right-hand side of the green card and secure on the reverse.   Fix this card to the white base card.   Add a bow using Magi-Bond Glue.

Cut out and emboss the flowers and the flower stems  using  the Grand Calibur or similar machine  and the dies.   Colour one flower with red distress ink and cover with a little of the silver mica powder.

Take the die-cut flower centres and cover with some silver sparkle medium and leave to dry.   Rub the red distress ink around the edges of the white flower petals and glue the flowers to the card front using the glue.   Glue the silver centres to the flowers.   Rub some red distress ink around the edges of the white base card.

Well there we are the card is now finished.   Hope you give this card a go as it is an easy and quick card to make and looks really effective.

Thank you so much for stopping by  to visit my blog.  Hope you have enjoyed your visit.  I'll be back soon with another card.   Take care of yourselves.

                                                             Love and rainbows,
   
                                                               Hugs Jennifer xx 

Tuesday 8 October 2013

Golden Snowflake

Good evening All,  hope your day has gone well and everyone is happy, if not tomorrow is a whole new day lolls !   I have had a good day, got the housework done ,went food shopping, did a little crafting and then collected our Grandson from school.   Then of course it was homework and mealtime - no rest for the wicked as they say !!  mind you I wouldn't have it any other way lols

Well onto this evening's card.   As my thoughts are of Christmas at the moment, I thought another Christmas card would be appropriate.   This card I made for Sue and Harvey of Imagination Crafts  in July of 2012 ready for the Christmas craft shows.   I used their Snowflake  Decoupage Stamp Set.   So here goes, let's get started!

The base card is made from black shiny card.  I then matted some white card onto the black, leaving a small border of black showing.

Using the square punch, punch out three gold, three red and three green squares.   Put each square into an embossing machine with the embossables and emboss.   I used three swirls, two dots, one owls, one trees, one holly and one bauble.   When they are embossed, trim around the edges with the decorative scissors.   Arrange the squares on the card front and fix in position with  double sided sticky tape.

Using a die cutting machine and the corner die, cut out and emboss the corner embellishments from white card.   Glue these to the four corners of the card with Magi-Bond Glue.


Take a piece of white card and stamp the main snowflake image and heat emboss using a Veramark pad and gold embossing powder.

From red, green, black and white card stamp the image six times using gold embossing powder and the Versamark pad.   Cut out the snowflake and 3D onto the main image.

Matt this onto a piece of black card and trim around the image.   Add the gold, red and green gemstones to the snowflake using a good strong glue, I used Imagination Craft's Magi-Bond Glue.   Matt the whole image onto the base card.   Well that's it folks, this card is not as quick to make as my previous card but I feel the extra time spent is worth it.   Hope you like it and thanks once again for stopping by to visit my blog.   See you again soon with another card.  Take care of yourselves until next time.

                                                                Love and rainbows,
                                                              lots of hugs Jennifer xx

Sunday 6 October 2013

Little Donkey

Good evening  All, I do hope you have all had a lovely weekend.   The weather hasn't been great but at least it has been dry.   Just picked the last few Victoria plums from our plum tree today, so I made a plum batter pudding for our Sunday lunch and if I say so myself, it was delicious.   Well onto tonight's card.   I made this card in June of this year for Sue and Harvey of Imagination Crafts.   I think this is such a beautiful design,  a real cute little donkey peeping over the gate on a cold snowy winter's day.

I made the base card from black shiny card, then I matted a smaller piece of white card onto that.   I then took a piece of light turquoise blue card and tore it across the centre in the shape of a hillside.   A piece of ribbon was wrapped  around the centre and the card glued to the white card.   I then added a ribbon bow to the right-hand side of the card.


The corners were cut out from matt silver card using a Marianne Design Die.   Christmas wishes and a piece of holly were stamped on the bottom right using a versamark pad and heat embossed with silver embossing powder.

The donkey image was stamped onto white card again using a Versamark pad but this time using black embossing powder.   The image was then coloured with mica powders mixed with water.   The corners of the image were punched with a small circle punch.   The image was then matted onto some lilac card and fixed to the centre of the base card.  I added some narrow strips of  lilac and blue card to the top half of the  base card.

Well that is that, the card is finished.   The photographs unfortunately don't show up the beautiful sheen of the mica powders.   When the light shines on them, the colours look like silk - very pretty !!   Hope you like this one.   Another idea for a Christmas card lol !!   Quite a quick card to make.   Take care of yourselves until I blog again.   Have a good week.   Thanks for stopping by.

                                                             Love and rainbows,

                                                                Hugs Jennifer xx


Thursday 3 October 2013

Humming Bird


Good evening Fellow Crafters Friends and Visitors,

Jennifer back again, hope you have all had a good week so far and are feeling well and happy, if not I hope this card will cheer you up lols !!   I made this card for Sue and Harvey of Imagination Craft's  in June of this year.   I just love making cards, I am very passionate about my card making.  I met Sue and Harvey over ten years ago and I was thrilled when they asked me to design cards for them.   I have been on their design team for many years now and I absolutely love doing their samples.   Their products are first class and I just can't wait to get started when  I receive a parcel of new products in the post lol !!   Without further ado let's get started with tonight's card.   This is a particularly pretty stencil I think.

Spread the Black Sparkle Medium through the stencil onto the lemon satin card.   Add a small amount of the Gold Shine Sparkle Medium over parts of the design where you think the light would come from.   Remove stencil and leave to dry.         

Glue the Memory Box die cut to the reverse of the lemon card leaving some of it showing.   Matt this onto a larger piece of black shiny card leaving larger borders at the top and bottom and narrow borders on the two side edges.

Matt this onto a larger piece of lemon satin card.   Add a gold ribbon bow to the top left of the card..   Well that is this card finished, quite a quick card to make and very simple to do !!                                                                                                                                                                                 

                                                                                                                                                                   Thank you so much for stopping by to visit my blog, I hope you have enjoyed your visit and I hope that you have been inspired with what you have seen .   I would love it if you would leave me a comment  and would  love it even more if you were to 'follow' my blog !   that would be really cool !

I'll be back soon with another creation.   Until then take care of yourselves and have a great weekend.

                                                              Love and rainbows,
                                                                Hugs Jennifer xx                                                                                                                                           


Tuesday 1 October 2013

Christmas Lantern


Good Evening Fellow Crafters, Friends and Visitors,

Jennifer here again, hope you have all had a good day despite the dull weather.   We have just dug up our potatoes, well hubby dug up the most lolls !! and they are now bagged and put in store.   All the plums have been picked and quite a lot eaten already, they are Victoria plums and they are so.....sweet,  really delicious.   This year we have had a good crop of fruit and veggies, unlike last year lolls which was a disaster because of all the rain.

Well enough  chit chat - on with tonight's card.   I made this card for Sue and Harvey of Imagination Craft's for their latest QVC show last month and I have again used one of my favourite Imagination Craft's Christmas stamps.

The base card was made from red card.   The cream card was covered with the Holly Arch stencil and using a spatula,  the Red Berries Sparkle Medium was spread over the stencil.   This was then matted onto the red
base card.

 The Christmas greeting was stamped in the top left corner using a Versmark Pad and heat embossed with gold embossing powder.

A circle was die cut from gold mirror card and then glued to the cream card.   The lantern was stamped onto white card and also onto some green patternd paper.   They were both cut out,  the leaves and the lantern from the patterned paper were glued onto the white stamped image.

The lantern was then glued to the gold cirle and the ribbon coloured  red.   A red bow was added to the top of the lantern and some Red Berries Sparkle Medium added to the berries and the ribbon on the candle.   Some Gold Shine Sparkle Medium was dotted on the holly leaves and the candle flame.

There we have it, another card finished.   I do like to hear what you think of my cards and better still I would love it if you 'followed' my blog.   Until my next blog, happy crafting.

                                                                 Love and rainbows,
                                                                     
                                                                        Jennifer xx