Followers

Friday 26 November 2021

'Emerald Butterflies.'

Good evening Lovelies,

Hoping this post finds you all well.   Tonight I would like to share another of my sample cards, which was made for the Imagination Craft's shows, on the Create & Craft T.V. Channel yesterday and today when Mandy launched the gorgeous new 'Earth Born' collection.

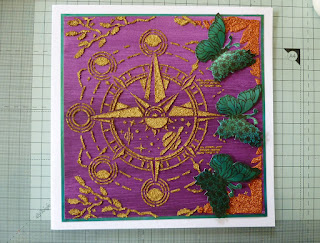
Cut a piece of white card 7"x7" square and paint it with the Cadence plum Hybrid Acrylic paint.


When this is dry, lay the design from the 'Look to the Stars' stencil onto the painted card and spread the Cadence Dora Perla  gold Relief Paste, through the design using a metal spatula.


Remove the stencil and leave the image to dry.


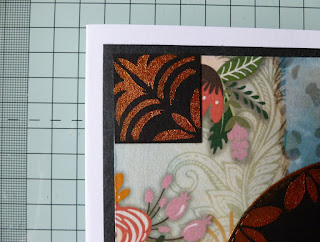
Lay the corner design from the stencil in the top right corner of the painted card and spread the Cadence Dora Perla orange oxidized Relief Paste through the design using the metal spatula.  .  Repeat this in the bottom right corner.   Remove the stencil and leave the image to dry.


Cut a piece of white card seven and a quarter inches square and paint all four outer edges with the Cadence Emerald Dora Metallic Paint.   No need to paint the whole card as only the edges will be seen   When dry, matt the plum card onto it, then matt that onto an 8"x8" white base card.


 Paint a square of white card with the emerald metallic paint and using a black ink pad, stamp the butterfly from the stamp set onto it, three times.


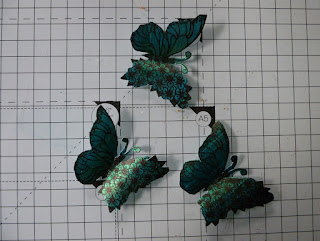
Cut out each butterfly and shape their wings a little with your fingers, then glue them to the right-hand side of the coloured card using mixed media glue, adding some silicone glue under each of the wings.


Below are a few more photographs taken at different angles.


Thank you for taking the time to visit my blog,  which  is much appreciated.    I do hope  you have enjoyed your visit.    That is  all from me for the moment but please pop back soon, as I will have another card to share with you, which was made using the same gorgeous collection.   Take care and stay safe.

                                                                     Love and rainbows,

                                                                     Hugs   Jennifer xx.


Thursday 25 November 2021

'Bouquet Butterfly.'

Good evening all,

I hope you managed to tune in to Create & Craft T.V. Channel today to see Mandy launch Imagination Craft's beautiful 'Earth Born' Collection.   Gorgeous rice papers, stencils and stamps and of course some fabulous Cadence Relief Pastes and Decoupage glue etc.,  plus  some Imagination Craft's Sparkle & Twinkle   .

I would like to share one of my sample cards which was shown on the show today.   I hope you like it as much as I enjoyed using this collection.   I think this is definitely one of my favourite collections.


Cut a 7" square of white card.   Cut out the section of rice paper of your choice, cutting it a little larger than the 7"  square piece of card.   Using the decoupage glue, fix the rice paper to the 7" square piece of card, bending the extra rice paper to the back of the card and securing with the glue.

When this is dry, lay the stencil design onto the right-hand side of the rice paper background card, masking off the design, then using a metal spatula, spread the Cadence Orange Oxidized Relief Paste over the design.   Remove the stencil and leave the image to dry.  

Matt the background card onto a slightly larger piece of black card.


Matt and layer this onto an 8"x8" white base card.

Roughly cut out the world, the large flower butterfly and the larger of the two brown butterflies from the second sheet of the same design rice paper.   Using the decoupage glue, fix these to some spare white card.


When dry, trim around the images, cutting away any excess white card, then 3D them onto the original images on the background card, using silicone glue and sticky foam pads.   Last of all, spread a little Imagination Craft's Bright Copper Sparkle & Twinkle over parts of the world with your finger as I did, or with a piece of cut n, dry foam and a tiny amount on the centres of the flowers on the butterfly's wing. 


Below are a couple of photos taken at angles to show the dimension of the card.


Hope you have enjoyed your visit to my blog. .  Please pop back soon as I will have another card to share with you, which was made using this fabulous collection.   In the meantime, take care and stay safe.   

                                                                Love and Rainbows,

                                                                  Hugs   Jennifer xx.


Tuesday 23 November 2021

'Floral Fantasy.'

Good afternoon Lovelies,

Hope all is well with you.   Many thanks once again for all your visits and lovely comments on my last blog post.   Today I have another card to share with you, which I made using Imagination Craft's beautiful 'Flowermania' collection. Hope you like it.   I have used one of the colourful  rice papers, along with the Artist's Treasure A4 stencil and of course some Cadence Diamond Relief Paste, Decoupage Glue and Brilliant Gold,  Dora metallic paint.


Cut a piece of white card 7"x7" and using the Cadence decoupage glue, fix the section of the rice paper of your choice, cut slightly larger than 7"x7" to the piece of card bending the excess rice paper to the back of the piece of card and securing with the glue. .  (This makes a neater edge to the card).


Lay the large petal design from the 'Artist's Treasure' stencil onto the left-hand side of the background card, securing with Imagination Craft's Mixed Media blue tape.   Using a metal spatula, spread the Cadence pink Diamond Relief paste through the design.   Spread the gold relief paste through the two teardrop shapes of the flower.   Remove the stencil and leave the image to dry.


Take a slightly larger square of white card and paint all four outer edges of it with the brilliant gold metallic paint,   (no need to paint all of the card, as only the edges will be seen - save that paint for another project - waste not want not ! lol ).   Do not worry that the tip of one of the petals  has covered over part of a rose, as this will be decoupaged later and not seen.


Matt and layer the background card onto the gold edged card, then onto an 8"x8" white base card.

From the second sheet of the same design rice paper, roughly cut out the roses and glue them to a spare piece of white card, using the decoupage glue.   When this is dry, trim around the design, cutting away any excess white card.   Fix the roses to the original image on the background card, using silicone glue to add some dimension to the card, overlapping the gold border at the base of the card.


That is all from me for the moment,  I will be back soon with another card using a fabulous new collection, which will be launched on the Create & Craft T.V. Channel  very soon.   I think you will love this collection as much as I have but my lips are sealed for the moment lol!   Take good care of yourselves and stay safe.   Catch you all again soon.

                                                                     Love and rainbows,

                                                                     Hugs   Jennifer xx.


Sunday 14 November 2021

'Tiger Tiger.'

 Hi again Lovelies,

A much better day here, the sun was  actually shinning !  a very pleasant Autumnal day.  Hoping all is well with you.   Thank you once again for all your visits and comments on my last  blog post.  

Today I have another card, made using Imagination Craft's 'Flowermania' collection.   This time the animal is a wonderful tiger.   I have used rice papers and the 'Peacock Flair' A4 Stencil from the collection.  I have also used the Cadence Dora  'Zinober  Gold' Metallic Paint.   I love this particular paint, the colour is fabulous and when the light or the sun catches it, it just gleams all shimmery - love it and I feel it is just right for this design.      O.K  time to begin making the card below.

Matt and layer a piece of black card onto an 8"x8" white base card, leaving a small border of the white card showing.

Cut a square of white card 7" x 7" and glue the rice paper (cutting the rice paper slightly larger than 7" square), fix the rice paper to the piece of card, using the Cadence Decoupage Plus Glue, bending the excess paper to the back of the piece of card and securing with the glue.  (This gives a neater edge to the card).

When dry, matt and layer this onto the black matt on the white base card, leaving a tiny border of the black showing.

Die-cut a 4" circle from black card.   Using part of one of the square border designs from the stencil and  using the Imagination Craft's blue Mixed Media Tape, mask off all but the three petals.   Using a stencil brush, stipple the Zinober Gold metallic paint through the 3 petals and do this 5 times around the left-hand edge of the black circle.


Remove the stencil and when image is dry, (which won't take long, as this paint dries very quickly), add a little of the paint around the edge of the circle with your finger as I did, or with the remains of the paint on the stencil brush.   Glue this circle to the centre of the background card.


Using some black card  and  the Zinober Gold paint, stipple it  through part of the design from one of the  border  squares on the stencil, onto the black card, using the stencil brush.    Do this twice.


The photo below shows the shimmer of the Zinober Gold paint when the light catches it.   How gorgeous is that ?    I love it

Cut these designs into 2 squares measuring approximately one and a quarter inches square.   

Next cut a 1 inch strip of black card, 7" long and stipple the paint through the top half  of one of the squares from the stencil, three times, matching up the design each time.   Put to one side for the moment.


From the second sheet of the same design rice paper, roughly cut out the tiger and glue it to a piece of white card, using the decoupage glue.   When dry, trim around the tiger, cutting away any excess white card, then glue it to the top of the base card, (matching up the tip of the tail on the original image), using silicone glue.

Glue the 2 small black squares to the top left and right-hand corners of the base card and the strip to the bottom of the card.


Well that's  all from me for the time being but please pop back as I will be posting more cards soon.   I do hope you have enjoyed your visit.    Happy Crafting All.

                                                                    Love and Rainbows,

                                                                       Hugs  Jennifer xx.


Wednesday 10 November 2021

'Proud As A Peacock.'

 Hi there Lovelies,

Hoping everyone is staying safe and well.   Thank you for your visits and encouraging comments on my last blog post, each and every one appreciated.

Imagination Craft's have a show on the Create & Craft T.V. Channel today, when Mandy will be launching yet another beautiful collection.   This collection is called 'Flowermania.'    The date and  time of the program is  Wednesday 10th. November at  1.30pm.             I do hope you can tune in.

Below is one of my sample cards made for the show.


Cut a piece of white card seven and a quarter inches square and colour all four outer edges with the emerald green, brilliant gold and the sax blue Cadence Dora metallic paints, in  2" blocks of colour, as below:-


Matt this onto an 8" square white base card.

Cut a 7" square of white card.   Cut out the section of rice paper you want as a background, cutting it slightly larger than the 7" square card.   

Using the Cadence decoupage glue, fix the rice paper to a 7" square piece of card, bending the excess paper to the back of the card, making sure there are no air bubbles on the front and secure with the glue.


When this is dry, lay the broken dots design from the 'Artist's Treasure' stencil, onto the bottom left of the rice paper background.   Spread the gold Diamond Relief Paste through the design, using a metal spatula.   

Repeat the above on the top right-hand corner.   Remove the stencil and leave the images to dry, you will find  this relief paste dries quite quickly.


 Matt and layer this background card onto the 8" base card.

From the second piece of the same design rice paper, roughly cut around the flowers and the peacock.   Fix them to some spare white card using the decoupage glue.   When dry, cut them out, cutting away any excess paper and white card using the decoupage glue.


Fix the flowers and peacock to the original images on the background card, using silicone glue, to give a little dimension to the card.


Thank you for visiting my blog today, I do hope you have enjoyed your visit.   Please pop back again soon, as I will be posting more cards made using this beautiful collection.   Please don't forget to tune in to Create & Craft today at 1.30pm..   Catch you all again quite soon.

                                                                   Love and Rainbows,

                                                                   Hugs   Jennifer xx.