Followers

Monday 31 May 2021

'Smuggler's Cove.'

Good evening Lovelies,

Wow! what another fabulous day we have had here, wall to wall sunshine and fluffy white clouds.   I do hope you are all enjoying this glorious weather.   Thank you all once again for your lovely comments and  visits on my last blog post.   Today I would like to share another card with you, which was made using Imagination Craft's  fabulous 'Smuggler's Haunts' collection.   This is such a fun collection, love it!


Matt a seven and a half inch square of black card onto an 8" square white base card.   Cut a seven and a quarter inch square of white card,   Add  small blobs of the Cadence acrylic paints - light yellow, turquoise and warm brown onto a glass worktop, or similar and add some sprays of water to each and mix  a little with a paintbrush, not mixing the colours too much.

Lay the piece of white card down on top of the paints and gently rub your hand over the card, then lift the card up and leave to dry, or if you are an impatient crafter as I am lol! you can dry with a heat gun, (but I do think the best results are achieved when letting the paint dry naturally).

Stamp the ruined tin mine building and chimney, plus one of the smugglers on the top right of the coloured card, using a black ink pad.


Stamp the cove in the bottom left corner of the card using a black ink pad and one of the smugglers on the rocks in the bottom right corner.  


Stamp a clump of grass in the bottom right corner,  again using a black pad.


Stamp the sailing ship in the cove using black ink.

Matt and layer this card onto the black matt on the base card.


Lay the compass design from the stencil onto a spare piece of white card and spread the Bright Copper Sparkle & Twinkle over the design, using a metal spatula.   Remove the stencil and leave the image to dry.   Repeat this once more and leave to dry.


When the compasses are dry, cut them out leaving a tiny border of white card around the edges.   Fix one to the top left and the other in the bottom right corners, using sticky foam pads and the card is finished.


Below are a couple of photos  taken at an angle to show the dimension and the sparkle on the compasses.   Thanks again for stopping by my blog.   Enjoy the gorgeous weather but please do stay safe, we're not out of the woods yet! as they say.


                                                                      Happy Crafting, 

                                                                    Love and rainbows,  

                                                                     Hugs   Jennifer xx.


Friday 28 May 2021

'Partners In Piracy.'

Hello again Lovelies,

At long last, a little sunshine in out lives lol!   although even as I write this, the dark clouds are returning, hopefully they will pass by and the sun will appear again......well,  we can but hope lol!

Thank you all for your visits and lovely comments on my last blog post, much appreciated.   Today I would like to share another of my cards, made using the rice papers and stencils from Imagination Craft's Smuggler's Haunts' Collection .   I have also used their beautiful Twinkle and Sparkle and Cadence Finger Wax.


Matt a 7" square of red card onto an 8"x8" white base card.


 Cut a slightly smaller square of white card.   Cut out the section of the rice paper with the pirates on, cutting it slightly larger than the square of white card.  

Fix the rice paper to the square of white card, using the Cadence decoupage glue, bending the extra rice paper to the back of the card and securing with the glue.


 When this is dry, rub some Cadence Antique Gold Finger Wax around all four edges of the rice paper.


Lay the word 'Myth' from the stencil onto the top left of the rice paper and using a metal spatula, spread the Bright Copper Sparkle and Twinkle over it.   Remove the stencil and leave the image to dry.


Lay the word 'Legend' from the stencil, down the right-hand side of the rice paper and spread the Sparkle and Twinkle over it as previously.  


Remove the stencil and leave the image to dry.

Matt this onto the red matt on the base card using double sided sticky tape plus a little mixed media glue to make sure it sticks well.

Take the second sheet of the same design  rice paper and roughly cut out the two pirates.   Fix these and the pile of gold coins onto some spare white card, using the decoupage glue.   Add some gold finger wax to the gold coins.

When they are dry, cut out parts of the pirates and 3D them onto the original background rice paper, using silicone glue.   Fix some of the gold coins onto the pile using silicone glue.


Add a little gold pen to her headscarf and the scarf tied around her waist.


I added a little colour to their faces to make them look slightly dirty.    That is the card finished.   Hope you like it as much as I did when making it....such fun thinking of what life must have been like in those days lol!       That's all from me for the moment but I will be back again soon with another card, made using this collection.   Please take care of yourselves and above all stay safe.

                                                                 Love and rainbows,

                                                                 Hugs   Jennifer xx.


Tuesday 25 May 2021

'Ahoy There !

Good morning Lovelies,

Hope all is well with you, although the weather is not so good but we mustn't grumble, some better weather I understand from the forecasters, is on the way for the weekend, brilliant some sunshine at last lol.

I am sharing this card with you which I made using Imagination Craft's fabulous new collection called 'Smuggler's Haunts.'     This will be launched by Mandy on the Imagination Craft's Facebook page at 7pm. this evening,  (Tuesday).   I do hope you can watch it as she will be doing some great demos as usual, using some great Cadence products too.  


Trim a piece of black card using a trimmer and the 'wave' cutter until it measures seven & a quarter by seven & a quarter inches and matt this onto an 8"x8" white base card.

Spread some light yellow, amber and the blood red Cadence acrylic paints onto a glass worktop or similar.   Then add some water and gently move the paints around.

Die-cut a rectangle with a scalloped edge from white card, then lay it on top of the paint and lift up, do this until the rectangle is covered but the colours are not 'muddied' and leave to dry.


In the meantime, cut a  seven and a half  inchsquare of white card. .  Spray this piece of card with the blue and light green Shimmer Spray Inks.   Take the top off the pearl spray ink and hold it over the card and gently tap it to release some drops of the pearl ink onto the card, then leave to dry.


Trim this using the trimmer and the wave cutter until it measures six & a quarter inches square.


Matt this onto the black matt on the 8" white base card.   Stamp the sailing ship  onto the coloured rectangle, using a black Versamark ink pad and heat emboss with clear embossing powder.

Matt this onto some black card with straight edges but slightly larger than the coloured rectangle. 


Paint the waves with the tidal blue Dora metallic paints and the crest of the waves with the silver.   Add small amounts of the silver to the flag, sails and portholes.


Matt this onto a larger die-cut white scalloped rectangle and then onto the base card, set on an angle.   Paint a small piece of white card with the silver Dora metallic paint and from this die-cut a 2" circle.   Glue the moon in position in the top left of the rectangle.


Using an alphabet die from my stash, I die-cut the letters T R E A S U R E from black card, then glued them to the bottom of the card.   Glue 5 clear gemstones to the letter  T and one at the beginning and the end of the word.   


Below are a couple of photos taken at an angle to show the shimmer of the paints.


Well that's all from me for the moment,  I will be back soon with another card, made using products from this collection.    Please don't forget to watch Mandy this evening on the Imagination Craft's Facebook page at 7pm.     Stay well and safe my friends.

                                                                  Love and rainbows,

                                                                  Hugs   Jennifer xx.

Thursday 13 May 2021

Butterflies, Butterflies and More Butterflies.'

 Hi there Lovelies,

Thank you all for your comments and visits on my last blog post, I really love to read your comments, plus I love to visit your blogs and see your beautiful creations too.

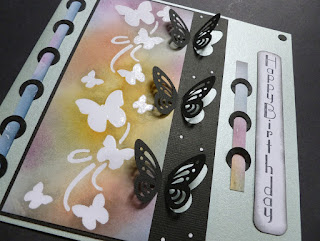
Today I have another  card to share with you which was  made because I had some spare time (a rare commodity lol!) between shows, so thought I would use one of  Imagination Craft's pretty  panel stencils.   I have also used Cadence transparent  relief paste, a few distress inks and a  punch I have had in my craft stash for many years.   Hope you like it, I think most people like butterflies, they're just so pretty and delicate fluttering around the Buddleia bush.


Take some white card and lay the butterfly panel  stencil from the 'Tumbling Blossoms' set onto it and spread the transparent relief paste through the design, using a metal spatula.   Remove the stencil and leave the image to dry.


I have held this piece of card on an angle so the transparent relief paste can be seen.

Using the Victorian Velvet,  Fossilized Amber Weathered Wood, Seedless Preserves,  Shaded Lilac and Dried Marigold distress inks, colour the card using a blending tool.


Using some black soot distress ink and a blending tool, rub the ink around all four edges of the coloured card.

Using a piece of kitchen roll, gently rub away any ink from the butterflies ( the relief paste acts as a resist  and allows the ink to be rubbed away, leaving the butterflies white).   Trim this to a rectangle approximately three inches by six and a half inches.


Take a rectangle of black card four inches by six and three quarter inches and using the butterfly punch, punch three butterflies evenly down the right-hand side of the black card.


Matt the coloured card onto the left-hand edge of the black rectangle, then matt and layer this onto a seven inch square blue pearl base card.   Glue some very small white circles (leftover after punching some other shapes previously, I don't throw anything away lol! they usually come in useful at some time! )   in between each butterfly.

Using some of the coloured card, leftover after trimming the butterfly rectangle, glue some black rings onto the coloured strips.   (I used a hole strengthener die  from a tag die set  I have in my craft stash).   Glue the longer length to the left-hand side.


Glue the shorter length to the right of the butterfly rectangle.


Take a strip of white card and stamp 'Happy Birthday' using a black ink pad, down the strip.    Use a corner rounder punch to round off the corners and   add a little black soot distress ink to the edges   Glue this to the right-hand side of the base card.   Glue two small black circles to the top and bottom right-hand corners and the card is finished.


Below is a photo taken at an angle to show the dimension of the card.   Thanks for stopping by my blog, I do hope you've enjoyed your visit.   Please pop back again soon.


                                                                     Love and rainbows,

                                                        Happy Crafting!    Hugs   Jennifer xx.


.