Followers

Friday 28 January 2022

'Blues and Browns.'

 Good evening Lovelies,

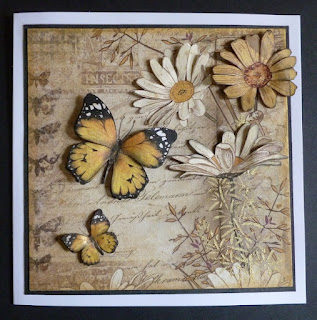
Hope all is well with you.   Thank you for visiting my last blog post and thank you to those who left me lovely comments, means a lot.   O.k. onto this evening's card.   This was made for the  Imagination Craft's show on the Create & Craft T.V. Channel on the 20th. January 2022.   I used Imagination Craft's beautiful 'Belle Jardin' collection - rice papers and stencils,  alongside Cadence metallic paint and decoupage glue.


Cut out the section of rice paper you would like for your background, cutting it slightly larger than a 7" x7" piece of card.

Cut out a 7"x7" piece of white card and using the Cadence Decoupage Plus glue, fix the paper to the piece of card.   Bend the excess rice paper to the back of the piece of card and secure with the glue.   When dry, rub some Walnut Stain Distress Ink around all four outer edges of the background paper, using a piece of cut and used foam.

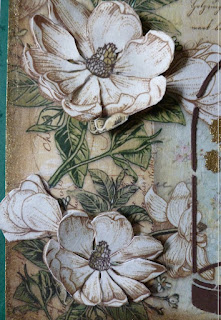
From the second sheet of rice paper, roughly cut out the flower head, cutting it a little larger than 4 inches in diameter.   Fix this with the decoupage glue onto a 4 inch die-cut white circle of card.   Bend the excess paper to the back of the circle and secure with the glue and rub some Walnut Stain Distress Ink around the edge of the circle.

From the second piece of rice paper,  cut out the tag and glue this to a piece of white card, using the decoupage glue.   When dry, trim around the tag, cutting away any excess white card.   Cut out the small flowers and fix these to some white card and when dry, paint them with watered down Mediterranean sky metallic paint, then  cut them out.

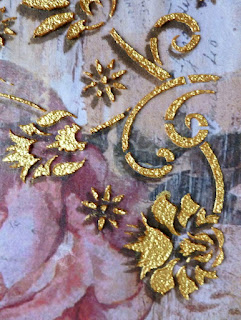
Cut a piece of white card seven and a quarter inches square and paint all four outer edges with the Cadence Dora Metallic Paint -  Mediterranean Sky and leave to dry.

Paint the flower head with watered down Dora Mediterranean Sky metallic paint.


Matt and layer the background card onto the blue edged piece of card and then onto an 8"x8" white scalloped base card.

Glue the circle in position on the background, matching the original images on the background rice paper, using silicone.fix the small flowers in the bottom right corner, using silicone glue. 

Glue the tag in position using silicone glue and add a blue satin organza  ribbon bow to the top of the tag.   


Make two small butterflies by laying the stencil onto some spare white card and stippling some of the blue metallic paint through the small butterfly design using a stencil brush.


(I actually made 1 large and 2 small butterflies, intending to use all 3 but then decided that 3 made the card look too busy)


Cut out the butterflies and glue one to the top right corner and the other to the bottom of the tag.   Well that is the card finished.


Thank you for visiting my blog, take care of yourselves and stay safe.    I will be back again quite soon.

                                                                     Love and rainbows,

                                                                      Hugs   Jennifer xx.


Saturday 22 January 2022

'Butterflies and Daisies.'

Good evening Lovelies,

 Hoping this post finds you all well and safe.   After a couple of beautiful bright sunny days, we are back to the dull dreary weather once again...........ah well mustn't grumble, it could be a great deal worse.   Thank you once again for your lovely comments and visits to my last blog post.

My card today is made using the Imagination Craft's 'Belle Jardin' collection which was launched recently.  This is made using one of  the very pretty rice papers from the collection and the A4 'Botanical' stencil from the collection, plus Cadence decoupage glue,  Dora white gold metallic paint and Inca gold Finger Wax.

Begin by matting a seven and a quarter inch square piece of black card onto an 8"x8" white base card.   Cut a piece of white card 7"x7".   Cut out the section of rice paper you want for your card front, cutting it slightly larger than the 7" square of white card.   Using the decoupage glue, fix the rice paper to the 7" piece of white card, bending the excess rice paper to the back of the piece of card and securing with the glue.
When this is dry, take a piece of cut and use stamp pad and add some watered down Inca gold Finger Wax around all four outer edges of the rice paper background card.
Add some watered down Dora white gold metallic paint to the wings of the butterflies.   Lay the greenery design from the 'Botanical' stencil on the bottom right corner of the background and secure in position with the blue Mixed Media Tape.   Using a stencil brush, stipple some Dora white gold metallic paint through the design,  (the stippling/pouncing action, helps bring the sparkle to the surface).   Remove the stencil and leave the image to dry, (this paint dries very quickly).  


Matt and layer the background onto the black matt on the white base card.   From the second sheet of the same design rice paper, roughly cut around the large and small butterflies and the three main flowers and glue them to some spare white card, using the decoupage glue.


Trim around the outlines of the  five images, cutting away any excess white card and shape the images a little with your fingers. 

Fix these images to the original images on the background, using silicone glue.


Paint the wings, petals and flower centres with a little watered down Inca gold metallic paint.   Below are a few photos showing the dimension of the card.


Thank you for visiting my blog, I do hope you have enjoyed your visit.   Have a happy,  relaxing Sunday.   I will be back again quite soon with another card to share with you.

                                                                  Love and rainbows,

                                                                   Hugs   Jennifer xx. 


Wednesday 19 January 2022

'A Beautiful Garden.'

 Hi there Lovelies,

Thank you for visiting my blog, I hope you enjoy your visit and thank you also for your visits and lovely comments on my last blog post, much appreciated by me.

Today I have a 'sneaky peek' at one of my sample cards for you, made for the Imagination Craft's show  on the Create & Craft T.V. Channel tomorrow Thursday 20th. Jan. 2022 at 12 noon, when  our lovely Mandy Taylor will be launching this beautiful collection.   I do hope you can tune in.    Now onto my 'sneaky peek' lol .


Matt and layer a seven and a quarter inch square of dark green card onto an 8"x8" white base card.   Cut a 7" square of white card and the section of the rice paper design, cutting the rice paper, slightly larger than the 7" white card.

Using the Cadence Decoupage plus glue, fix the rice paper onto the piece of card, bending the excess paper to the reverse of the card and securing it with glue.

Lay the design from the A4 'Garden Diary' stencil onto the right-hand side of the rice paper background and secure to the card and worktop, using the blue mixed media tape, to stop the stencil moving (or you could use Cadence stencil spray). 
Using a metal spatula, spread the Cadence Shabby Chic Chocolate Relief Paste over the design.  .
Remove the stencil and wash it and the spatula and leave the image to dry.
When dry, rub some walnut stain distress ink around all four outer edges of the background card, followed by some white gold Dora metallic paint.

Lay the stencil back in position over the relief paste and using a stencil brush, stipple some white gold paint over the stem, leaves and the flower heads in the glass jar.   Remove the stencil and leave to dry.

Fix the background card onto the dark green matt on the 8"x8" white base card.

From the second sheet of the same design rice paper, roughly cut out the large and small flower heads and the bud, then fix them to some spare white card, using the decoupage glue.

When they are dry, cut them out, cutting away the excess white card.   Cut and shape the petals, then fix them to the original images on the base card, using silicone glue.
The card is now finished.   I do hope you like it.    Below are a couple of photos taken at an angle so the dimension of the design can be seen.

That's all from me for the moment, I will be back soon with another card, made using this lovely collection.   In the meantime, stay safe and well.   Please don't forget to tune in to see our Mandy launch this lovely collection tomorrow Thurs. 20th. Jan. at 12 noon.

                                                                  Love and rainbows,

                                                                   Hugs  Jennifer xx,


Tuesday 18 January 2022

'Golden Florals.'

Good afternoon Lovelies,

Hope everyone is well and that you are all enjoying a little sunshine as we are today .   Thank you for your visits and lovely comments on my last blog post, as you already know, I appreciate each and every one.

Well, now onto today's card.   This was made for the Imagination Craft's show on the Create & Craft T.V. Channel on the 13th. Jan. 2022.   I have used one of  the beautiful rice paper designs from the 'Mixed Media Rice Paper' collection called 'Vintage Floral Script, ' such a pretty background paper on which to base your card design.


Begin by matting and layering a seven and a quarter inch square of dark brown card onto an 8"x8" white base card.    

Cut a piece of white card 7"x7".   Cut out the section of rice paper you want to use, (I chose the section with the rose on),  cutting it slightly larger than the 7" square piece of card.

Cover the piece of card with the rice paper using the Cadence Decoupage Plus glue, bending the excess rice paper to the back of the card and secure it with the glue.   When this is dry, rub some Cadence Inca Gold Finger Wax around all four outer edges of the background card.

Lay the floral design from the A4 'Artist's Treasure' stencil (from the 'Flowermania' Collection) onto the bottom right corner of the background card.   Using a blending tool, rub the Versafine  pigment pad 'Vintage Sepia'  through the design, then remove the stencil.


Re- lay the stencil over the floral design but off-set the stencil slightly.   Fasten the stencil down with the blue mixed media tape or some stencil spray to stop it moving.   Using a metal spatula, spread the Cadence gold Diamond Relief Paste over the floral design on the stencil.
Remove the stencil, wash it and the spatula and leave the golden image to dry.   This gives a great shadow effect.
Matt and layer this background card onto the brown matt on the white base card and the card is finished.
Below are a few close up photos taken at an angle so the depth of the design can be seen.


Thank you for visiting my blog, I do hope you have enjoyed your visit and if you are not already a card maker, I hope I may have encouraged you to 'have a go' lol.   Take care of yourselves and stay safe.   I will be back quite soon with another card from another new collection.   Catch you then.

                                                                  Love & Rainbows,

                                                                  Hugs   Jennifer xx.


Monday 10 January 2022

'Lavender Time.'

 Hi there Lovelies,

Hope you are all well, the weather is so dreary at the moment but one good thing is, that the nights are getting slightly lighter now lol!     I did notice some snowdrops and daffodils were popping up around the garden today, always lovely to see, a sure sign that Spring is on its way.   Isn't Mother Nature wonderful!   which brings me to my card for today.   This was made for the Imagination Craft's 'Lavender Chic' show on the Create & Craft T.V. Channel on 4th. January 2022    I just love the large bee on the A4 stencil.


Cut out the section of the rice paper with the bunch of lavender on it, cutting it slightly larger than 7" square.

Cut a 7"x7" square of white card and using the Cadence Plus Decoupage Glue, fix the rice paper to the card, bending the excess rice paper to the back of the card and securing with the glue.

From the second sheet of the same design rice paper, cut out the bottom of the upper sign, plus the larger sign from the bottom and glue them to some spare white card, using the glue.   When dry, trim around both images, cutting away any excess white card.

Fix both of these to the original images on the background card, using silicone glue to create some dimension to the card.


Fix the background card to an 8"x8" white base card,

Take the 'Simply Lavender' stencil and lay the large 'open' bee onto some white card.   Using a stencil brush, stipple the Cadence black acrylic paint through the design.   Repeat this once again and leave both to dry.   Wash the stencil and brush.


Next lay the 'full bee' from the stencil on top of the black bee, securing the stencil with the mixed media low tack tape, to stop it moving, then stipple the Cadence Dora Metallic Rich Gold paint through the design using the stencil brush as previously.   Repeat this on the second black 'open' bee and leave to dry, which will not take long at all, as this paint dries very quickly.


When dry cut out one of the bees and only  the body and wings of the second bee, and glue the body and wings on top of the first bee, using silicone glue.   


Lastly, glue the bee to the base card and the card is finished.   I do hope you like it, I really enjoyed working with this pretty collection, the bee stencil is just great, I love it.   Below are a couple of photos showing the dimension of the card.


Thank you once again for stopping by my blog,  hope you have enjoyed your visit.   I will be back soon with another card, made using another great collection which will be launched very soon on the Create & Craft T.V. Channel.      Stay safe and well.

                                                                    Love and Rainbows,

                                                                     Hugs   Jennifer xx.