Followers

Friday 30 April 2021

'Man on the Moon Machine.'

 Good afternoon Lovelies,

Thank you for your visits and comments on my last post, which are much appreciated as always.     Hope everyone is well and safe.    Here we are in the last day of April, where has the beginning of the year gone!     I think it is time to share another of my cards, made for Imagination Craft's show on the Create & Craft T.V. Channel earlier this month.   This is made using products from Imagination's 'Fantasy Steampunk' collection, Stencil, Rice papers, Stamps.  Sparkle & Twinkle and  Cadence Finger Wax.   I think this is my favourite rice paper from the collection......such a fun design.


Roughly cut out the section of the rice paper with the ' man on the moon machine' and the three clock faces.,   slightly larger than a seven and a half inch square of white card. 

Using the Cadence decoupage glue fix the rice paper to the square of white card, bending the extra rice paper to the back of the white square and  securing with the glue.


Cut out the left-hand section of the rice paper from the second sheet of the same design and glue this to a spare piece of white card, using the decoupage glue and leave to dry.


Cut out the man on the moon machine and the three clock faces, trimming away any excess white card   Using the Wild Honey Distress Ink, blend it on parts of the background and the clock faces,  then blend some Black Soot Distress ink around the edges of the card.

Rub some Aztec Gold Finger Wax around the edges of the card on top of the inks.

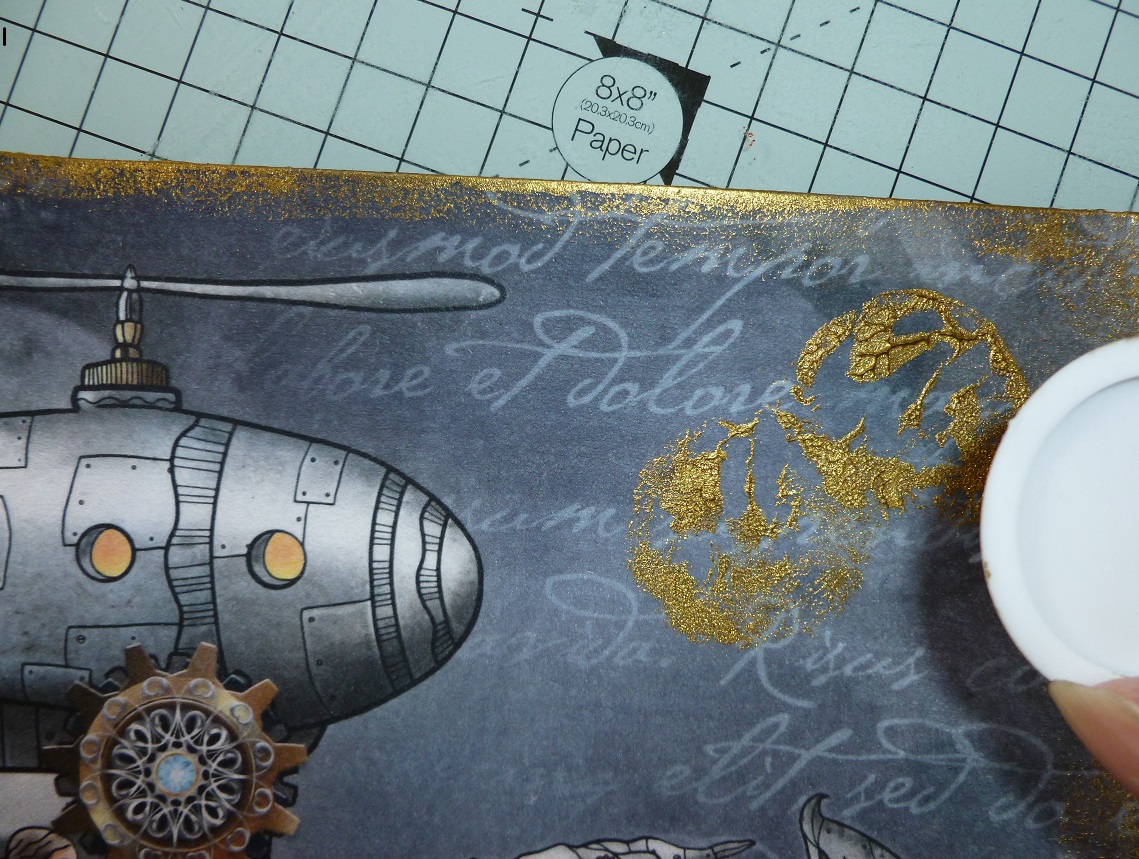
Lay the words 'Tick Tock' from the stencil onto the top right of the background card and secure with blue low tack tape or stencil spray and spread some Bright Copper Sparkle & Twinkle through the design, using a metal spatula.

 Remove the stencil and leave the image to dry. 


Matt and layer the background card onto an 8" x 8" white base card.

Colour the three cut out clock faces and the man on the moon machine with a little of the wild honey distress ink.


Fix these two images on top of the original images on the background card, using silicone glue.   Paint a small piece of white card with the gold finger wax and when dry, stamp three cog wheels from the stamp set onto it, using a black ink pad.   Cut these out and glue them to the cogs on the  moon machine.


From the left-over gold card, punch out 6 small circles and glue 5  to each of the dark brown/black diamonds on the background design and the other onto the centre of the top cog on the moon machine.   Next punch out 4 tiny gold circles and glue to the  clock faces.


Below  are a couple of photographs taken at an angle to show the dimension on the cards.


Well that's all from me for the moment, I will be back again soon with another card to share with you but it won't be from this collection....not sure what the subject will be (whatever takes my fancy lol!)   In the meantime, take good care of yourselves and above all........ be happy.

                                                                Love and rainbows,

                                                                  Hugs   Jennifer xx.


Monday 26 April 2021

'Wings of Time.'

 Hello Lovelies,

How are you all ?  well I hope.   The weather has changed here today, dull,  overcast and really quite chilly but hey ho! lol we mustn't grumble, after the wonderful weather we have had and the farmers, growers and the  gardens are in desperate need of water.   Well, onto today's card, once again, made using rice papers from the fabulous 'Fantasy Steampunk' collection from Imagination Crafts, which was launched recently on the Create & Craft T.V. Channel.   Now I have to admit steampunk was not one of my favourite subjects but.......this collection I found was really fun to use.    


Cut out a seven and a half inch square of white card.   Cut out the section of rice paper you wish and cut it slightly large than the piece of white card.   Fix the rice paper to the square of white card using the Cadence decoupage glue, bending the extra rice paper to the back of the card and securing it with the glue.

I had a piece of left-over rice paper as cut,  after cutting out the man on the moon machine and as I do not like to throw anything away lol!   I glued it to some white card using decoupage glue.

                         When this was dry, I rubbed some black soot distress ink around the edges

Roughly cut out the butterfly and the clock face from the second sheet of rice paper and glue them onto some spare white card  again, using the decoupage glue.

                                  When dry, cut them out, trimming away any excess white card.

Matt and layer the background card onto an 8" x 8" white base card.   Fix the left-over piece of rice paper down the right-hand side of the background, using silicone glue to add some dimension to the design.

Fix the clock face in the bottom left corner and the butterfly on top of the original image again, using silicone glue.


That's all there is to it, the card is finished, this is quite a quick card to make.   Below are a couple of photos taken at angles, to show the dimension.


Thank you for your comments and visits to my last blog post, much appreciated as always.   Take good care of yourselves and stay safe.   I'll catch you all again soon, when I will be sharing another card made using this collection...'The Man on the Moon Machine.'   love this design - such fun.

                                                                  Love and rainbows,

                                                                   Hugs   Jennifer xx.


Friday 23 April 2021

'Fantasy Travel.'

 Good afternoon Lovelies,

Hope you are enjoying the beautiful weather we are having.    Did you manage to see our Mandy on Create & Craft today when she launched another fabulous collection from Imagination Crafts ?  I do hope so, there were some fabulous samples on show to inspire everyone and of course some great Cadence products too.

Thank you all for your continued visits and comments on my last blog, very much appreciated.   Today's card was shown on the show today.   These mixed media collections can be used in so many ways, including card making.    Here is today's card.


Cut a seven and a half inch square from white card.   Cut out the section of rice paper with the airship, woman and the dragon on, cutting this slightly larger than the white square.

Glue the rice paper onto the square of white card, bending the extra paper to the back and securing with the Cadence decoupage glue.


When this is dry, take the jar of Green Gold Finger Wax and remove the white plastic stopper.   Add some of the Green Gold Wax to the underside of the stopper and use this to add 2 circles to the top right and one on the left of the rice paper background (these give the impression of other planets).   


When they are dry, take the same finger wax and rub some around all four edges of the card.

Next, add some white structure paste through the small circles and stars from the stencil, adding these in between the main images on the background.


Lay the word 'Fantasy' from the stencil onto the bottom left corner and spread some white structure paste through the word.   Remove the stencil and leave the image to dry.


Glue this background card to an 8"x8" white base card.   In the meanwhile, roughly cut around the airship, woman and the dragon from the second piece of the same design, rice paper.   Glue these to some white card  using the decoupage glue.


When dry, fussy cut around these images, removing any excess white card.   


Fix these images to the original images on the background, using silicone glue to add some dimension to the card and the card is finished.


Thanks so much for taking the time to stop by my blog, I do hope you have enjoyed your visit.  If so, I do hope you will pop back again soon, when I will be sharing another card, made using the products from this collection.

Take good care of yourselves, happy crafting!

                                                                  Love & Rainbows,

                                                                       Jennifer  xx.

Wednesday 21 April 2021

'Beautiful Angel.'

Hi there Lovelies,

Hope you're all having the beautiful sunshine that we are today, it does make a difference lol!   Thank you for taking the time to stop by my last blog, your visits and comments are very much appreciated.   I did mean to get this blog post on here before now but I have been busy making more samples for the Imagination Craft's show on the Create & Craft T.V. Channel coming up soon.  I'm not sure of the dates yet but I will be posting my samples on here.   Back to today's card.   This was made for Imagination Crafts in March 2021 and the products used were from the very beautiful 'Vintage Beauty' collection,  stencil and rice papers.   Cadence Dora Metallic paints and Decoupage glue.


Lay the lily image from the stencil onto the right-hand side of an 8"x8" ivory base card.   Mask off the stem and leaves, then using a stencil brush, stipple a blend of the Cadence Pearl and Amethyst Metallic paint through the lily flower heads on the stencil.  Remove the stencil and masking tape.

Mask off the flowers this time and lay the lily stencil image, back in position.   Blend the Emerald and the Pearl metallic paints together and stipple the paint through the stencil, covering the stem and leaves this time, using the stencil brush. 


Remove the stencil and leave to dry, which won't take long as this paint is quick to dry.


Repeat the above on the left-hand side of the base card, flipping the stencil over, so that both images will face the outside edges of the card.

Add some script from the stencil on to the bottom right and left-hand corners (but do not flip the stencil this time, as the script will be the wrong way round.)   Stipple the White gold metallic paint through the script on the stencil.   Remove the stencil.


Paint a piece of white card with the amethyst and from this die-cut a large tag shape.   Cut a rectangle to fit the tag, from white card.    Cut out the angel from the sheet of rice paper, slightly larger than the rectangle and fix this to the white card, using the decoupage glue, bending the the extra paper to the back of the rectangle and fix with the glue.   Fix the angel to the large tag shape.


Glue the tag onto the centre of the ivory base card, using silicone glue or sticky foam pads.

 Punch out 4 small circles from the amethyst card, left-over after die-cutting the tag shape and glue one in each corner of the base card.   Glue three purple gemstones to the bottom right of the tag.   Add a cream organza bow and a lilac flower to the top of the tag.


Well that's it from me for the moment my Lovelies.   Take care of yourselves and be safe.   I will be back soon with another card.

                                                                  Love and rainbows, 

                                                                   Hugs  Jennifer xx.