Followers

Tuesday 27 October 2020

'Lupins and Butterflies.'

 Good afternoon Lovelies,

Thank you for your visits and comments on my last blog post.   Today I have another card, made for Imagination Craft's shows on the Create & Craft T.V. Channel  earlier in the year. 


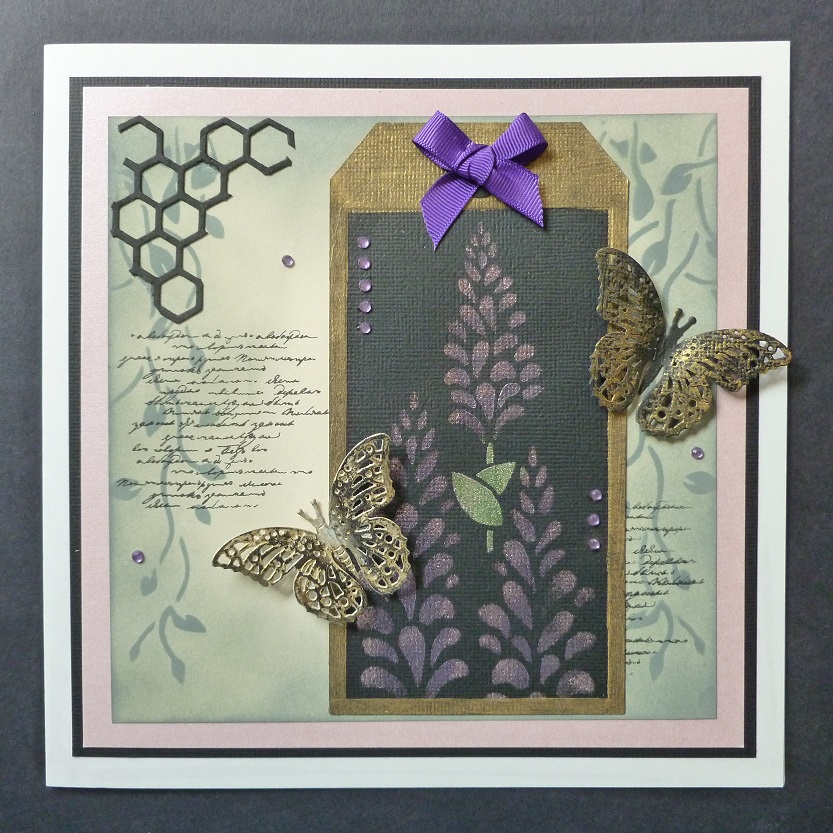
Matt a seven and a quarter inch square of black card onto an 8" ivory base card.   Next matt a pink pearl square, slightly smaller than the black square, onto the black matt.

Take a square of cream card cut smaller than the pink and colour around the edges, using the Iced Spruce Distress Ink and a blending tool, getting lighter towards the centre of the card.

Lay the hanging leaves stencil onto the left of the card and rub the distress ink through the design.   Repeat this on the right-hand edge.


Stamp the text from Imagination's Distress set 1. onto the left and right sides of the card, using a black ink pad.   Matt this onto the pink matt on the base card.

Die-cut a large tag shape from black card.   Lay the flower stencil (which in this case I have used as a Lupin flower  but could also be used as a  Wisteria plant), a very versatile stencil)   Stipple some Cadence Menthol metallic paint onto the leaves and stem, some amethyst and dried rose onto the flowers.    Remove the stencil.


Paint around the edges of the tag with watered down Inca Gold finger wax.


Glue five amethyst gems to the top left of the tag and three to the right.   Die-cut two butterflies using the Spellbinder's die, one from white card and the other from black card.   Rub over the black butterfly with some Inca Gold finger wax.


Paint the white butterfly with the gold, then add a little Black Soot Distress Ink over the top.

Glue the tag to the front of the base card, more to the right-hand side of the card.   Glue the butterflies, one to each side of the tag.   Add some silicone glue under each of the wings.


Glue a small piece of die-cut 'chicken wire' from black card, to the top left corner.    Lastly, glue three amethyst gems to the card front and a purple ribbon bow to the tag top.


Well that is all from me for the moment but I will be back again soon with another card to share with you.   Until then take care and stay safe.

                                                               Love and Rainbows,

                                                               Hugs   Jennifer xx.


Tuesday 20 October 2020

'Flourish Fountain Card.

Good Evening Everyone.

Thank you for all your comments and visits to my last blog post, very much appreciated by me.   Hope you are all managing to cope with the difficult situation we are all in at the moment.   We must stay strong and keep going, hopefully things will get better.

I have just posted my latest samples off for the Imagination Craft's next shows on the Create & Craft T.V. Channel.   I will let you know the date and time nearer the show date and will post some of my samples on here.   In the meanwhile, I would like to share a card I made for another Imagination show  back in August of this year.   I used the 'flourish fountain' panel stencil, Art  Texture stamps,  fly stamp from the 'Dark Angel' collection and the flower stamen die from the 'Modernista' collection.   Something a little different from my usual cards.


 Matt and layer a 7" square of black card onto an 8" ivory base card.   Trim a piece of cream hammered card to a six and a half inch square.   Colour using a blending tool and the Barn Door, Mustard Seed distress inks and the Spiced Marmalade distress oxide, getting lighter towards the centre.   Add a touch of the Black Soot around all four edges of the card.

Take the main panel stencil (flourish fountain) and lay it down the centre of the coloured card using a blending tool and rub the Black Soot distress ink through the design.   Remove the stencil.


Using the Barn Door distress ink, stamp the broken diamond image to the top left and bottom right corners.

Take the text stamp from the 'Distress Set 1' set of Art Stamps and stamp on the left side just below the broken diamonds, using a black ink pad.   

Repeat the above using the text stamp, stamping it just above the broken diamonds on the right side of the card.

Stamp the set of lines in black on the bottom left and the top right.   Stamp the same lines but this time, using the Mustard Seed distress ink, next to the black lines.


Die cut the flower stamen, using the die from the 'Modernista' collection and paint it with the gold metallic paint.   When dry, cut in half and glue one half to the left side of the card.

Using the cogwheel fly  stamp from the 'Dark Angel' collection, stamp the fly six times onto white card using a black ink pad and colour, cut out and 3D them using silicone glue, making two flies.


Glue the flies to the card front.      Finally glue a red heart gem to the right and three small red gems to the top right corner and three to the bottom left corner.


Matt this onto the black matt on the base card and the card is finished.


 Thanks for visiting my blog once again,  I  love to share my projects with you.   I do hope you have enjoyed your visit and if you are not a cardmaker already, maybe I  may just have inspired you to have a go at this very satisfying hobby.      Take care of yourselves and stay safe and well.

                                                                   Love and rainbows,

                                                                    Hugs   Jennifer xx.


Sunday 11 October 2020

'Day Dreaming in Paris.'

Hello everyone,

Hope you have all enjoyed your weekend.   Thank you once again for your comments and visits on my last blog post.     As it is a while since I last blogged, I thought I would share a card I made, using the 'Voila' collection from Imagination Crafts.   This was made after the show on Create & Craft so was not seen during the show.   I just love this image and had to make another card using it.   

I am now working on another fabulous collection and I am so enjoying using it.     So many great images and dies, just couldn't make my mind up just  what to use first lol!   Fabulous rice papers, and stencils too.      I cannot tell you more as my lips are sealed for the moment but I think you will love this collection too, it certainly makes me happy whilst working with it.   I will let you know about it and the date and time of the programme, as soon as I can.


Take  a piece of black card seven and a quarter inches by six inches and matt  and layer a piece of pink pearl centura card onto the black, leaving a small border of the black showing.


Matt and layer this onto an eight inch square ivory base card, across the centre, leaving the narrowest borders at the left and right -hand sides .


Cut a piece of black card six inches by seven and a half inches and matt this onto the pink card, portrait style.   Sorry I forgot to take a photo at this stage.

Draw and cut out a heart seven high by approximately five and a half inches at the widest part, from white card.   Colour the heart using the Tattered Rose, Shaded Lilac and Stormy Sky Distress Inks, using a blending tool.


Add some Black Soot Distress ink around the outer edges of the heart.   Using the A4 stencil, lay the brickwork from the bridge onto it and using some cut n' dry foam and the Hickory Smoke and Black Soot, add a stone wall for the girl and her pet dog to sit on.


Lay the stencil back onto the heart and using the Tattered Rose D.I.  and some cut n' dry foam, rub the ink through the design, adding some raindrops to the scene,  using the stencil.


Take some spare black card and using the Encore silver pigment pad, stamp the girl and her dog onto it, then heat emboss with silver embossing powder.   Cut the image out leaving a tiny black border around the embossing (if you don't do this, the embossing may chip away.  


Glue the girl and her dog to the base of the heart, as though they are sitting on the wall.


The last thing to do is to die-cut the ivy leaves from black card, using the die from Imagination Craft's  beautiful 'Secret Garden' Collection.   Cut a total of four.


Cover all four of the ivy leaf die-cuts with the silver pigment pad, add some silver embossing powder.   Remove the excess powder and then heat with a heat gun.


 Glue one in each corner of the black card and glue a silver ribbon bow to the left-hand side of the card and the card is finished.   Hope you like it.


Below are a couple of photos taken at an angle to show how the silver embossing shines when the light catches it.


 Well that's me for tonight, I do hope you like my card as much as I did whilst making it.   Please take care and stay safe my lovelies, until next time.   Hopefully I will be back again soon, time permitting lol!

                                                                  Love and rainbows,  

                                                                  Hugs   Jennifer xx.                                                                                                                                                           


Thursday 1 October 2020

'A Romantic Liason.'

 Hello Everyone,

Hope you have all had a great day, whatever you have been doing.  Here we are once again at the beginning of another month, how this year is flying by!    Thank you all for your lovely comments and all your visits to my last blog post, much appreciated.

Tonight's card is another sample I made for the Imagination Craft's shows on the Create & Craft T.V. Channel last month, using the beautiful 'Voila Collection.'


Matt a square of black card onto an 8" square ivory base card, leaving a small border of the ivory showing.

Take a slightly smaller square of ivory card and lay the A4 stencil from the collection onto it.


 Spread the Shabby Chic sage relief paste over the design, using a metal spatula.


Remove the stencil and leave the image to dry.


Matt this onto the base card.

Stamp the lovers with the umbrella onto some white card five times, using a black ink pad.


Colour them with the Fuschia and light purple mixed media spray inks, using well watered down orange ink for their skin.    Cut the stamped images out. 

Colour his suit with watered down Black soot distress ink.


Cut out and 3D the images onto the original stamped image, using silicone glue.


Glue the lovers to the left-hand side of the base card.   Stamp the sentiment on the right-hand side of the card using a black ink pad.


Stamp the Amour heart and arrow onto some ivory card, using a black ink pad, cut out and fix just above the heads of the lovers using silicone glue.


Paint a piece of white card with the Brilliant Gold and Zinaber Gold metallic paints, blending them together.   When this is dry, paint the back of this card with the light purple spray ink.   From this, die-cut three roses  ( I used a rose die which was given free with a craft magazine a few years ago).    Roll them up adding a dot of glue to stop it unwinding (like quilling).   Roll so the gold is on the inside of the rose and the purple underneath each petal..

Glue these roses to the bottom right corner of the card.            


The card is now finished.   I have really enjoyed using this beautiful collection and I hope my cards may have just inspired you to have a go at this fabulous hobby.    The card below is taken at an angle to show the dimension of the card.


That's all from me for the moment.   Take good care of yourselves and stay safe.   I will catch you all again quite soon.

                                                                  Love and rainbows,

                                                                  Hugs   Jennifer xx.