Followers

Thursday 24 June 2021

'A Magical Walk.'

 Hello Everyone,

Hoping this post finds you all well.   I would like to share another of my cards, made using Imagination Craft's beautiful 'Fantasy Christmas' Collection, which was launched on the Create & Craft T.V. Channel, earlier this month.   I have also used the fabulous Cadence Glitter and Acrylic paints,  Dora Metallic paint and Cadence silver Metallic Flexible Relief Paste and Imagination Craft's Sparkle & Twinkle.

Using the mountain scene from the rice paper, left over after cutting out the dragon and animals to make a previous card, fix this to a square of white card, cut slightly smaller than the 8" white base card, using decoupage glue.   Bend the excess rice paper to the reverse of the white card, using decoupage glue.


Mix some ultramarine and antique white glitter paints together and paint the white card below the rice paper to look like ice and snow, blending the paint over the 'feathered' edge of the rice paper and leave to dry.


Lay the word 'ICE' from the stencil onto the top left corner.   Using some cut 'n' dry foam rub some 'Deep Lagoon' Versafine ink through the word.   Remove the stencil and leave  the image to dry.


Once dry, re-position the stencil over the word 'ICE'  off setting it slightly, secure with the low tack blue masking tape, then spread some Diamond Sparkle & Twinkle over it using the metal spatula.   Remove the stencil and leave the image to dry.


 Fix this card to a white 8" x 8" base card, leaving a border of the white card showing.

Colour a spare piece of white card with a mixture of the Leaf Green Glitter Paint and Pure White Acrylic Paint.   When dry, lay the text from the stencil onto it.   Using a stencil brush, stipple some Dora silver metallic paint through the design.   


 Remove the stencil and leave image to dry.

From this, die-cut a large circle. five and a quarter inches in diameter.

Glue this circle to the base card near to the left-hand side.

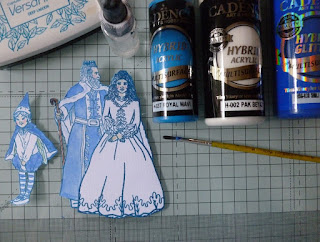
Using the deep lagoon ink pad, stamp the couple twice onto white card and the pixie once.   

Stamp the holly and the robin,  again, using the deep lagoon ink.   Cut these out.   Mix some Ultramarine and Antique White together and paint his clothes and the pixie's cloak, hat, trousers and tights and the Robin's breast.   From the second stamping, cut out the lady only and glue her onto the original stamped image.

Fix the couple, pixie, holly and the Robin in position on the base card, using silicone glue.


Spread the silver Flexible Relief Paste over the Decorative Trees blue silicone mould and leave to dry.   

When dry, remove the trees and snowflakes from the mould and use one large and one small snowflakes from it and glue these to the top left of the circle and the card is finished.


 Thank you once again for your visits and comments, I do love to read them.   Take care of yourselves and have a good weekend when it arrives.   I am working on more samples at the moment which I will post on my blog nearer the Create & Craft T.V. show date.

                                                                   Love and rainbows,

                                                                   Hugs   Jennifer xx.


Saturday 19 June 2021

'Winter Solstice.'

Hello Lovelies,

How are you all?  well I hope.   I would like to share another card with you, made using Imagination Craft's beautiful 'Fantasy Christmas' collection.   This collection is just so different...love it! 


Take the rice paper with the dragon and animals  etc., on and run a paintbrush dipped in some clear water along a line where you want your design to end...ie: in this case, just below the animals, cutting enough rice paper to fold over to the reverse of the card on the top and two sides, making the edges look neater.   Gently pull the rice paper apart below the animals, feathering the edges.   I chose to make a wavy line to give a little perspective to the scene.


Cut a piece of spare white card six and three quarter inches square and using a pencil, draw a feint line where the feathered edge of the rice paper will be, then paint just below that line with the Cadence Dora metallic blue paint.


When this is dry, fix the rice paper to the top of the painted card, using decoupage glue, the feathered edge just on the blue paint.   Fold the excess rice paper on the top and two sides, to the reverse of the card secure with decoupage glue and leave to dry.


Add a small amount of Imagination Craft's Diamond Sparkle & Twinkle to the feathered edge of the rice paper.


Lay the words 'Winter Solstice' from the stencil onto the top of the rice paper background, securing with blue low tack masking tape.   Using a metal spatula, spread the Gold  Diamond  Metallic Relief paste over the words, remove the stencil and leave the image to dry.


Take the second sheet of the same design rice paper and roughly cut out the animals.   Glue this to some spare white card, using the decoupage glue and leave to dry.


Cut around the animals cutting away the excess white card and rice paper,  cutting off the far wing of the dragon.


Glue the animals to the original image using silicone glue and leave to dry.


Spread the Cadence gold metallic flexible relief paste over the 'lacy flakes' blue silicone mould, using a metal spatula, removing the excess paste and putting it back in the jar, to be used again.   Leave this to dry.


When this is dry, remove the lace from the mould,  then cut away four of the points from the lace and glue them along the bottom of the card using Mixed Media Glue.   Matt and layer this card onto a slightly larger square of navy blue card.


Matt and layer this onto an 8" square, scalloped white base card.   To finish off, add some small amounts of Diamond Sparkle & Twinkle to the  circles on the rice paper background.


The photos below are taken at an angle to show the dimension  and the sheen from the Dora metallic paint.


Well that's this card finished,  I do hope you like it.   I would just like to thank you for visiting my blog and for all your support, comments and visits over the years, they are very much appreciated.   I do hope you have found a little inspiration from my blog for your cardmaking.   Until my next post......Happy Crafting, stay safe and well.

                                                                    Love & rainbows,

                                                                    Hugs   Jennifer xx.


Tuesday 15 June 2021

'Winter Sparkle.'

 Hello Lovelies,

Hope everyone is well and still enjoying the sunshine.   Tonight l'd like to share another card I made using the Imagination Craft's beautiful 'Fantasy Christmas'  Collection and Cadence paints.   This is a lovely collection to work with,  so different.


Cut a 7" square of white card and paint this with a mixture of the Ultramarine blue and Antique white Cadence Hybrid Glitter Paints.

Paint the bottom third of the card with the antique white glitter paint leaving some of the blue paint showing through in places.   


The glitter in the paints show up when the light shines on the paint, so pretty.   When this is dry, lay the fir tree design from the stencil on the left hand side of the coloured card, then spread the Diamond Metallic 'Grass' Relief Paste through the design, using a metal spatula.

Remove the stencil and whilst this is still wet, sprinkle some Sparkle & Twinkle Cracked Ice Glitter over the trees and leave to dry.


Lay the snowflake moon from the stencil onto the top right of the painted card and spread some Diamond Sparkle & Twinkle over it using a metal spatula.


 Remove the stencil and leave the image to dry.


 Take the Christmas tree blue mould  and spread the silver Diamond Metallic Flexible paste over the design, remove and excess paste from the mould using the metal spatula.   Put the excess paste back in the jar to be re-used and leave the paste to dry.


When dry, remove the  Christmas tree lace from the mould and cut off four of the snowflakes and glue these to the sky.   Keep the rest of the lace for another project.    Stamp the word 'Winter' on the top of the card, using a black ink pad.  


Stamp the girl and the goose three times onto white card, using a black ink pad.   Colour her dress with the blue and white glitter paints, her hair with the white gold Dora metallic paint, the warm orange acrylic paint for the webbed feet and bill of the goose.   Paint the leaves around the neck of the goose with the Dora green metallic paint and a skin toned  coloured pencil for her skin.   Cut out the layers of the girl.


3D her using silicone glue and fix her to the bottom right of the card.    When this is dry, matt and layer this card onto an 8" square white base card.


Stamp the holly twice onto spare white card, using a black ink pad.  Paint this with the Dora green and red metallic paints. cut out and glue one on top of the other, then glue to the bottom left of the base card using silicone glue.


Well that's this card finished, hope you like it.   Thank you again for your comments and visits, I hope you find some inspiration for your card making.     I will be back again soon with another card, made using this fabulous collection.


 Until my next blog post, look after yourselves, stay safe and well.

                                                                   Love and rainbows,

                                                                   Hugs   Jennifer xx.