Followers

Thursday 27 February 2020

My Japanese Fan, made using Sue Baker's 'Peace, 'Love' & 'Happiness' Collection.

Hi there Lovelies,

Time once again for me to share another of my card samples with you  I do hope all is well with you  whatever you are doing today.   Isn't the sunshine lovely!   So nice to see it, even if it is only for a minute or two at a time lol!   Just keep thinking....Spring is just around the corner lol!

Welcome to my newest follower, I hope you  enjoy your visits and maybe find a little inspiration from my makes.   If you have a blog too, please leave me a comment and I will reciprocate by visiting and commenting on your blog......can't have enough blogging friends!

O.K. here is today's card, this was made using Sue Baker's gorgeous 'Peace' 'Love' & 'Happiness' collection, such a lovely collection!  plus the fabulous Cadence products too.


Take a square of turquoise card, cut slightly smaller than the 7" x 7" white base card, and glue it to the base card.


 Lay the text from the stencil onto the right-hand side of the turquoise card.    Using  the Cadence  white gold paint stipple it through the design, using a stencil brush.   Remove the stencil and clean it.


Using decoupage glue, fix the sheet of rice paper onto an A4 piece of white card.   When dry, die cut 9 fan pieces, using the fan dies from the collection.   I only used 8 pieces, the ninth was a spare in case one got spoiled.


Take a piece of white card  and using the outside part of the die-set only, die-cut 8 of these.   Paint these with the Cadence dried rose paint.


Glue these to the back of each of the rice paper covered fan pieces, making sure the pink paint shows through the die-cuts.


Add some turquoise Pearl Drops to each fan piece and leave to dry.


Glue each fan piece in position using silicone glue onto the base card.   Glue the turquoise gemstones to the top of each fan piece and the smaller gems to the bottom.


(When I die-cut the fan pieces from the rice paper coloured card, I numbered each one on the back, so the colours and design would follow through).   I added the blue gems to the pink fan pieces and the pink gems to the blue fan pieces, making them stand out more.


Glue a tassel to the base of the fan.


Colour some white card  with the Cadence Dried Rose and another with the Mediterranean Sky paints,   from these cut out and roll  4 pink and 4 blue roses, ( or you could use a small rose die by Sizziz,  as I did).    Glue the blue roses to the pink fan pieces and the pink to the blue fan pieces.


Apologies for the above photo as the light was not good, so used my daylight bulb and the pink paint looks almost gold lol!


Well that's this card finished.      I have to say, it did take quite some time but I feel it was well worth it to see the end result, I do hope you think so  too.


Thank you so much for visiting and commenting on my last blog.    Hope you have enjoyed your  visit today.   Have a wonderful weekend and I will see you again quite soon.

                                                             Love and rainbows,

                                                              Hugs   Jennifer xx.


Friday 14 February 2020

'Peace and Light.'

Hi there Lovelies,

It's time for me to share another of my cards with you.   I do hope  you are all safe and well during this dreadful weather.....rain wind and more rain and wind!  oh, and forgot to mention we had 2 inches of snow recently, although the rain has chased the remains of the snow away I'm pleased to say lol!     My heart goes out to those poor people who have been flooded yet  again,    must be so upsetting,    I can't begin to imagine how they must be feeling.

My card tonight was made for Sue Baker's Imagination Craft's shows on the Create & Craft T.V. Channel recently.   For this card I have used products from the  gorgeous 'Love Peace & Happiness'  Collection.   I have used the lantern dies, stencils and stamps, along with Cadence Spray inks, Sparkle and Twinkle and the beautiful Dora metallic paints which give such a fabulous effect.   I coloured the background with Mixed Media Spray Inks.   Please bear with me, there are quite a lot of photos but you'll be pleased to know....not too much reading involved lol!

     
Take a square of white card slightly smaller than the 7" x 7" white base card.   Colour this by adding tiny drops of the Sunshine, Light purple and Light blue Mixed Media Spray inks onto a glass worktop and spray with water to weaken the colours a little.   Lay the square of white card onto the inks, then lift off and leave to dry.

    
When this is dry, stamp the main lantern image onto it using a black Stazon inkpad.   Next, colour around the edges of the card using s blending tool or piece of cut 'n' dry foam and the Dusty Concord Distress ink.  

Using the foam or blending tool, dab the  Dusty Concord Distress Ink through the text design on the stencil, onto the top right corner and the other design on the top left corner of the coloured card.


Lay the word 'Peace' from the stencil onto the bottom right corner and dab Dusty Concord through the stencil.  Remove and clean the stencil, then re-lay it back in position but off-setting the stencil slightly, then stipple the Dora White Gold paint through the stencil, this creates a shadow effect on the letters.  Remove stencil and clean it.


Matt this onto the base card using double sided sticky tape.

  
Colour a piece of spare white card with the White gold, Dried rose and Mediterranean sky Dora paints, blending the colours.   When dry, stamp the main lantern image onto it, using the black Stazon inkpad.

  
Cut out  the flower blossoms and buds  and glue onto the original images.   


Die-cut the lanterns using the dies from the collection.

  
Colour a small piece of white card with the lavender Sparkle & Twinkle, spreading it with a metal spatula.

  
When dry, cut into 3 pieces and glue one behind each of the die-cut flowers on each lantern, so the Sparkle & Twinkle shows through the open flowers.


Glue the lanterns in position over the original images, using silicone glue.

  
Punch out 10 small circles from the left-over painted card and glue them above the word 'Peace.'

Colour another small piece of card with the white gold paint and when dry, stamp the Japanese coin four times using the black inkpad.   Using a small circle punch, punch a hole in the centre of each coin.   Cut out the coins and glue one in each corner of the card using silicone glue.


Well that's this card finished, hope you like it, I did enjoy designing and making this card and was quite pleased with the end result.

 
That's all from me for the moment Lovelies, stay safe and warm and I will be back again soon, with yet another card for you to look at.   Happy crafting until my next post.

                                                                  Love and rainbows,

                                                                  Hugs   Jennifer xx.


Thursday 6 February 2020

'Pretty Peony.'

Good Evening  Lovelies,

Hope your week has been good so far, the weekend will soon be here once again,  they seem to come around so quickly lol!     Thank you  so much for taking the time to visit and comment on my last blog post I really appreciate your thoughts on my projects.
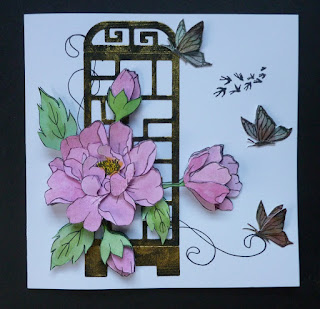
Today I would like to share another of my cards which was made for Sue  of Imagination Crafts for her two hour show on the  Create & Craft T.V. Channel recently.   For this card I used her beautiful new  'Love Peace  & Happiness Collection.

             
Using a black inkpad,   stamp the large peony flower and bud onto the bottom left of a 7" x 7" white base card.


Paint the flower,  and bud   with watered down  Fuchsia Mixed Media Spray ink and  the leaves with the clover acrylic paint.      

   
Die-cut the screen from black card using the dies from the collection.

         
Rub some Cadence white gold finger wax over the die-cuts, leaving some of the black card showing. (using your finger gives the best effect I think).   

     
Glue the screen on top of the stamped image.


Using the black inkpad once again, stamp the group of flying birds near the top right of the card. 

Stamp the main image a further 5 times. Paint with the fuchsia and clover green as previously but this time adding some watered down Cadence Dora dried rose metallic paint to the petals.   Cut out and 3D onto the original image on the base card, using silicone glue.


Add a touch of  yellow spray ink to the peony centre.

Colour a piece of white card with the Dora metallic paints - Mediterranean Sky, White gold and Dried rose, blending the colours together.

  
When dry, stamp the butterfly 6 times onto it using a black inkpad.


Cut out  the butterflies.   Next cut out and 3D the nearest wing on each butterfly, using silicone glue, so you end up with 3 butterflies.


Glue the butterflies to the base card, fixing one to the top of the screen.

  
Well that's it finished, I do hope you like it, I really enjoyed making this card, such a beautiful stamp and of course the fabulous look of the Cadence paints just give a lovely effect.

Thank you all once again for taking the time to stop by my blog, I know just how precious time is.   Take good care of yourselves and I will be back again soon with another card.

                                                               Love and rainbows, 
                                                                Hugs  Jennifer xx.