Followers

Tuesday 30 June 2015

A Splash of Colour.

Good evening Lovelies,

How are you all, hope you have been enjoying the sunshine today.   What a lovely day it has been.   Thunder and heavy rain forecast for tomorrow!    Ah well, I'm sure the sun will be back again soon.   Tonight's card was made for Sue and Harvey of Imagination Crafts.   For this card I decided to use my Brusho paints, I really enjoy using these as no two cards  ever look the same  lol!

   
Make a base card from bright blue card.   Matt a slightly smaller piece of white card onto the blue.   Glue two blue  oblongs to the white card,  one on the bottom left and the other on the top right..

Take a piece of white card and colour with the Brusho paints and leave to dry.


Take the flower panel stencil and mask off everything except for one flower head.   Lay the stencil in the position you want the flower head,  onto the coloured card.   Spread the bright copper Sparkle Medium over the flower head.   Remove the stencil and leave the image to dry.

   
When the image is dry, turn the stencil over so the flower faces in the opposite position from your first flower head and position where you want the second flower to be and spread the bright copper  Sparkle Medium over it and leave to dry.  

        
When dry, trim this card to correct size for the base card, leaving a border of the blue and white  showing and fix to the base card.

Thanks a lot for visiting ny blog, I really appreciate you taking the time.   If you have left me a comment, many thanks, I read every one.   See you again soon.

                                                                    Love and rainbows,

                                                                 Crafty Hugs,   Jennifer xx.


Monday 29 June 2015

Blues and Pinks.

Good evening Followers, Friends and Visitors,

Well, I don't know what happened to the heatwave we were supposed to have today, this  morning began cold and quite windy.    Although it did get warmer  later in the day at 18 degrees c.  I think the wind made if feel cooler.   Hope you have enjoyed some sunshine, maybe it will come our way tomorrow lol! 

On to tonight's card, which was made for Sue and Harvey of Imagination Crafts  for their Create & Craft T.V. show at the end of May 2015.

Fold the white card down the crease line, making a 7"x7" square card.  Take another piece of white card six and a quarter x the full length of the base card.   Paint this with the blue brocade Silkie.   When dry, matt onto the white base card.

    
Take a piece of white card, smaller than the blue matt.   Spread small amounts of the blue brocade, pink lace and turquoise Silkies onto a smooth surface or splodge matt and spray with water until the paints spread.   Lay the piece of white card on top of the Silkies, then lift off.    Leave this to dry.

   
When dry, punch the border using the Martha Stewart punch from white card, painted with the blue brocade Silkie.   Glue this to the middle of the right-hand edge of the coloured card, on the reverse, then  fix this matt  to the base card.

        
Lay the topiary leaf stencil onto the centre of the coloured card and stipple the blue brocade through the design on the stencil.   Remove the stencil and leave the image to dry.  The Silkies dry almost immediately, so not long to wait lol!!    Using a white pen, draw around parts of the design and add small amounts of diamond Sparkle Medium to the plant and pot.  

        
                                                                    Add a ribbon bow.    

Die-cut the small border using the Sweet Dixie die and colour this with the diamond Sparkle Medium.   Glue this to the left-hand edge and add three blue gems to the flower centres.   Glue three blue gems to the bottom right corner of the base card.

   
Well that's all from me tonight my friends,   I'm now popping over to my Pinterest page to add some pins, then it will be off to the land of nod for me I think lol!     Take care of yourselves and I'll be back soon.

                                                                    Love and rainbows,

                                                                      Hugs   Jennifer xx.


Sunday 28 June 2015

Canal Holiday.

Good evening everyone,

Well the weekend is nearly over.  The weather here has been quite nice,  although a little windy but a warm wind it has to be said.   Sounds like we're going to have a heatwave next week lol!

In between housework etc.,   I did manage an hour in my little crafty space today, making samples for Imagination Craft's  next show in July on Create & Craft T.V.   Some of you  may have already seen tonight's card on the Imagination Crafts blog  some time ago,  I thought I would still share it for those of you may not have seen it.


Make a base card from blue card stock and matt a smaller piece of white card on top.   Take another piece of white card and using the Inkadinks mixed with water in the misting pens, spritz the white card, letting each colour dry before spritzing the next.     Mix a little copper mica powder with the ochre Inkadink and spray onto the other colours.

 
When dry, lay the 'By the Canal' stencil on top and spread the  amethyst Sparkle Medium over the design.   Remove the stencil and leave the image to dry.    Matt this onto the base card. 


                       Add a white die-cut scroll using the Marianne Design die, to the top left corner. 


                                              Lastly add a gold ribbon bow to the top left.


That's all from me for now, see you all again soon.   Thanks for stopping by, hope you've enjoyed your visit.

                                                                   love and rainbows,

                                                              Crafty Hugs,  Jennifer xx.


Saturday 27 June 2015

'A Winter Bouquet.'

Good evening everyone, hope you've all had a good Saturday so far.     The weather has been quite nice here today.   Should have been busy in the garden but my day just seemed to disappear lol!  No crafting done today I'm sorry to say, I do like to do just a little something each day but it just wasn't to be today lol!   Tonight I would like to share another Christmas card with you, which I made for Imagination Crafts  in September 2012.   For this card I have used vellum for a change, hope you like this one.

      
Make a card from black card stock.   Matt a piece of white card onto the black card, leaving a narrow border of black showing.   Take a piece of vellum slightly smaller than the white and emboss  it,  using   the 'snowflakes' embossable and an embossing machine.   Remove from the machine and lay the vellum on to the embossing pad and using an embossing tool, go over every snowflake.

Colour the vellum with the distress inks of your choice.   When dry, fix this to the base card.   Die-cut and emboss, two pine tree branches, using black card  and glue to the base card.

Stamp the mistletoe sprig onto the vellum with the black ink pad.   Stamp the 'Winter Bouquet' onto white card, four times using the black ink pad.   Colour with distress inks, cut out and 3D using silicone glue.   Fix this to the centre of the base card.   Well that's it my Lovelies,   thanks for taking the time to visit and comment on my blog, I really do appreciate every one.   See you all soon.   Have a fun Sunday.

                                                              Love and rainbows,

                                                          Crafty Hugs   Jennifer xx.


Friday 26 June 2015

'Merry Christmas.'

Good evening Followers, Friends and Visitors,

Another day nearly over, wow! this month is just flying by, it will soon be  July lol!   At least we have not had any rain since this morning  and it has not been particularly cold.   Hope you've all had a good day.

Tonight I would like to share another card with you.   This was made for Sue and Harvey of Imagination Crafts,  latest show on Create & Craft T.V on the 12th June.   I'm afraid it is a Christmas card, I know some of you really don't want to think about Christmas, when we haven't even had Summer yet lol!!   but  we crafters like to get an early start on our cards  !!      It is a traditional Christmas card, made using traditional colours and of course, a little Sparkle Medium,   well lol!  what's a Christmas card without a little sparkle !

Fold the white card down the crease line, making a 7"x7" square base card.   Matt a smaller piece of red card onto the white, then a smaller piece of black card onto the red.

   
Take a piece of white card, smaller than the black and colour with distress inks, red, yelloe and green.   Rub some black soot distress ink around the edges and leave until dry.

Lay the holly wreath stencil onto this card and dab Versamark through the design, using a piece of cut n' dry foam.   Remove stencil and cover with some gold, copper and silver embossing powders.  Shake off the excess and heat emboss using a heat gun.  

     
Die - cut four corners from black card, using the Tattered Lace corner die and glue one in each corner of the base card.   Cover a spare piece of card with bright red Sparkle Medium and leave to dry.   When dry, die - cut four corners and glue these on top of the black corners, offsetting them slightly to create a shadow effect.

   
Lay the stencil back on the coloured card and dab some black ink through the words 'Merry Christmas' using a piece of cut n. dry foam.   Remove stencil and leave the ink to dry.   When dry, lay the cleaned stencil back on the 'Merry Christmas' offsetting slightly to create a shadow effect. and spread the bright red Sparkle Medium over the words.

    
                           Remove the stencil and leave the image to dry.   Glue this to the base card.

Die - cut another corner from the bright red Sparkle Mediumed card and glue to the centre top of the wreath.  

   
Lastly, glue a small red satin ribbon bow to the top of the wreath.   Well, this is now finished.   Thank you all for visiting my blog  I do hope you have enjoyed your visit.   I'll be back again soon, until then stay safe and above all, be happy!

                                                                Love and rainbows,

                                                                  Hugs   Jennifer xx.


Thursday 25 June 2015

Tangled Fir Trees.

Good evening Peeps,

Hope all is well with you.   Tonight I would like to share a Christmas card with you which is just a little different.   When I received this stencil to work with, I thought  what could I do that is different.  I hope you like what I have did..   I made this for Sue and Harvey of Imagination Crafts in June 2014. for their show on Create & Craft T.V.  at the end of July 2014.

Make a base card from white card.   Matt a piece of black card onto the white, leaving a border of the white showing.       Cut a piece of white card slightly smaller than the black.   Lay the fir trees stencil on top and trace around the design using a black pen.

    
                           Remove the stencil and fill in the design with patterns using the black pen.  


Using the Three Wise Men stencil, spread some Sparkle Medium  over the  main star and the smaller ones.     Draw a hillside and fill in with patterns to ground the trees.    Lastly fix this onto the base card.

Hope you like it,    I found this a very relaxing card to make,   why not give it a go!!     That''s it for tonight, enjoy the rest of your evening and I'll be back soon with another card.

                                                                 Love and rainbows,

                                                                  Hugs   Jennifer xx.


Tuesday 23 June 2015

A rose for all Occassions.

Hello again Lovelies,

Managed to have an hours crafting time this afternoon, up in my little space, listening to my cd's very relaxing.   I would like to share another card with you which I made for Imagination Craft's T.V. show on Create and Craft at the end of May this year.   I have used their beautiful 'rose duo' panel stencil.   Such a useful stencil, roses are lovely for all kinds of cards.


Fold the white card in half  down the crease line, making a 7"x7" square card.  Matt a dark green scalloped card onto the white base card, leaving a border of white showing.   Colour some white card using the vine leaf stencil,  sunset satin  and apple lace Silkies.    Make this background by covering the stencil with the silkies, then spraying it with water, using a spritzer bottle and putting a piece of white card on top.   Rub over the card with your hand, then remove and leave the card to dry.


When dry, rub ruby gold  Sparkle Medium  around the edges and matt onto the base card.   Using the rose
duo panel stencil and some white card,  spread the ruby gold Sparkle Medium over the design.

   
Colour the leaves and stems with the lime green stencil paint.   Add some golden chestnut Sparkle Medium to the leaves and stems.   Die-cut a scalloped circle around the roses and matt onto a larger green scalloped circle. 

   
Stamp 'with love' onto some white card, using a Versamark pad and heat emboss with gold embossing powder.     Die-cut a small scalloped circle around the sentiment and glue this onto a slightly larger dark green scalloped circle.

    
Fix both circles to the base card using sticky foam pads for a little dimension.   Lastly, add a gold ribbon bow just above the small scalloped circle.

Well that's all from me tonight, my bed is calling me and so is my Hubby, it's nearly midnight.  Night night, sweet dreams Lovelies, see you again very soon.

                                                                     Love and rainbows,

                                                                      Hugs   Jennifer xx.  


Monday 22 June 2015

A Bouquet of Roses.

Hi there everyone,

Where has the sunshine gone !!!!   another dull, wet day here today.   The lawns need cutting but are too wet and the weeds are growing really fast.   Still too cold and windy to put out my begonia hanging basket.

Hope you have had a good start to your week.   Tonight I would like to show you a card I made for Imagination Craft's  Create & Craft T.V. show at the end of May this year.

Fold the white card in  half down the ready creased line, to make a 7" x 7" square card.   Using the faded jeans Distress Ink, stamp the rose around all four edges of the card.  

   
Colour each rose with diluted Blue Brocade Silkie.   3D each corner rose, using silicone glue.


Lay the rose boquet stencil on the centre of the base card and using a piece of cut n'dry foam, dab the distress ink through the stencil design.  Remove the stencil and wash it.   Dry it and lay the stencil back on the image and move the stencil slightly to one side.   Dab the blue brocade Silkie through the design, then remove the stencil and leave the image to dry.

  
                                                        Add a ribbon bow to the stems.


                  Colour the white  flower,  with some blue brocade Silkie  and glue this to the bouquet..

 
                           Die - cut the letters R O S E S and glue to the card using Magi-bond glue.

 
Die - cut the letters L O V E and glue these to the card.    Punch out two silver hearts and glue them at either side of the ribbon bow.

 
Die - cut the heart lock and key from the silver satin card and glue to the bottom right.   Glue a blue paper rose to the heart lock.

That's it finished, thanks for stopping by to visit my blog and if you have kindly left me a comment, thank you again.    See you all again soon with another creation.

                                                                Love and rainbows,


                                                                   Hugs   Jennifer xx.


Sunday 21 June 2015

Topiary Tree.

Good evening Fellow Bloggers, Friends and Visitors,

Hope you have all had a lovely weekend.   I've had a quiet weekend, quite a lot of time spent in my craft room, preparing samples for Sue and Harvey of Imagination Crafts, next T.V. show in July.   Thoroughly enjoyed myself with the new products. 

Tonight I would like to share another card with you which was made for imagination Craft's  T.V. show on Create & Craft at the end of May.

Make a white base card eight and a quarter inches by four and a quarter inches.   Onto this, matt a smaller piece of navy card, leaving a border of white showing.   Next, matt a piece of pink onto the navy, again leaving a small border  showing. 

          
Take a smaller piece of green card and punch all four corners using the corner punch.   Add a small piece of navy card behind each corner, so the navy shows through the small design on each corner.   Matt this onto the base card.

  
Lay the 'Topiary flower' stencil onto a piece of navy card and put through an embossing machine.   Colour the tree and stem with pearl and gold gilding wax.

  
Cut out the tree,  stem and plant pot and add a small piece of lacy ribbon around the pot. 

      
Glue this to the centre of the base card and glue blue flower gems to the topiary tree.

 
Glue three pink gems around the top of the pot and a blue flower gem to the centre of the pot and   glue a blue ribbon bow to the top of the stem.

   
Well that's all from me tonight,  Have a good week and I'll be back again soon with another of my creations.

                                                               Love and rainbows,

                                                                 Hugs   Jennifer xx.


Friday 19 June 2015

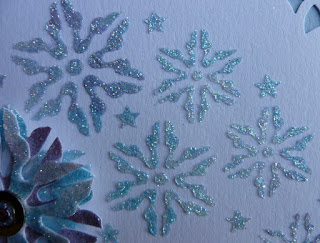
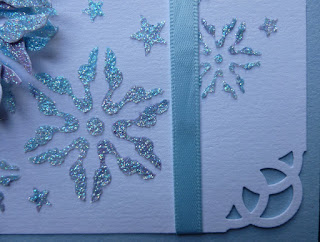
Snowflake Sparkle.

Hi there Lovelies,

Yep! the weather forecasters were definitely right again  lol!!  dull, dreary, wet, windy and cold !   Never mind a good excuse for a spot of crafting.     I had 'happy post' today from  Imaginations -products to make samples from,  for their show on Create & Craft T.V.  next month,  always exciting opening the box to see  what new products there are !   and I certainly wasn' disappointed lol!  Enough chit chat, let's get cracking with tonight's card.   This was made for Imagination Craft's  latest show earlier this month.

Fold the white card in half down the crease line to make a 7"x7" square card.   Matt a slightly smaller piece of navy card onto the base card.   Next natt a smaller piece of light blue card onto the navy,

   
Take a smaller  square  of  white card and lay the snowflake crescent stencil onto it.     Mix together some diamond Sparkle Medium with a touch ( a tiny amount only is needed as the pigment is very strong - a little goes a long way lol!!!)  of the dark orchid Starlight Metallic paint.   Spread this over the stencil but do not cover all of the design.  Next mix more diamond Sparkle Medium with the blue Starlight paint and spread this over parts of the design.   Lastly, spread some of the diamond Sparkle Medium over the design, making sure everything is covered.   Remove the stencil and leave the image to dry.

   
When dry, punch all four corners using the Martha Stewart corner punch. 


 Wrap a ribbon down the right-hand edge and secure on the reverse.   Matt this onto the blue card and
add a ribbon bow to the top,

     
Glue an eight gem strip to the ribbon, just below the bow.

Take some white card and using each colour as you mixed previously. lay the large snowflake from the stencil, onto the  card and spead the three colours through the stencil, one blue, one dark orchid and one diamond with just a slight touch of blue in it.   When dry, cut out  each snowflake and lay one one on top of the other, off setting them slightly, using silicone glue.

    
Glue this to the original image on the base card and add a silver washer to the centre of the snowflake, then add a pink gem to the centre of the silver washer.    Well that's all from me for now,  hope you have enjoyed your visit.   I'll be back soon, hope you will too!!    Have a fun weekend.

                                                                 Love and rainbows,

                                                                   Hugs   Jennifer xx.


Thursday 18 June 2015

A Touch of Gold.

Hello there fellow Bloggers, Friends and Visitors,

Well here we are again nearly at the end of yet another week!   Where do they go lol!   It has been a very dull, dreary day here tosday and quite chilly for the time of year.   Where has the sun gone lol!

Tonight I would like to share another card that I made for Sue and Harvey of Imagination Crafts, latest show on Create & Craft T.V.    For this card I have used their fabulous new white gold metallic Starlight paint.   This paint  is so amazing, the colours are stuning, it glides onto the card and dries almost instantly.   Such  a brilliant product and I'm having so much fun experimenting and finding out what I can do with it.

  
Fold the white card down the crease line to make a 7"x7" square card.   Take a further piece of white card approximately half an inch smaller than the base card and paint all the edges with the white gold Starlight paint (no need to paint the whole card as only the edges will be seen.)     Matt this onto the base card.   Matt a  smaller piece of black card onto the gold card.   Matt this onto the base card.

Take a smaller piece of white card and lay the Christmas wreath stencil onto it and dab the black Starlight paint through the design, using a piece of cut n' dry foam.   Remove the stencil and leave the image to dry.   This paint dries really  quickly, so no need to wait around for it to dry !   Matt this onto the base card.

    
Die-cut four black corners using the Tattered Lace corner die and glue one in each corner.   Paint a piece of white card with the white gold paint and when dry, die-cut another four corners from this card.   Glue these on top of the black corners, just offsetting them slightly, so giving the effect of a  shadow.


Stamp the 'Noel' in the centre of the wreath. using a black ink pad.   Colour more white card with the white gold paint and when dry, stamp the Christmas rose from the stamp set, ten times using a black ink pad.


Cut out each Christmas rose, shape it a little with an embossing tool and glue around the wreath.


This card is now finished, I do hope you like it.   It is a really easy card to make and does not take a great deal of time.

See you all again soon and thank you for taking the time to visit my blog.   If you are not a card maker, I hope I may have inspired you a little,  to take up this great, satisfying hobby.    Have a fun weekend, see you soon.


                                                                Love and rainbows,

                                                           Crafty hugs    Jennifer xx.