Good afternoon Lovelies,
I thought it was about time I shared another card with you all. Hope you are all well and safe. The weather seems to be improving and Spring is just around the corner, the sun is shinning and the birds are singing as I write this post, I feel Spring is in the air lol! I do hope so as we could all do with some sunshine in our lives at the moment.
I was tidying up my box of dies a few days ago and came across a few dies which haven't seen the light of day for many a year ! so I decided to have a little play with them and this is what I made. I also used one of the first stamps I ever purchased many years ago - the fairy text which if I remember rightly was a Clarity stamp I think.

Cut another square of white card just slightly smaller than the first matt and using the Sizzix large corner dies, die-cut the diamond design on the top right corner and then the honeycomb design on the bottom left corner.

Matt this card onto the deep lavender matt. Using the fairy text stamp and the Vibrant Violet Stazon ink pad, stamp the text onto the front of the card. Apologies for the shadows on the photos below as the sun was streaming through my craftroom windows, which was lovely but did create shadows.


Die-cut two of each of the small Tattered Lace corner dies from the deep lavender card. I have had these dies for a very long time too and they have been used a great deal over the years.


Glue two small corner dies to the top left and two to the bottom right corners.


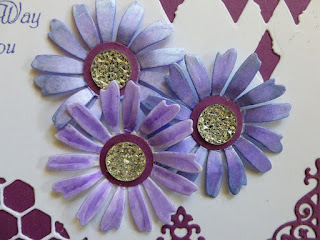
Using the Spellbinder's flower die, cut out three flowers from white card. Paint these with the Royal Orchid and Sweet Thistle Twinkling H2O's paints and the Harebell Cosmic Shimmer paint.

Using the Woodware small circle punch, punch out three circles from the deep lavender card. Glue a clear gemstone onto the centre of each circle and then glue these to the centre of each flower.

Glue these flowers to the front of the base card and the card is finished. This is an easy, quick card to make. Hope you like it.

Thank you for stopping by my blog and for your lovely comments and visits to my previous blog posts, I really appreciate them all. Take care of yourselves. I will be back again quite soon.
Love and rainbows,
Hugs Jennifer xx.