Followers

Sunday, 29 July 2018

'Postcard From Paris' card.

Good afternoon Lovelies,

Hope you are all enjoying your weekend.   It is dull and showery here today but we did have thunder and lightening a couple of evenings ago.      I for one, am pleased it has cooled down a little.   Well enough said about the weather lol!   onto a 'sneaky peek' at a  card I have made for Sue's Imagination Craft's  T.V. shows this weekend on the Hochanda T.V. Channel,  for this card I have used Mixed Media Spray Inks, Starlight paints, A3 Art stencil and one of the fabulous new products being launched on the programme - Shabby Chic Relief Paste, love using this, so easy to use!    All these great Imagination Craft's  products can be purchased from Crafters Companionwww.crafterscompanion.co.uk  O.K. let's get started lol!


Take a piece of white card 6" square and paint around all four outside edges with the Amethyst Starlight paint.


When dry, matt this onto a 7" x 7" white base card.

Take a slightly  smaller square of white card and colour with the green, yellow and light purple Mixed Media Spray Inks and leave to dry.

Lay the A4 Art stencil no. AS-464  onto the coloured card on a slight angle and spread the Lavender Shabby Chic Relief Paste  over the design, using a metal spatula.


Remove the stencil and leave the image to dry.   Wash the stencil as it will be used again on this project.

Re-lay the stencil back in position on the dried relief paste design and using the stencil brush, stipple the white gold Starlight paint over parts of the design.


Glue a dark lavender satin ribbon bow in the top right corner of the design.

  
Lastly, matt this card onto the base card and the card is finished.

 
I have taken the above photo on an angle so the beautiful shine from the white gold Starlight paint can be seen.

Another easy card to make and quick lol!   Please do not forget to tune in to Hochanda T.V. tonight for the launch of the new One Day Special programmes, I know I will be glued to the screen as always lol!      Catch you soon with another of my canvases.

                                                                 Love & Rainbows,

                                                                 Hugs   Jennifer xx.


Saturday, 28 July 2018

My 'Follow Your Dreams' 10" x 12" Canvas.

Good evening Friends, Followers and Visitors,

Well at long last we have had some rain !   not a lot though but every drop has been welcomed, as our garden desperately needed it lol!   not keen on the hail, thunder and lightening though lol!

Tonight I would like to share a 10" x 12" canvas I have made for Imagination Craft's One Day Special shows, launching on Sunday evening.   I have used one of their fabulous rice papers, the new Shabby Chic Relief Paste, stencils, Sparkle Medium and Just Pearls.   Hope you like it as much as I did making it.

   
Using the canvas in a portrait style, cut out and glue a piece of the A3  rice paper no. 551 onto it, using the decoupage glue, keeping the edges cut straight and not 'feathering'  them, also leaving a small border of the white canvas showing, just to frame the design.

Lay the flourish stencil no. AS-465 onto the canvas, closer to the right than the left edge.   Spread the sage Shabby Chic Relief Paste over the stencil using the metal spatula. 

   
Remove the stencil and leave the image to dry.

Lay the script stencil no. MA-86 onto the top right and then the bottom left corner of the canvas and spread the  Copper Sparkle Medium over parts of the stencil, using the metal spatula.

   
Repeat the above on the top right corner, again using the copper Sparkle Medium.   Remove the stencil and wash it, leaving the images to dry.

Using the stamps (given free with Quick Cards Magazine designed by Jenny Ellory) and a black ink pad, stamp 'Follow your dreams' in the top left corner and 'Live'   'Love'  'Laugh' in the bottom right corners.


Now for the flowers.    Colour a piece of white card with the transparent and chocolate Shabby Chic Relief Pastes, only small amounts of the chocolate and blend together.  


When dry, die-cut 5 large and 5 smaller flowers from this card.   Add some copper Sparkle Medium over the petals and use the 'foiling' technique to flatten the glitter in the medium.

      
Glue a small flower to each of the larger flowers, then glue in position on the green flourish, using Magi-bond glue.

   
Add some black Just Pearls to each flower centre, plus the 2 flowers on the top left of the rice paper background.

   
Last but not least, glue 5 white lace flowers to the top right, adding a black centre to each of the flower centres, using the black Just Pearls as previously.

   
Well that's all from me for the moment.   Please don't forget to tune in to see Sue demonstrating some fabulous new products, not to mention the wonderful samples the design team have made.   The ODS launches tomorrow night at 6pm I believe.

                                                               Love and rainbows,

                                                                Hugs   Jennifer xx.


Thursday, 26 July 2018

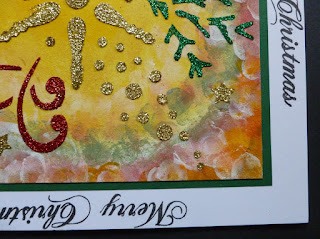
'Merry Christmas Snowflake Swirl' card.

Hello again dear Friends, Followers and Visitors,

Hope you are enjoying the warm weather.   I know some of you will not be and I'm one of them lol!   don't get me wrong,  I love some sunshine but not this hot !!!   I am really a Spring and Autumn  and Winter  person, as long as there is not too much snow lol!

Thank you for visiting my last blog post.   Tonight I have another Christmas card for you but a little
different to my usual style,  hope you like it.   This card was made for Imagination Craft's shows on the Hochanda T.V. Channel at the end of June 2018.

  
Using a 7"x7" white base card, stamp 'Merry Christmas' on all four outer edges of the card, using a black ink pad.

Matt a smaller dark green square onto the base card, leaving the stamped greetings showing.

 
Take a slightly smaller square of white card and colour it with the Lavender blue, Yellow, White & Sage Acrylic Fabric Paints and Red and Orange Mixed Media Spray Inks,  ( these products will work perfectly well with each other)  leaving the centre part yellow.

  
When dry, lay the snowflake swirl stencil onto the coloured card, secure to your worktop so the stencil does not move.   Spread the Forest green, Gold shine and Bright red Sparkle Mediums over the design, using the metal spatula.

     
Remove the stencil and leave the image to dry.   When dry, matt this onto the base card and the card is finished.

  
This is another very quick and easy card to make.   That's all from me for now, thanks for stopping by and I'll be back soon with another creation.

                                                               Love and rainbows,

                                                                Hugs   Jennifer xx.


Monday, 23 July 2018

'Santa's On His Way' Card.

Hi there Friends Followers and Visitors,

Sorry not to have blogged for a while but I thought I'd give my computer a break for a while.   Then I had to wait for a new part to get it going again !  so much for the break lol ha ha!   If you have been popping by my blog, thank you for that.   Today I have a card to share with you which I made for Imagination Craft's shows on the Hochanda T.V. Channel at the end of June and is a Christmas card.   Yes I know, it is hard to think about Christmas, whilst in the middle of a heatwave!!

  
I used a 7"x7" white base card on which to work.    I measured a slightly smaller square of white card and coloured this with the light blue, yellow and green Mixed Media Spray inks, along with a few spritz's of water.

When dry, I stamped the Christmas Script down the left-hand side of the piece of coloured card, using a black ink pad. 

Next I  stamped Santa and his sleigh across the card on an angle, again using a black ink pad.

    
Then I stamped  the 'Believe in the magic' 'Happy Christmas' and the 'Sparkles' onto the card.


I used the 'Hanging snowflakes' stencil, using  the hanging cord from one of the snowflakes and using that to male the border around the coloured card, using a black ink pad and blender or cut 'n' dry foam.


Matted  this onto the white base card and the card was finished, a very quick and easy card to make, especially if you are batch making your Christmas cards.   That's all for now my Friends, see you all again soon.

                                                                   Love and rainbows,                      
                                               
                                                                     Hugs   Jennifer xx.