Followers

Thursday, 27 September 2018

Imagination will take you anywhere.

Good afternoon Lovelies,

Hope this post finds you all well.  Sending kind thoughts to those who, for whatever reason aren't feeling so well.

My card today was made using a  stamp set  given free with the Simply Cards & Papercraft magazine.    The sentiment stamp is a Woodware stamp.

   
Make a square base card from some white cardstock.   Fix a rectangle of black card down the left-hand side. 

Colour a piece of white card with the Cracked Pistachio Distress Oxide.   When dry, put it into the embossing folder, I used a scrolls folder from Cuttlebug I have had for  many years but any pattern would work just as well.

   
Leave the top, left and the bottom edges as straight edges and cut the right-hand edge in a wavy pattern.   Glue this to the black rectangle.

Stamp the sentiment onto some spare white card using a black ink pad.   Trim this and matt onto a slightly larger piece of black card.   Glue this onto the base card.   

     
                 Glue three lilac gems to the top left and bottom right-hand corners of the base card.

  
Colour some white card using the Imagination Craft's   Pink, White & Navy Blue Fashion Sprays and when dry, stamp the flower five times using a black ink pad.   Cut them out and 3D them, using silicone glue.

    
                         Repeat this twice more, so that you have a total of three   3D flowers.

    
Glue the flowers on top of the green embossed card.   Add some white dots around each flower petal and on the centre of the flowers.

   
                          Apply tiny dots of the Stickles Lime Green Glitter Glue to the stamen.

Well, that's another card finished, hope you like it.   I have to say, I find it difficult leaving large areas of white card lol!  but I think it has worked on this one, I hope you think so too.   Catch you all again soon.

                                                               Love and rainbows,

                                                                Hugs   Jennifer xx.


Saturday, 22 September 2018

With Love & Best Wishes.

Hi there everyone,

Wishing you a very happy Saturday.   Hope you have a good weekend, whatever you have planned.     Thank you all for your visits and comments on my last post, each and everyone is appreciated.  This afternoon I would like to share another card with you, which I made using a beautiful set of stamps, which were given free with the Simply Cards & Papercraft Magazine - issue 178.   Hope you like what I have done with them.

    
Make a square card using some white cardstock.   Cut a smaller square of white card and colour it with the Victorian Velvet Distress Ink and the Fossilized Amber and the Cracked Pistachio Distress Oxides.   Stamp over the colours with the Imagination Craft's 'script' stamp using the Victorian Velvet Distress Ink.

      
Using the pink metallic,  Encore pad, stamp the large flower head around the edges of the coloured card, then heat with clear embossing powder.   Matt this onto the white base card.

   
Add water with a paintbrush to the petals of the flowers and dab  the coloured inks away, using a piece of kitchen roll.   Next paint the petals with D.I. Victorian Velvet and water.

Stamp the greeting onto a piece of white card, using the pink metallic pad and heat emboss with clear embossing powder.   Die cut this using the Spellbinder's  die.

   
Rub some pink D.I around the edges of the label, then some black soot D.I.   Glue this to the centre of the base card.

Using the Versamark pad, stamp the butterfly from the stamp set, onto a piece of dark lavender card and heat emboss using gold embossing powder.   Cut the butterfly out and glue it to the top left of the card, using silicone glue under the wings.

   
Well that's it from me for now my Friends.   Thank you so much for taking the time to check out my blog, much appreciated.    See you all again very soon.   Have a wonderful, peaceful, relaxing Sunday.   Take good care of yourselves.

    
P.S.   I know this photo is on a peculiar angle lol!     but it does show up the clear embossing on the flowers. 

                                                                 Love and rainbows,

                                                             Crafty Hugs,   Jennifer xx.


Tuesday, 18 September 2018

The Clearing Christmas Card.

Good afternoon Everyone,

Well what a change in the weather lol!   Autumn is definitely with us,  the leaves are turning beautiful colours and are blowing around the garden in the wind!    I do love the Autumn,  the season of mists and mellow fruitfulness.   Thank you all once again for all your visits and comments on my last post, much appreciated.   The products used in the making of this card can be purchased from  www.crafterscompanion.co.uk

Today I would like to share a card with you which I made for the Imagination Craft's shows on Hochanda T.V. back in June of this year.   I have used one of my all time favourite Imagination stencils - 'The Clearing,'  just love this stencil as I love anything to do with deer.


Mask off the left hand side of the white base card and colour the rest of the card with the light blue and yellow Mixed Media Spray Inks.   When dry, add some Forest Green and Gold Shine Sparkle Mediums to parts of the card, using your finger.   Remove the mask.

Using a black ink pad, stamp the Christmas Script down the left edge of the base card.   Lay the clearing stencil onto the card, securing it with masking tape or Crafter's Companion 'Stick & Spray.'   Stipple the white gold Starlight paint through the design using a stencil brush.   Remove the stencil.   Repeat this once again onto spare white card but stippling the deer only.

  
Glue the blue resin strip down the edge of the coloured section of the card.   Cut out the deer and 3D it onto the original image, on top of the blue strip, using silicone glue.   Repeat once more but this time only stipple the deer and the  front and back legs only.   Cut this out and glue in position over the blue strip.

 
                                                Glue a blue bow in the top left corner.

Add a little white gold Starlight paint, using just what is left on the brush, adding it over the coloured side of the card.

Die- cut the corner, using the Crafter's Companion die, from white card.   Colour this with the yellow and light blue spray inks, adding a little of the forest green and gold shine Sparkle Mediums.     Add a line of blue Sparkle Medium at the bottom of the trees and  the legs of the deer to ground them.

          
                                             Glue the die cut to the bottom left corner.


When the light shines on the card the beautiful sheen of the white gold Starlight paint looks lovely, I have tried to capture this in the above photograph.

That's all from me for now, enjoy your week ahead,   the sun is shinning once again as I write this, how long for though, is anyone's guess lol!    Take good care of yourselves   until next time.

                                                                   Love and rainbows,

                                                                     Hugs   Jennifer xx.


Friday, 14 September 2018

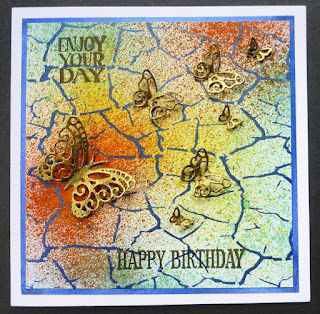
Sunburst Golden Butterflies.

Hello Lovelies,

Hoping this post finds you all well and happy.    I would just like to say 'thank you' for your visits and comments on my last post, each and everyone is appreciated by me.    I do hope my friends across the pond stay safe during the horrendous storms that are happening there at the moment.    Today I have another card to share with you which has been made using Imagination Craft's products, which can be purchased from  www.crafterscompanion.co.uk       I have used Imagination Craft's Mixed Media Spray inks,  Starlight paints, Stencil Brush and their   A4  Mixed Media Art stencil  - No. MA-18. Cracked Earth.

The greetings stamps and butterfly dies were given free with various craft magazines.


Make a square base card from white card stock.   Take a smaller piece of white card and colour  all four outer edges only  (as the rest will not be seen - waste not want not lol!  we crafters don't like to waste anything lol!!  and I am no exception ! ),  with the Hibiscus Starlight Paint and when dry, glue this to the base card.

  
Take another piece of white card, slightly smaller than the blue edged card and colour, using the yellow, orange, purple and light blue Mixed Media Spray Inks and leave to dry or dry using a heat gun.

   
Next, lay the stencil on top of the coloured card and using a stencil brush, stipple the Hibiscus Starlight Paint through the design.   Fix this to the base card.

  
Using a black ink pad, stamp 'Enjoy Your Day' in the top left corner and 'Happy Birthday to the bottom, just to the right of the centre.

  
Die-cut 1 large, 3 medium and 3 small butterflies from some black card and paint them with the Rich Gold Starlight Paint.


                            Glue the butterflies to the card front and the card is finished.


 Add a tiny amount of clear silicone glue under each wing, near to the body where it will not be seen.

    
Well, that is all from me for the moment.   Have a happy, relaxing weekend and I will be back again very soon.

                                                             Love and Rainbows,

                                                               Hugs   Jennifer xx.


Sunday, 9 September 2018

So Proud of You.

Good afternoon All,

Happy Sunday, hope you are all having a great weekend, whatever you are doing.   Today I would like to share a card with you which I made using free 'Build a scene stamp and die set, which was given free with the Cardmaking & Papercraft magazine - issue 186.   Hope you like it.


Fold a piece of A4 card in half portrait style,  cutting off a one quarter inch strip from one long edge.   Stamp the corner stamp in each corner of the base card, using a black ink pad and colour with  Marvy Le' Plume pens.

   
Die-cut a large scalloped oval using a Spellbinder's die, from navy card and glue to the card front, nearer to the top than the bottom.

Die-cut a smaller plain oval from white card and stamp the tree branch on it, using a black ink pad.   Glue this to the navy oval.


Stamp the peacock 6 times onto some spare white card and colour with the pens.   Cut out and 3D onto the branch, using silicone glue, leaving the bottom of the feathers un-stuck for now.

                           Die-cut 9 tail feathers from white card, using the die and colour.

    
                  Keep the tiny negative pieces and glue around the navy scalloped oval.

 
Fix the tail feathers under the base of the peacock using glue.     Add some silicone glue under the centre of each feather to hold in position.


Glue the bottom of the bird onto the top of the tail feathers which you left un-stuck previously.


             Stamp the greeting centrally on the bottom of the card,  using a black ink pad.

That's all for now my friends,  I'll be back soon with another project to share with you soon.

                                                               Love and rainbows,

                                                                Hugs   Jennifer xx.


Thursday, 6 September 2018

Pretty Poppies.

Hello there Friends, Followers and Visitors,

Today I have a card to share with you using a Stampendous stamp and die set,  I just love anything to do with poppies lol!   This is a fairly quick card to make, hope you like what I have done with this gorgeous stamp.


Trim away one quarter of an inch of an A4 piece of white card.   Then fold in half, portrait style.

Matt a piece of black card onto thie base card, leaving a small border of the white showing.   Next take a slightly smaller still, piece of light blue card and colour lightly with the black soot distress ink, using a blending tool.


Using the spare white card, stamp the poppies, leaves, buds and glass vase onto it, using a Versamark pad, then heat emboss with black embossing powder, do this twice.    Colour with Promarker pens, then cut out  and 3D the poppy petals, using silicone glue.

 
Cut out a small piece of Imagination Craft's 'Crackle Artz Cutz and colour with a black ink pad.   Glue this to the bottom of the blue card, giving the vase something to 'sit on.'    

Using silicone glue, fix the vase, flowers, etc., to the blue card, 3D - ing the poppy petals.   When dry, glue this card to the base card.

   
Stamp 'Hello' in the top right hand corner, using a black ink pad.   Add small amounts of lime  green
Stickles Glitter Glue to the flower centres, buds and leaves.

  
Well that's this card finished my friends, have a good weekend when it arrives.   See you all again soon.

                                                                Love and rainbows,

                                                    Happy Crafting,  Hugs   Jennifer xx.


Saturday, 1 September 2018

My 'Beauty, Nature, Harmony & Joy' 10" x 12" Canvas.

Good morning Friends, Followers and Visitors,

Hope you managed to watch our lovely Sue from Imagination Craft's last night and this morning, demonstrating her beautiful Starlight paints, the colours are just stunning....and they are on special offer on the Hochanda T.V. Channel,  order 10 and get 2 of these free!  so you are only paying for 8 !  The gorgeous stencil I used on this canvas,  unfortunately sold out on this mornings 9am. show, not sure if they can get more for the rest of today's shows at 1pm and 5pm today.   Onto my canvas, please bear with me as there are quite a few photos of the different stages.   I have tried to cut down on the text lol!


Canvas painted with a thin layer of Linen Shabby Chic Relief paste.


 Dry brushed small amounts of Passion Flower Starlight paint on top of linen.

Chocolate Relief paste spread through corner designs using the stencil.


Using stencil brush, I stippled Rich Gold,  Passion Flower and Orange Oxidized through the half circle and lines on the stencil, top right corner.   Below is a photo of the stencil used.

       
Spread the Chocolate paste over the large circle  in bottom corner of canvas.

   
Stippled Orange Oxidized Starlight paint over small circle.  Added dots of green Stickles around the circles and lines.


Stamped script in half circle using Versamark pad and heat embossed with copper embossing powder.

  
Butterflies stamped with Versamark and heat embossed with copper  and gold embossing powder, (2 of each,)

  
Painted butterflies with Starlight paints and brown pen for edges of wings.

   
Stamped Beauty, Nature, Harmony & Joy in black ink.


Spare white card painted with linen Relief Paste, then stippled Starlights through the large butterfly from the stencil onto it.    Added Chocolate paste to edges of the wings.    Cut out and glued to canvas.


Added black soot distress ink around edges of wings.

Art Cutz leaves painted with Menthol Starlight paint and glued to bottom right corner.

  
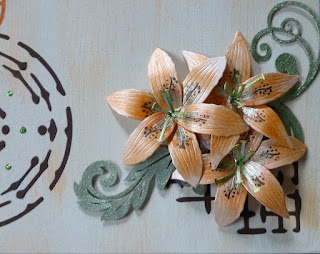
Three lilies die-cut, using the Crafter's Companion lily die and painted with Starlights, passion flower with a touch of orange oxidized.


Black soot added around edges of the canvas and that is now finished, hope you managed to stay with me to the end lol!   Please don't forget to tune in again at 1pm. and 5pm. today.

Have a wonderful weekend and I will be back again soon.

                                                                Love and rainbows,

                                                                 Hugs  Jennifer xx.