Followers

Friday, 28 August 2020

'Butterfly Trio.'

Hi there Friends, Followers and Visitors,

Thank you for visiting my blog and leaving such lovely comments.  It is so  nice to get some feedback, good or bad, thankfully, all good lol !  makes all  the effort worth while knowing others derive some pleasure from their visits and hopefully get some inspiration for their creations.   I would also like to welcome my newest Follower  Christine Kiehl,   thank you for following, I hope you enjoy your visits.

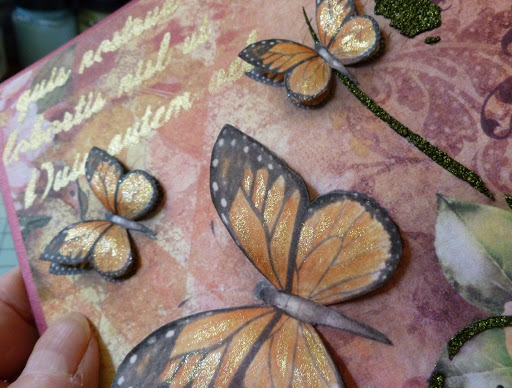
Today's card was made for Imagination Crafts, using their beautiful 'Wind in your hair' collection.   For this card I have used one of the gorgeous rice papers and the A4 'Floral cascade' stencil from the Collection, alongside Cadence Malahit textured Relief paste and Dora metallic paints.


Take a piece of white card six and three quarter inches square.   Cut out the section of rice paper you want for the background.   Matt this onto the square of white card using the Cadence decoupage glue.

Trim away any overhanging  pieces of rice paper.   Lay the broken diamond part of the 'floral cascade' stencil onto the top right of the background square and cover up the parts you don't want the paste to go onto with  the blue masking tape.   Then spread the Malahit  textured relief paste through the design, using a metal spatula.   Remove the stencil and clean it along with the spatula as they will be used once again.


 Repeat this again using a smaller part of the diamond design on the bottom left, adding the flourish also.   Remove the stencil and leave the images to dry.


When this is dry, lay the script part of the stencil onto the top left and secure with the masking tape.   Stipple the white gold metallic paint through the design, using a stencil brush.   Remove the stencil and leave to dry, shouldn't take long, as these paints dry quite quickly.


 From the second sheet of the same design rice paper, cut out the three butterflies and fix them to some spare white card, using the decoupage glue.


Cut out the butterflies.   Paint the butterflies on the background paper with watered down white gold metallic paint


Paint the three cut-out butterflies with some watered down white gold paint and gently shape their wings with your fingers.


Glue these to the original background images, adding a little silicone glue under each wing.

Matt and layer this onto a piece of wine red pearl card, cut slightly larger than the main image, leaving a small border of the red showing.

  Matt and layer this onto an 8" x 8" ivory base card and the card is finished.    Thought I would just show you a close up of the fabulous Cadence textured Relief Paste.......I love the look and feel of this! isn't it fab !   It also has a very subtle sparkle to it.   Looks great with this broken diamond design  I think and it comes in some beautiful colours too for instance - gold, silver and the gorgeous dark orchid.


That's all folks, I'll catch you again soon.   In the meanwhile, enjoy your weekend  whatever you may have planned.

                                                              Love and Rainbows,                                                                                                                                     Hugs   Jennifer xx.


Monday, 24 August 2020

'Hidden Beauty.'

Hi there Lovelies,

Hope you  all enjoyed the beautiful sunshine today,  a lovely day, not too hot and not cold, just perfect.  The Rowan berries on our  trees are red now, a sure sign Autumn is not far away.   A season I love . 

Thanks for your visits and comments on my last blog, always much appreciated.   Tonight I would like to share one   of my cards made for Imagination Craft's shows tomorrow 25th. August, on the Create & Craft T.V. Channel at 12pm.- 1.30pm.    This is a beautiful collection,   fabulous A4 stencils,  flower dies  and very pretty rice papers.   Some great Cadence  texture relief pastes and  metallic paints to purchase also, which marry up perfectly with the rice papers.


 Cut a square of cream card six and three quarter inches square.   Paint a small section of the top left corner of the cream card with the light green MDF paint.

Take the chosen rice paper and cut out  the section you wish to use,   Wet around the top left edge of the paper and gently pull away, then using the decoupage glue, fix the rice paper to the cream card, leaving the green paint showing in the top left corner.   Add a little of the light green MDF paint to  the edges of the rice paper to blend the rice paper to the card.


Lay the group of butterflies from the stencil onto the top left of the card.   Using a metal spatula, spread the Cadence Dark Orchid Texture Relief paste through the butterflies.   Remove the stencil and leave the images to dry.    I love the raised surface you get with this  texture paste as it leaves a fabulous effect., so 'touchy, feely' lol  and it has a subtle sparkle to it too.  


 Matt and layer this onto a piece of light green card, leaving a narrow border of the green showing.

Matt this onto an 8" x 8" ivory base card. 


Using the flower dies, the small and large leaf dies, cut these from cream card.

Colour the leaves with the green metallic paint and the flower petals with the Tattered rose and Dried marigold distress inks, followed by the Abandoned coral distress oxide.   Make up the flower adding a black circle for the flower centre, then glue some green seed beads to the black circle.

Glue the flower and leaves to the right hand side of the card.  Add some Imagination Diamond Sparkle and Twinkle to the edges of the flower petals and a little to her eyes.


Having done all this, I still felt a little something else was needed to balance things up, so I decided to add a little flourish from the stencil in the bottom right corner.    Lay the flourish on the bottom right and stipple the dark orchid  metallic paint through the design, using a stencil brush.   Remove the stencil and leave to dry, voila! I was now happy with the overall look of the card.


Well that's all from me for the moment, I will be back again very soon with another card made using this beautiful collection.     Please don't forget to tune in to Imagination Crafts shows tomorrow on the Create & Craft T.V. Channel, 12pm. - 1.30pm.  to see what our lovely  Mandy and the design team have made  using these great products.

Stay safe and well.   Happy crafting.

                                                                Love and rainbows,

                                                                 Hugs   Jennifer xx.

Friday, 21 August 2020

Carnation Time.

 Hi there Lovelies,

Hope everyone is safe and well,  goodness it is really windy here today.   Heavy showers of rain too,  with an odd glimpse of the sun between the showers.    A  good day for visiting my craft room I think!   My latest samples are in the post, so I must tidy up my work space ready for the next 'happy post' to arrive.   I always look forward to seeing what new products are in the box.  What am I like lol, I'm just like a little child at Christmas!!!   anyway enough of that, let's get down to today's project.

Today I'd like to share another card I made for  the Imagination Craft's shows on the Create & Craft T.V. Channel on the 18th. August, using a panel stencil 'Carnation' from the Tumbling Blossoms collection.   This is a quick card to make if time is short.


Matt and layer a square of black card cut slightly smaller than the 8"x8" ivory base card.

Take a smaller square of white card and lay the Imagination Craft's 6"x6" 'Retro Squares' stencil on the centre of the card.   Lay a large circle die onto the centre of the stencil and fix to the card using masking tape to hold it in position whilst you work on it and preventing any ink getting onto the rest of the white card.

Using a blending tool and the  distress inks:- Shabby shutters, Fired brick, Fossilized amber and Shaded lilac, colour inside the circle blending the colours together.   Remove the masking tape and the circle die.


Next lay the carnation panel stencil onto the centre of the coloured circle and stipple the black metallic paint through the design, using a stencil brush.   Remove the stencil and leave the image to dry, which doesn't take very long.


Using the large circle die, draw two circles around the design, using a black pen.   Stamp the word 'Smile' (from the Birds & Blossoms' Collection). inside the drawn circles.

Punch out 12 medium sized circles from black card and glue between the two drawn circles.    Punch out 6 small circles and glue these to the central design.   Matt and layer this onto a piece of light blue card cut slightly larger than the white card.


Punch four larger circles from black card and glue one in each corner of the white card, adding a medium sized white circle to all four black ones.

Matt and layer this onto the 8"x8" ivory base card  and the card is finished.   Thanks once again for visiting my blog, I do hope you have enjoyed your visit.   Until my next blog, take care of yourselves, be happy, healthy and stay safe.

                                                                 Love and rainbows,

                                                      Happy Crafting, Hugs   Jennifer xx.


Wednesday, 19 August 2020

'Flight of the Butterflies.'

Hello Everyone,

Hope you've had a good start to your week and you managed to tune in to Create & Craft yesterday, to see Mandy doing her fabulous demonstrations and the design team's fabulous samples.   I'm busy working on new samples for Imagination Craft's next shows, a quick turnaround lol so I'd better get my skates on lol!  not much time between shows.   Just love it when my 'happy post' arrives....can't wait to get started!

Today I'd like to share another of my sample cards made for yesterday's shows, using the Tumbling Blossoms collection.   This one used the fabulous Sparkle & Twinkle, one of my favourite products.


Matt a 7"x7" piece of wine coloured pearl card onto an 8"x8" ivory base card.take an oblong piece of white card and colour using the Cadence matt acrylic paints - Carmine, Lavender blue, Green land and Ecru and blend the colours on the card.


Next, stamp the right-hand half of the church window (from the Secret Garden stamp set) onto the coloured card using a  'Stonewash' Adirondak ink pad.


Spray the back of the butterflies panel stencil with a little of  the Cadence stencil spray and lay onto the coloured, stamped panel card.


Using a stencil brush, stipple some of the Lavender blue paint through the butterfly design, remove the stencil and leave the image to dry.


Using the paint left on the brush, rub this around the edges of the oblong card.   Take a piece of white card six and three quarter inches square and lay the Deco branch panel stencil onto the right-hand side of the white card and secure with the blue stencil tape.   Spread the Diamond Blue Sparkle & Twinkle over the stencil, using a metal spatula.   Remove the tape and stencil and leave the image to dry.


Repeat this on the left-hand side also, but remember to 'flip' the stencil over if you want them to match.    Matt  and layer this onto a slightly larger square of wine red coloured pearl card.

                                   Next matt and layer this onto the 8"x8" ivory base card.


                                                                                                                                                                       Using some white card to make some more butterflies to overlay the original stamped image, lay the stencil on the card  and spread the Diamond blue Sparkle & Twinkle through the 2 large butterflies and one tiny butterfly, the Gold through 2 smaller and one tiny butterflies and the Diamond through the 4 smaller ones - total.....10 butterflies.

                                                                                                                                                                     Cut out the butterflies and glue to the original images on the oblong piece of card.   Glue this panel onto a slightly larger piece of wine coloured pearl card.


                                                                                                                                                                                                       Glue this oblong panel to the centre of the ivory base card. 

                                                                                                                                                                                          Glue a wine/gold edged ribbon bow to the top left corner and the card is finished. 


That's all from me for the moment but I will be back again with another sample from the Tumbling Blossoms stencil collection.    Until then be safe, well and happy.   See you all again soon.

                                                              Love and Rainbows,                                                                                                                                Hugs  Jennifer xx.