Followers

Monday, 14 February 2022

'Butterfly Circle.'

Good evening Lovelies,

Thought I would share a 'sneaky peek' with you, of one of my cards made using Imagination Craft's fabulous Impression Plates and stamp set.   This show will be on the Create & Craft T.V. Channel tomorrow Tuesday 15th. Feb.  at 9am. and again  at 1.30pm.   I do hope you can tune in.  Our lovely Mandy Taylor will be showing you some great demos, hints and tips for using the impression plates.   


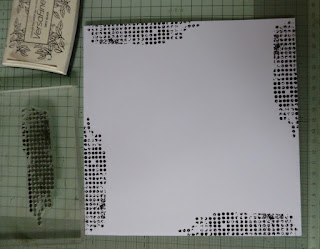
Using the broken circles texture stamp from the A4 stamp set 'Imprints.' stamp it four times around the 8"x8" white base card, using a black ink pad.


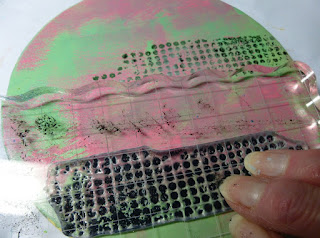
Using the 6" circle impression plate, add layers of the Safran, Lavender, Mint green and Bubblegum Cadence Premium acrylic paints to the surface of the impression plate using a brayer.


Stamp the broken circles onto the touch dry paint, using a piece of 'cut & use again foam', adding some black acrylic paint to the piece of foam, then onto the stamp, then stamping, onto the plate.   (The wavy line which can be seen in the photograph above, is my acrylic stamping block.).


 Next I stamped the smaller flower head onto the plate using a black ink pad.


Next add  a thin layer of  the Saffran acrylic paint  with a brayer.


Lay the 'Bloom' stencil on top of the paint, and using some foam add some black acrylic paint through the design.


Finally, cover this with a thin layer of the white acrylic paint and whilst the paint is still wet, place a piece of white copy paper on top of the impression plate and smooth over the paper with your hand, then slowly pull the paper from the plate and 'voila'....you have your background.


When this is dry, lay the bloom stencil onto the background paper, securing with masking tape and using either a stencil brush or a piece of the foam, rub the black paint through the design.   Remove the stencil and leave the image to dry.

Cut out the circle, slightly larger than the actual circle, then using the decoupage glue, fix this to a five and a half inch white circle, bending the excess paper to the back of the circle and glue it in position.   Matt this onto a slightly larger circle of black card and then onto the centre of the stamped 8"x8" white base card.

Using some spare white card, stamp the butterfly from the stamp set 5 times using a black ink pad and cut them out.   

Paint 4 of the butterflies with watered down Bubble gum and Mint green paint, leaving one unpainted.


Glue the black/white butterfly to the right-hand side of the circle and the other 4, spaced equally around the circle, adding a little silicone glue under each of the wings.


Add 3 lavender gemstones to the bottom of the circle.   I added some white dots to the top of the main flower, using a white pen.


Thank you so much for stopping by my blog, hope your visit may have encouraged you to have a go, using this fabulous impression plate, such fun, every background turns out differently lol.

Please tune in tomorrow morning to see Mandy's demonstrations and the fabulous samples the design team have made.   Take care and stay safe.

                                                                     Love and rainbows,

                                                                     Hugs   Jennifer xx.


Tuesday, 8 February 2022

'A Bunny Basket' Sneaky Peek.

 Good evening Lovelies,

Hoping you have all had a good day.    Thank you once again for your visits and lovely comments on my last blog post.

Tonight  I have a sneaky peek at one of my cards made for the Imagination Craft's shows on the Create & Craft T.V. Channel tomorrow,  Wednesday 9th. February, when our lovely Mandy Taylor will be showing you the adorable 'Spring Breeze' rice paper collection.    The show times are 10.30am. and 2.15pm.   I do hope you can tune in as Mandy will be doing some great demonstrations.

How adorable are these sweet little bunnies, I love them, so cute.   Matt and layer a seven and a half inch square of brown card onto an 8"x8" white base card, using double sided sticky tape.

Cut a seven and a quarter inch square of white card.   Cut out the section of the rice paper with the bunnies in the basket on it, cutting it a little larger than seven and a quarter inches.   Using the Cadence decoupage Plus glue, fix the rice paper to the seven and a quarter inch piece of card, bending the excess rice paper to the back of the card and securing it with some glue.


When this is dry, matt and layer this onto the brown matt on the base card, using double sided sticky tape and I like to add some mixed media glue to the tape, which gives me a little wriggle room, just in case I don't get it perfectly lined up straight away with the base card  lol !  (always good to have a little wriggle room lol !).

From the second sheet of the same design rice paper, cut out the rabbits  the basket of flowers and three daisies, then fix them to some spare white card, using the Cadence decoupage Plus glue.   When they are dry, cut them out, cutting away any excess white card and rice paper.


Fix these to the original images on the base card background, using silicone glue.   Cut down some of the daisy petals and shape with your fingers, then glue them to the top right corner with silicone glue.

From the third sheet of rice paper, cut out the two rabbits (heads only),  and the nearest flowers in the basket and glue them to some spare white card, using the decoupage glue.   When dry, cut them out, cutting away any excess card and rice paper.

 Glue these onto the original images on the base card using silicone glue.   Add a pink/white gingham ribbon bow to the top left of the base card.


Below are a few photos showing the dimension of the card.


Thank you for visiting my blog, I hope you have enjoyed your visit, just remember on these dull days we are having at the moment.....Spring is just around the corner !   

Please don't forget to tune in tomorrow to see the launch of this beautiful collection and the gorgeous samples the design team have made, plus of course Mandy's inspirational demonstrations.

                                                                  Love and rainbows,

                                                                   Hugs   Jennifer xx,