Followers

Sunday, 7 April 2019

Pitter Patter, April Showers.

Hi there Friends, Followers and Visitors,

I do hope you have all enjoyed your weekend and are ready for the  week ahead.   Where are these weeks disappearing too lol ?   Time seems to be going faster each year!   Thank you for your lovely comments on my last blog post, I do love to hear from you and I appreciate each and every comment and visit.   Tonight I have a card to share with you which I made in February 2019.   For this card I have used a wooden stamp which I found whilst  tidying  and sorting my stamps.   Such a sweet little image and is a stamp by Funstamps, not sure if it is still available.   I have also used a stencil from Imagination Crafts, called 'leafy spray,'  a very useful stencil.

              
Make a square base card from white cardstock.   Lay the leafy spray border stencil onto the card front and dab the two green distress inks through the design.

     
Stamp the mouse image onto some spare white card.   Colour with  distress inks, water and a paintbrush.   Stamp again, colour and then fussy cut the flower and the sleeve of the jumper from the second image.


3D the flower and sleeve onto the original image, using silicone glue.   Matt and layer the mouse image onto a slightly larger piece of blue card, then glue this to the centre of the base card.


Using a black ink pad, stamp 'Happy Birthday'  centrally to the top of the card and 'Hugs & Kisses' to the bottom of the card.


Well, this card is finished, quite a quick card to make.   Hope you like it.   Cheerio for now,  I'll be back soon with another card.   Have a good week and look after yourselves.

                                                                 Love and rainbows,

                                                                 Hugs   Jennifer xx.


Sunday, 31 March 2019

'Believe, Achieve, Succeed.'

Happy Sunday afternoon Lovelies,

Hope you are all enjoying a lovely weekend, whatever you may be doing.   We are just having a quiet one, relaxing and chilling out.   The weather is dry here but really quite chilly.

Today I have a card to share with you which I have recently made, using a great set of stamps which were given free with the February 2019 issue of the 'Making Cards' magazine.   Just couldn't resist this set, just so different, love them.   This is one of the images from the set, hope you like what I have done with it.

  
Make a square white base card and cover the front with the pink/white spotted paper.   (I used paper from my craft stash), leaving a narrow border of the white base card showing. 

Die-cut the trellis using blue cardstock and the Spellbinder's 'Fancy Lattice' die.   Glue part of this die-cut down the left hand edge of the card. 

Stamp the girl onto a spare piece of white card, using a black ink pad and colour her with the watercolour pencils.   Water down a little of the Imagination Craft's Bright Gold Starlight paint and using a paintbrush, add a thin layer of the gold on top of her brown hair, which just adds a glow to her hair.

Trim the image and matt and layer onto a slightly larger piece of blue card.   Glue this to the centre of the base card, adding 3 red coloured punched hearts to the topper.

  
Stamp 'You go girl'   and   'believe  achieve   succeed' onto some white card,  again using a black ink pad and trim the edges, then matt onto some slightly larger blue card.

  
Glue one to the top right and the other to the bottom left of the base card.

  
Add a blue ribbon bow to the top left.

       
Glue some blue sequin stars to the right half of the card and the card is now finished.


Have a good week my friends and I will be back again soon.

                                                               Love and rainbows,

                                                                Hugs   Jennifer xx.


Friday, 22 March 2019

'Anemones.'

Hello Lovelies,

First of all, I must apologise for not blogging for a while but life has been so busy recently,  I just haven't had the time lol!  ah well, I suppose it is better than getting bored lol!    anyway, I'm back again.   Hope this blog finds you all well and that you have enjoyed the odd beautiful days we have had recently.  Today the weather is back to the usual.........drizzly rain and strong winds!   Our potatoes are 'chitting' and are really ready to go into the veggie garden, only the weather has not  been dry for more than one day at a time, unfortunately,  not long enough for our small field to dry out, so Hubby can  get in there with our mini tractor to plough  the manure crop into the soil, which adds nutrients and goodness so  hopefully, when we do get them planted,  we will get some good potatoes lol!

Today I'm sharing a card I made for Sue & Harvey  of Imagination Crafts way back in January 2008.   I used their beautiful Anemone stamp which was at that time, a grey rubber stamp.   I just love this design, so pretty.

 
I began by making a landscape style card from hammered cream card.  I took some watercolour paper and spritzed it with water, then ran my brayer over the red/green end of  a Vivid inkpad, called Indian Summer., then ran that over the watercolour paper.

 
I then took some acetate, the same size as the watercolour paper and stamped the Anemones onto it, using  Timber Brown Stazon Inkpad.    This was put  on top of the coloured paper so the colours  showed  through the design.

I punched each corner of a slightly larger piece of matt gold card, using the EK Success corner punch.

  
This was then matted and layered onto a piece of dark brown card, then onto a larger piece of gold mirri card and finally onto the cream base card.  The watercoloured paper and acetate was fixed into each punched corner of the matt gold card adding a dot of glue to hold in place,  (this is hidden by the coloured watercolour paper).

I then used the corner punch to punch out a small border from some leftover coloured paper and glued this down the right-hand side of the Anemones.

 
I coloured two oval wooden shapes with the Vivid ink pad and glued some small pieces of the punched corners (from the coloured watercolour paper) and glued them onto the ovals.


I punched a small hole in the top of each oval and threaded some brown fibre through each hole, then glued them to the top left of the base card using sticky pads.

I then added a pink satin bow to the top of the brown fibre.

 
The card is finished.   It seems so long ago that I made this card !  I am so pleased I kept a note of the products used and the technique back then, makes life much easier now lol!   as it was from quite a few years ago and the memory is not always as sharp as it used to be lol!    I do hope you like my 'blast from the past.'

 
Take good care of yourselves until my next blog post and I hope the sun shines on you all, wherever you may be.

                                                             Love and rainbows.


                                                              Hugs   Jennifer  xx.


Thursday, 7 March 2019

'Maggie's Birthday Surprise.'

Good evening Followers, Friends and Visitors,

Hope all is well with you today.  Sending  (((Hugs))) if you are feeling under the weather for whatever reason and hope things improve for you soon.

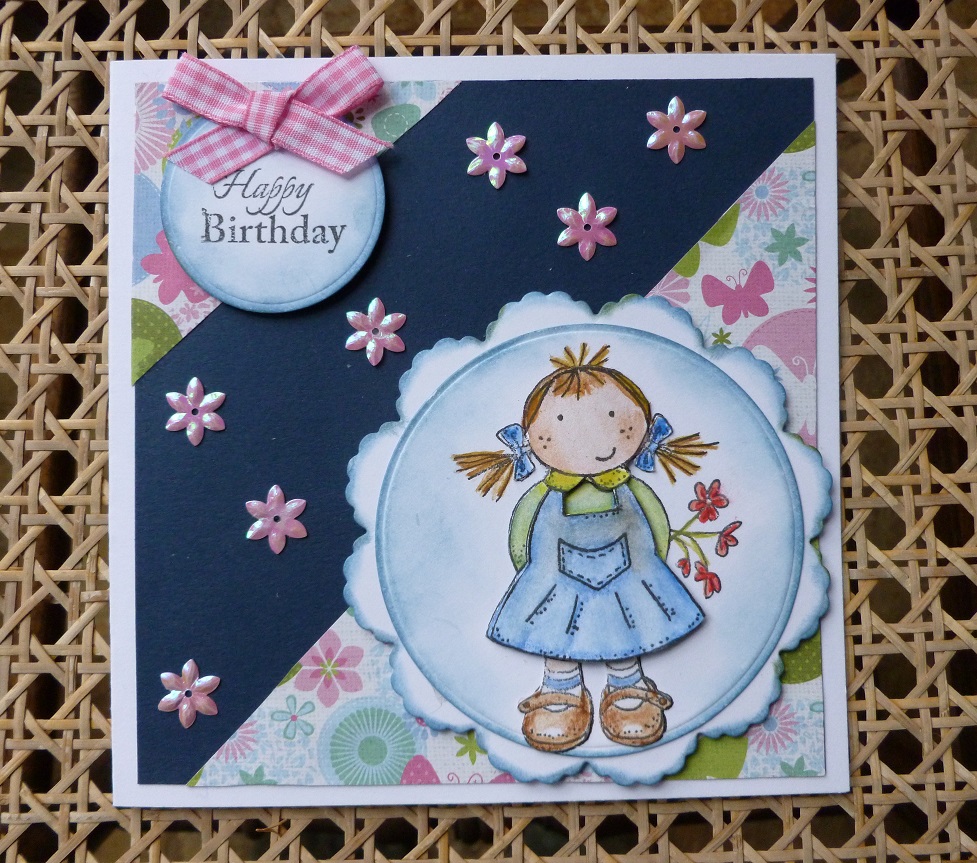
I would like to welcome my newest follower -  Kelly   I do hope you enjoy your visits to my blog and thanks for following me.   Today I would like to share a card with you I made in January this year.   I just had to use this stamp once again, as she is so cute!    This is a Sugar Nellie stamp and is called 'Maggie with flowers.'    I think this dates back to about 2007 if my memory serves me right lol!   Not sure if it is still available?

      
Make a square base card from white cardstock.   Matt and layer a smaller square of navy card onto the base card.   Cut out two triangles, one smaller than the other, from the patterned paper.   Glue the smaller one to the top left and the larger one to the bottom right corner.   (I used patterned paper called 'floral papers' by Jennifer Ellory, which was given free with the Quick Cards Magazine some time ago.)

  
Die-cut a small circle from white card and colour around the edges  with faded jeans Distress Ink.   Stamp 'Happy Birthday' in the centre of the circle, using a black ink pad.   Glue this to the top left corner using sticky foam pads.   Add a pink gingham ribbon bow .

 
Die-cut a scalloped circle and colour the edges with the faded jeans Distress Ink.   Die-cut a smaller plain circle from white card and stamp Maggie in the centre, using black ink once again.   Glue this circle to the scalloped circle, having coloured the edges first as on previous circle.

  
Stamp Maggie once again onto a spare piece of white card, colour her with the watercolour pencils and water, then cut her out and 3D onto the original stamped image on the small circle, using silicone glue.

  
Fix the scalloped circle in the bottom right corner using sticky foam pads.

  
Glue the pink flower sequins onto the navy card and voila!  the card is finished.   Hope you like it.


Well that's all from me for the moment, catch you all again soon.    Take care of yourselves.

                                                                 Love &  Rainbows,

                                                                   Hugs   Jennifer xx.


Wednesday, 27 February 2019

'Today's Little Moments.'

Good afternoon Lovelies,

How are you all,  well I hope.   What a beautiful day it has  been!    Thank you for all your visits and comments on my last blog.   Today I have a card which I made in October 2018.

    
Make a square white base card.   Cut a slightly smaller square of white card  and die-cut the top left and bottom right corners, using the Tim Holtz die.   Put a light layer of Imagination Craft's gold Starlight paint over the die cuts and around the edges.

Colour another square the same size as the die-cut card, using the broken china and spiced marmalade Distress Oxides.   When dry add a little gold gilt spray.   Glue this to the back of the card, so the colours show through the die-cuts, then glue this to the base card.

Stamp the sentiment onto the centre of the die-cut card, using a black ink pad.

   
Using a black pen, add some dots around the edges of the die-cuts.  


Stamp seven leaves onto some spare white card using a black ink pad   and colour with the distress oxides and gold gilt spray,    Cut out and shape the leaves, then glue three to the top right and


four to the bottom left, using silicone glue.

    
Stamp Tempus Fugit  in black onto white card, trim edges and glue to the top left using silicone glue.


Stamp the pocket watch onto white card and cut out.   Colour a small piece of white card with the rich gold paint, then stamp the watch again.   Cut out the watch, cutting the winder and the outer case only, then glue this to the first stamped  image, so the watch face is white and the case and winder are gold.


Glue this in the bottom right corner using silicone glue.   Add three topaz gemstones under the word 'become.'   That is this card finished.   Below shows the card at an angle so the 3D effect can be seen.


Well that's all from me for the moment,  hope you like it.   Take care of yourselves and enjoy the unusual sunny weather whilst it lasts lol!

                                                                  Love and rainbows,

                                                                    Hugs   Jennifer xx.


Tuesday, 19 February 2019

Fuschia Flower, Damask Card.

Hello Lovelies,

Hope this post finds you all well.   Apologies for not blogging recently but many other things to do lol!  but I'm back again!      There is a touch of Spring in the air just now I feel, although there is a chilly wind.   Lovely to hear the birds singing and the pretty little snowdrops are flowering profusely, always a herald that Spring is not too far away.   This afternoon I have a card for you which I made in October 2018.   I have used one of Imagination Craft's beautiful flower background stamps, their Damask stencil which is so useful and I have just used the corner of the design and the gorgeous, most used, of all my Starlight paints....White/Gold.      


 Make a square base card from hammered cream card.   Matt and layer a smaller square of black card onto the base card.   Cut a slightly smaller square of white card and colour using the  Imagination Craft's  Fuschia and Dark Brown Spray Inks.

 
When dry, lay the corner design of the Damask stencil onto the top right corner and stipple the white/gold paint through the design, using a stencil brush.   Lift off the stencil and repeat this on the bottom left corner.

   
Make two paper masks to cover each stencilled corner, then stamp the flower background stamp in the top left corner, using a black inkpad.   Using the same stamp, repeat this in the bottom right corner, joining up the flower dots with the previous flower dots.

   Using the left over coloured card, stipple parts of the stencil onto it, using the white/gold Starlight paint and a stencil brush.   From this, die-cut the flowers using Tim Holtz Alterations Decorative strip.   3D the flowers using silicone glue under some of the petals to add a little dimension to the flowers.   Glue the large flower in the centre of the larger upper stamped square,


 and the smaller flower in the centre of the smaller square.


Glue a black gemstone to the centre of each flower.   Using a small circle punch, punch out 15 tiny circles from the fuschia and gold left over card.   Glue these in position as per the photograph below and the top left corner as shown on main photo at the top of this page.

 
Finally glue this card onto the base card and the card is finished.

 
Hope you like it.   Thank you for taking the time to visit and comment on my blog,  much appreciated.   Take care of yourselves.   Cheerio for now, see you all again quite soon.   Hopefully not quite so long next time lol!!!

                                                                      Love and rainbows.

                                                                       Hugs   Jennifer xx.


Tuesday, 5 February 2019

Valentine Hamish Card.

Good evening Lovelies,

It is time again for me to share one of my cards with you all but before I do that, I would like to thank you all for your comments and visits to my last blog post, they mean a lot.   I know time is precious, so I really appreciate them even more so.   Hope this finds you all well.    O.k. onto to tonight's card.

This was made using another Sugar Nellie (Adoption Certificate) stamp I found a few weeks ago, whilst tidying up in my craftroom.   I know I said it was time to go back to more classic stamps but, I couldn't resist little 'Hamish' lol !!!   Well, here he is with some Valentines Day Flowers and a present.   The stamp is actually called 'birthday Hamish' but I thought he was just perfect for Valentine's Day !

    
Make a square base card from white cardstock.   Matt a smaller square of wine red and white heart paper onto it.   (The patterned paper 'Country Life' was given free with a craft magazine some time ago and is by Docrafts).

Die-cut two 'Wonky Squares' from white card and using the largest wonky square die, die-cut one square  from wine red card.   Using the largest die, draw around the outside edge of the die to make a slightly larger square, also from the wine red cardstock.   Cut this out.

   
Stamp 'Hamish' onto the smaller white square using a black ink pad.   Matt this onto wine coloured square.   Colour Hamish using the distress inks and water - Mowed lawn, Ripe persimmon,  Dried marigold, Scattered straw, Frayed burlap and Stormy sky.   Matt this onto the larger of the two white squares, then matt onto the larger wine red square.

Stamp Hamish three times onto some spare white card, using a black ink pad.   Colour with the distress inks and water, then cut out and 3D onto the original image, using silicone glue or sticky foam pads.


Put a small piece of wine card into the 'dots' embossing folder and emboss.   Rub a small amount of Imagination Craft's Gold Alchemy Wax over the surface of the dots.   From this, punch out two small

 
hearts and glue one to the top right and bottom left of Hamish.   3D  two of the small flowers in his bunch of flowers.

   
Die-cut four leaves and colour with the Jade Starlight paint.   Glue two paper flowers and the leaves to the bottom right corner of the base card.

  
Well there we have it my Lovelies, the card is finished.   Although this image is a 'birthday' image - (birthday Hamish' lol)  it is perfect for those Valentine cards.     Valentine's Day is not too far away lol!     Hope you like him.

Take good care of yourselves and I will be back soon with another card.

                                                           Love and Rainbows,

                                                            Hugs    Jennifer xx.