Followers

Sunday, 22 May 2022

'You Make My Heart Sing.'

 Hi there Lovelies,

Hope this post finds you all well and  that you are enjoying your weekend.    Another week about to begin, we seem to be galloping through the year so far lol!    I have another card to share with you, I do hope you like it, I just love the sentiment - 'You Make My Heart Sing.'   This stamp is a Woodware stamp I purchased a few years ago now and the Deco Frame die-cut is another favourite in my craft stash and is by Tonic  called 'Ivy.'    Unfortunately the sheen from the gold wax on the die cut,  does not show up on the main photo.     Time to get started on the card lol !

Make a white base card approximately five and three quarter inches x six inches, portrait style.   Cut another piece of white card just slightly smaller than the base card.   Colour this piece of card using the Fired Brick, Wild honey, Crushed olive, & Weathered wood, using a blending tool.


After die-cutting some flowers for a previous creation, I used the  left-over negative  piece of card as a stencil.   Lay the negative on the coloured piece of card and using a blending tool, lightly rub some fired brick through the flowers, don't try to make them perfect, just 'misty' like.


 Remove the negative.   Edge all four edges of this card with a black marker pen.


Matt and layer this onto the white base card.


Die-cut the 'Ivy' frame from white card and a one from black card.   Colour the white frame using  some gold wax ' and a blending tool or piece of cut 'n' dry foam.   Before fixing the frame to the card, lay it on the card so you can see where to stamp the sentiment so it will be in the centre of the frame.   Stamp the sentiment using a black ink pad.

Lay the gold frame on top of the black frame and just off-set it slightly, so there is a tiny bit of the black showing,  creating a 'shadow' effect.   Then glue them together.   Fix this onto the base card.

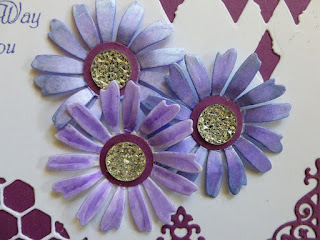
Stamp out five flower heads and six leaves onto white card,   colour them with the Distress inks and some water and cut them out.   Add some gold pen to the flower centres.

Glue the flowers and leaves to the base card, using silicone glue.   Stamp 'Happy Birthday' onto a piece of white card using a  black ink pad.   Trim the edges and add some black pen around all four edges.   Fix this to the frame using sticky foam pads.


Well that is this card finished, hope you're still with me lol !   if you are well done !   I do like to show photos of my stages, fortunately there is not a lot of reading to be done.   Thanks so much for stopping by my blog, I will catch you all again soon.   Take good care of yourselves and Happy Crafting.

                                                                 Love and Rainbows,

                                                                  Hugs  Jennifer xx.

Tuesday, 10 May 2022

Hello, Happy Birthday.

Good afternoon Lovelies,

How are you all, well I hope.   As I haven't posted any blogs for a while, I thought it was about time I did lol !!   so today I would like to share  a birthday card with you.    As the recipient will have received her card by now,  it is ok to share it with you.   I have used products I have had in my craft stash for many years, for example - silver peel offs, I used to use them often plus some decoupage papers which were hidden in the bottom of a draw.   If I remember correctly, the flower stem is a Lavinia stamp again, from some time ago and was given free in a set, with a Craft magazine.  Well, enough chit chat, time to share the card.


Fold a sheet of white A4 card in half portrait style, then trim away the excess card to make a square base card,  measuring approximately 6 inches square.   

Using the Versamark 'water mark' pad, stamp a stem of flowers down each edge of the white base card.   Add some silver embossing poweder and shake off the excess powder, then heat emboss it, using a heat gun.


 Fix a silver corner peel off into each corner of the card, between each flower stem.

From the decoupage paper cut out two rectangles of the same pansy head.   Glue one of the rectangles to a piece of lavender card, larger than the decoupage paper.   Next edge the paper with some silver peel off  border.   Cut out the pansy only from the second piece of decoupage paper and glue it onto the original pansy head, using silicone glue.   Matt this onto a piece of patterned silver card, slightly larger than the lavender card and then onto  a piece of black card,  leaving a small border of the black showing.  Using a black ink pad stamp the word 'Hello' on the left side of the base card, checking that the rectangle, when glued on.  will be in the centre of the card, just below the top flower stem.   Stamp 'Happy Birthday' towards the top of the bottom flower stem, using black ink, then glue the rectangle in position.


Glue four lavender gemstones to the card front and add a tiny silver heart peel off just above the pansy.


Below are a couple of photos taken at an angle.


Well that's all from me for the moment, thank you so much for stopping by my blog.   Hopefully it won't be quite so long next time when I post another card.   In the meantime, take good care of yourselves and enjoy the rest of the week.

                                                                  Love and rainbows,

                                                                    Hugs  Jennifer xx.


Friday, 15 April 2022

'Angels Like You.'

Hi there Lovelies,

Wishing you a Very Happy Easter.   I do hope you are all safe and well.   Thank you for visiting my blog, I hope you enjoy your visit.

Whilst I was going through my boxes of stamps looking for a particular stamp,  I came across this angel stamp, which must have been amongst the first stamps I ever purchased so........of course I just had to use it again  lol!   I also remembered that I had a sentiment stamp which would be the perfect accompaniment to the angel stamp.   The angel stamp is by 'Anita'  and the sentiment stamp is by 'Only Words.'   they are both wooden backed rubber stamps.   (not sure if they are still available now.)    Some of you may possibly have these stamps in your craft stash.   I just love this angel and with the added sentiment of 'Thank you,' it would make a lovely card to send to someone who has been very kind and helpful to you.


Take an A4 piece of white card and trim half an inch from one of the long sides and fold in half portrait style, making a base card on which to work.

Take one of the sheets of the Lavinia SceneScapes cards from the packet and trim this down to five inches by five and a quarter inches.   Using a black pen, run it around all four edges of this piece of card. making a narrow black border which will show up  when it is fixed to the main white base card.


Stamp the angel onto the left-hand side of the background card, using a black ink pad. 


  Fix this card to the top half of the white base card.   Punch out a variety of different sized stars from some gold mirror card and glue them around the angel.   Stamp the angel three times onto some spare white card, using black ink.   Colour them with the T.H. Distress inks, I used Walnut Stain for her hair,  Fired Brick and  Wild Honey for her wings,  Tumbled Glass and Weathered Wood for her dress, Peeled Paint and Crushed Olive for her sleeveless jacket and for her skin,  I used well watered down Fired Brick.   Cut them out and glue one whole angel flat onto the original stamped image on the background card.    Next 3D the others onto the whole angel using sticky foam pads.


Using some spare white card, stamp the sentiment - 'Angels like you'.....onto it using a black ink pad.   Trim around the sentiment and edge with a black pen, as previously.   Fix this centrally at the bottom of the white base card using sticky foam pads, adding a large gold star to each side of the sentiment.


Stamp the 'Many Thanks' sentiment onto some white card in black ink, cut out and glue to the right-hand side, adding a small coloured heart (left over after cutting out the angels.)

 Below are a couple of photos taken at an angle to show the dimension of the card.   The above sentiment stamp was given free with a craft magazine some time ago - apologies I cannot remember which magazine...sorry.


That's all from me for the moment, thank you for stopping by my blog.   I will be back again soon with another card to share with you.   Take care of yourselves and have a lovely Easter weekend.

                                                                       Love and Hugs

                                                                        Jennifer xx.


Tuesday, 1 March 2022

'A Little Bit of Sparkle.'

 Good afternoon Lovelies,

I thought it was about time I shared  another card with you all.   Hope you are all well and safe.   The weather seems to be improving and Spring is just around the corner, the sun is shinning  and the birds are singing as I write this post,  I feel Spring is in the air lol!   I do hope so as we could all do with some sunshine in our lives at the moment.

I was tidying up my box of dies a few days ago  and came across a few dies which haven't seen the light of day for many a year !  so I decided to have a little play with them and this is what I made.   I also used one of the first stamps I ever purchased many years ago - the fairy text which if I remember rightly was a Clarity stamp I think.

 Matt and layer a piece of deep lavender card five and three quarter inches square onto a 7"x7" white base card.

Cut another square of white card just slightly smaller than the first matt and using the Sizzix large corner dies, die-cut the diamond design on the top right corner and then the honeycomb design on the bottom left corner.  


Matt this card onto the deep lavender matt.   Using the fairy text stamp and the Vibrant Violet Stazon ink pad, stamp the text onto the front of the card.   Apologies for the shadows on the photos below as the sun was streaming through my craftroom windows, which was lovely but did create shadows.


Die-cut two of each of the small Tattered Lace corner dies from the deep lavender card.    I have had these  dies for a very long time too and they have been used a great deal over the years.  


Glue two small corner dies to the top left and two to the bottom right corners.


 Using the Spellbinder's flower die, cut out three flowers from white card.   Paint these with the Royal Orchid and Sweet Thistle Twinkling H2O's paints and the Harebell Cosmic Shimmer  paint.   


Using the Woodware  small circle punch, punch out three circles from the deep lavender card.   Glue a clear gemstone onto the centre of each circle and then glue these to the centre of each flower.


Glue these flowers to the front of the base card and the card is finished.   This is an easy, quick card to make.   Hope you like it.


Thank you for stopping by my blog and for your lovely comments and visits to my previous blog posts, I really appreciate them all.    Take care of yourselves.    I will be back again quite soon.

                                                                   Love and rainbows, 

                                                                   Hugs   Jennifer xx.