Good evening Followers, Friends and Visitors,
Hope you've all enjoyed your weekend and remembered to put your clocks back one hour last night. That extra hour in bed was appreciated this morning, not sure I like the darker evenings though lol!! ah well, can't have it all ways lol ! at least it is nice to have the glow of the log fire, all snug and warm and the curtains closed. No need to feel guilty about not doing outside work ! couldn't see anyway lol !!
Tonight I have a card to share with you which I made for Sue and Harvey of Imagination Crafts in March 2012. I used their 'Leaf Spray' stencil and some 'Black Stars' Sparkle Medium for this card.
Make a 6"x6" square card, using black card stock. Matt a square of pink card onto the black, cut slightly smaller than the black.
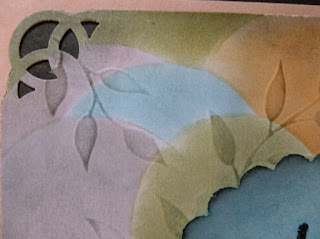
Take a square of white paper, enough to fit on top of the pinks card, leaving a small border of the pink showing. Take the leaf spray stencil and the paper and put through an embossing machine to emboss it. Take a smaller piece of white card and punch a 2" circle from it. Put the circle aside for another project and use the negative. Punch out a further 3 or 4 circles from paper to use as masks.
Begin by colouring the circle through the punched out hole (the negative) using any colour of Distress ink you wish. Remove the negative and cover over the circle you have just coloured, with one of the punched out masks, then colour another circle, overlapping the first circle. Continue in this manner until the whole piece of paper is covered with coloured circles. When dry, gently rub over the leaf stems with the Black Soot Distress ink pad, to give a little depth to the design.
Punch all 4 corners with the 'Rings' corner punch by Martha Stewart. Add some black card to the backs of the punched corners. Wrap some pink ribbon across the front of the circles paper, then fix to the base card.
Using the Spellbinder's 'Ironworks' border die and black card, de-cut the border and glue this below the pink ribbon. Punch out a scalloped circle from white card and colour it with a blue Distress ink and rub black soot ink around the scalloped edges.
Lay the 'Butterflies & Daisies' stencil over the scalloped circle, placing one of the butterflies in the centre of the circle and spread the Black Stars Sparkle Medium over the butterfly, using the metal spatula and leave to dry.
Spread some black stars Sparkle Medium through the same butterfly on the stencil, onto a piece of acetate. Remove the stencil and leave to dry. Cut out and glue the acetate butterfly onto the original image. Fix the circle on top of the pink ribbon, using sticky foam pads.
Add a pink ribbon bow to the right side of the scalloped circle and 3 pink gems to the bottom left of the circle. That is this card completed. I was really pleased with the results, the negative circle worked quite well I thought.
Have a good week, take good care of yourselves and I will be back again soon with another creation.
love and rainbows,
Crafty hugs to you all.
Jennifer xx.


A great design and details,this is gorgeous.xxx
ReplyDeleteHi there Doreen, thank you so much for stopping by and leaving a comment. Much appreciated.
DeleteHugs Jennifer xx.
Gorgeous card and love the colours.
ReplyDeleteHugs
Linda xxx
Thank you very much for your nice comment Linda.
DeleteHugs Jennifer xx.