Followers

Thursday, 28 November 2019

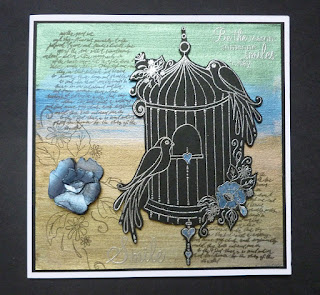
'Birds in a Silver Cage.

Good afternoon Lovelies,

How are you all, well I hope, if not here's a (((Hug))) for you and I hope you feel better very soon.   Thank you for visiting my last blog post, hope you enjoyed your visit.

Apologies for not blogging for a while but life seems so busy at this time of year, not sure where the days have disappeared too lol!   This afternoon I would like to share a card with you that I made for The Sue Baker Presents Shows on the Create & Craft T.V. Channel in August this year.   This is made using the beautiful Birds & Blossoms Collection, just love these stamps,  right up my street lol!

    
Cut a six and a half inch square from some black cardstock.   Paint across the card using stripes of the Green-blue,  Blue-rose, Gold-rose and the Aqua-gold metallic paints, blending one into the other as you work down the card.

     
When dry, stamp the text stamp in the top left and bottom right corners, using a black inkpad.   Stamp the flower flourish in black ink, just off the edge of the card, in the bottom left corner.

Take a  square of black  card,  (which is slightly smaller than the 7"x7" white base card ) and matt it onto the base card.

       
Matt the painted, stamped card onto the base card, then stamp the 'Be the reason...' in the top right corner, using the Versamark pad and heat emboss with silver embossing powder.   Stamp the word 'Smile' on the bottom of the painted card with Versamark and heat emboss with silver powder.

Take another piece of black card and using the Versamark pad, stamp the birdcage and birds onto it.   Heat emboss this with some silver embossing powder.   Carefully trim around the image of the birdcage but not right up to the silver embossing, or it may chip away.  


Fix this to the base card using some sticky fixers to give some dimension to the card design.

Paint a piece of black card with the Blue-rose metallic paint and when dry, stamp the flower from the flourish stamp 6 more times using a black inkpad.   (only 4 pieces showing in the photo).    Cut out and 3D the flower, then glue to the original stamped image on the base card.


That is this card finished my friends, quite a quick and easy card to make.   Hope you like it.   Enjoy the rest of your day.   I will be back as soon as time allows lol!   Take care of yourselves until then.


                                                                Love & Rainbows,

                                                                  Hugs Jennifer xx.


Sunday, 17 November 2019

'Winter Beauty.'

Good evening Lovelies,

Hope you have all enjoyed your weekend.   We've had a quiet, relaxed one.   I have been making samples for the next Sue Baker Presents shows.   The newest collection is just gorgeous and I am having so much fun with it.   I know I always say this  but this collection is no exception lol!   Sorry but my lips are sealed at the moment but take it  from me, it IS gorgeous!   I'm not sure of the date of the show yet but, rest assured I will let you all know, as soon as I know.   Well, onto my card  for tonight.   This was made for the Sue Baker Presents shows on the  Create & Craft  T.V. shows in June this year, in which the 'Snow Queen Collection' was featured, another stunning collection.


Matt a square of black card onto a 7" x 7" white base card, leaving a small border of the white showing.

Cut a slightly smaller square of white linen card and colour by painting with the Mediterranean Sky, silver  and the Amethyst Starlight paints, blending the colours together.


 When this is dry, matt it onto the black matt on the white base card.

   
Cut 4 x 3 inch squares from some  white linen card.


Using the stamps from the collection, stamp an image onto each square, making one of the squares a sentiment,  using a black inkpad.   Matt each square onto a slightly larger piece of black card.

   
Glue these squares to the painted matt. on the base card, evenly spaced.   

Colour a smaller piece of the white linen card using the Mediterranean Sky and Jade paints.   Stamp the  butterfly onto it, using a black inkpad.   Trim around the butterfly, gently shape the wings with your fingers and glue to the centre of the 4 squares.

        
Glue some single strips of lavender diamond wrap between the squares.     

Using silicone glue, add a 'blob'  under each wing to lift them up a little.   Glue some diamond wrap to the body of the butterfly.

    
From the left-over coloured card, cut out, or punch 2 small squares, then cut each square across the centre, corner to corner, making 4 triangles.   Glue one in each corner of the squares as shown.


Thank you  so much for your kind comments and your many visits to my last blog, each and every one is appreciated.   I hope you enjoyed your visit.   Please leave me a comment I do love to hear your thoughts on my creations.    Take care of yourselves, have a good week and I will be back as soon as time permits lol! ...........more samples to make.

                                                                  Love and rainbows,

                                                                  Hugs   Jennifer xx.


Friday, 8 November 2019

'A Bird of Colour.'

Hi there Lovelies, hope you are well, safe and warm after all the rain we have had over the last few days.   Thank you for visiting  my last blog post and for  your lovely  comments.   Today I have a card to share with you which I made for the Sue Baker Presents  programmes on the Create & Craft T.V. Channel back in July 2019.


Take a sheet of  paper from a watercolour  pad and cut to a five and three quarter inch square (including the punched edge).   Using a black inkpad ( I used a black Versafine pad) or you could use a Stazon pad, so the ink does not bleed when water is added.

Stamp the flower stem on the left-hand side and again on the right-hand side of the watercolour paper.      Stamp the single bird from the collection in the middle, adding the leaf and bud,  so it looks as though the bird is perched on the stem.

    
 Hand draw a black line between the flower stem on the left, across to the bird, using a pen.

 Add the colours from the Marvey le Plume felt tipped coloured pens  onto a glass worktop or acrylic block and add some water to the colours.    Paint the images with with a paintbrush and the watered down inks from the pens.


Stamp the word 'Happiness' to the bottom left corner using a black inkpad.

   
Stamp the hanging hearts  at the top right of the card using a black inkpad.

   
Add very diluted pen ink to the background to take away the starkness of the watercolour paper, using a little of all the six pen  colours.


When dry, matt this onto a slightly larger piece of black card.

   
Matt this onto a slightly larger piece of turquoise blue card, then finally onto a 7" x 7" white base card.

   
Glue a turquoise blue ribbon bow to the top tight of the card and the card is finished.

  
Thanks for stopping by my blog, much appreciated and I hope you have enjoyed your visit.   Stay safe during this very wet weather.   I'll be back soon with another creation to share with you.

                                                               Love and rainbows,

                                                               Hugs   Jennifer xx.