Followers

Monday, 30 November 2020

'Mardi Gras' card from Imagination Craft's 'Masquerade' Collection.

 Good evening Lovelies,

Hope you are all well.   Thank you so much for your lovely comments and visits to my last blog post, they mean a great deal to me and are what keeps me making more, so thank you again.

Tonight I have another card, made using the fabulous rice papers from Imagination Craft's 'Masquerade' collection, hope you like this one.


 Cover a 7" square of white card with the rice paper using the decoupage glue.

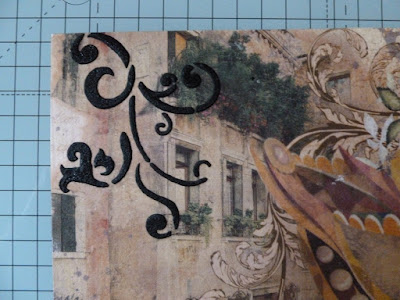
Lay the flourish design from the stencil onto the top left corner and spread thee black structure paste through the design, using a metal spatula.    Use either the blue masking tape as I have done or the Cadence stencil spray to secure the stencil to the card, whilst applying the structure paste.   Remove the stencil and leave the image to dry.


From the second piece of rice paper of the same design, cut out the section of the mask and glue this to a piece of white card, using the decoupage glue.   Whilst this is drying, lay the stencil back onto the 7" square background card, positioning the word 'Mardi'  over the bottom set of windows on the background and spread black structure paste through the word.    Remove the stencil and leave to dry.


Next reposition the word 'Mardi' over the original image and stipple the Cadence  rich gold, wine and vivid green  metallic paints over the top of the black structure paste using a stencil brush.


Take a square of black card slightly bigger than the background card and lay the background card on top and using the word 'Gras' from the stencil, judge where the 'Gras' should be positioned in the bottom left corner of the black card.   Tape the stencil in position and remove the background for the moment.   Using the stencil brush, stipple the three metallic paints through the stencil.  Remove stencil and leave to dry.   (I did not use the structure paste this time, just the metallic paints.)


Fix this black card to an 8" x 8" ivory base card.

Matt the background card onto the black matt, leaving the word 'Gras' showing in the bottom left.


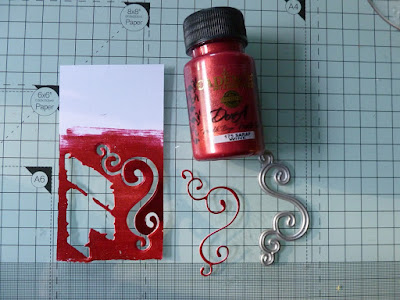
Die-cut the large flourish and the small feather from black card and colour with the Cadence rich gold finger wax, not necessary to cover them completely, as a little black showing in the odd place gives an aged look to them.


Next colour a piece of white card with a mixture of the Cadence wine and champagne metallic paints


Cut out a circle, then cut round and round the inside of the circle, creating a spiral.   Roll this up using a quilling tool or your fingers and add some glue to stop it unwinding again.


   Glue the rose to the bottom left corner.


Glue the feather to the left side and the flourish to the bottom right.


Trim around the mask which was glued to white card and using sticky foam pads, fix to the original image on the background..


Well that's this card finished, hope you like it.   I'll be back again soon with another card.  In the meantime, be kind, be safe and keep well everyone.

                                                                      Love and rainbows,

                                                                      Hugs   Jennifer xx.


Wednesday, 25 November 2020

'Through the Looking Glass' - A Sneaky Peek from the Masquerade Collection.

Hello  Lovelies,

It is time again for a sneaky peek at one of my sample cards, made for the Imagination Craft's show on the Create & Craft T.V.  Channel on Thursday 26th November 2020 at 12 noon and 12.45pm.   This is another beautiful collection, called 'Masquerade.'      A collection of gorgeous rice papers, stencils and dies, alongside some beautiful Cadence paints and finger waxes.   


Cut out the section of rice paper with the mirror and mask on it and using Cadence fabric decoupage glue, glue the rice paper to a square of white card and leave to dry.


From the second sheet of rice paper of the same design, cut out the mirror and the mask only.   Fix this to a spare piece of white card, using the fabric decoupage glue as previously.


When this is dry, trim around the design, cutting away any excess white card and cut out the eye shapes.    Fix this to the original image using sticky foam pads with a touch of  mixed media glue to make sure it is securely stuck down.    Then glue this to the 8"x 8" ivory base card.

Colour a small piece of white card with the Cadence Dora  Wine Metallic paint and when dry, die-cut the 'broken diamonds' and the 'large flourish' from it, using the dies from the collection.   


Glue the flourish to the top right of the base card and the broken diamonds to the bottom left.


Glue some gold seed beads to the mask front and the card is finished.   I do hope you like it.   Thank you for visiting my blog and I hope you have enjoyed your visit.


Please don't forget to tune in to the Create & Craft T.V Channel on Thursday 26th. November 2020, at 12 noon and 12.45pm  to see our lovely Mandy launching this fabulous new collection.    Take care all and stay safe.   Catch you all again soon with another card from this collection.

                                                                 Love and Rainbows,

                                                                  Hugs   Jennifer xx.


Saturday, 14 November 2020

Petal Tag.

Hello Lovelies, 

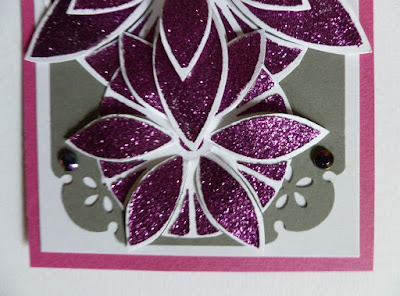
Hope you are all staying safe and well and are coping during this challenging time for us all.   Today I would like to share a tag I made in April 2016 using an Imagination Craft's stencil called 'Large Petal Tile,' and the smaller' Open Petal' stencil.    I do hope you like what I have created using these stencils in a different way.   I have to say I was quite pleased with the way it turned out.   I did make a similar tag some time ago using a different colourway.   When making this tag I didn't take any stage photos, sorry!  but I did take  close-ups at various angles.


Below is a photograph of the 'Large Petal Tile' stencil and the small open petal stencil.   I looked at them and thought to myself....how can I use these in a different way ?   and the photo above is the outcome.


(1)   Make a large tag shape from some cerise card.

(2)   Make a smaller tag shape from white card and matt onto the cerise tag shape.

(3)   Cut a smaller rectangle from grey card and punch all four corners, with the Woodware corner    punch,   Matt this onto the white tag.

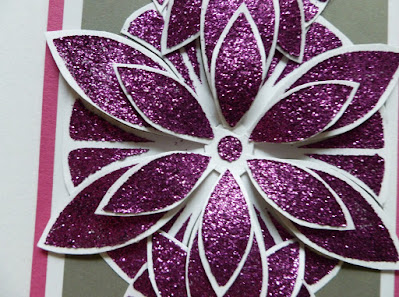
(4)   Take a piece of white card and lay the Large petal tile stencil onto it, then spread the Old Rose Sparkle Medium (now known as Sparkle & Twinkle), over the flower only, using a metal spatula.

(5)   Take the small open petal stencil and repeat the above a total of three times.   Remove the stencil and leave the images to dry.

(6)   When dry, cut out the large flower, carefully cutting each petal nearly down to the centre but not quite.   Glue this to the grey matt but do not glue down the petals.   Glue the centre and the remaining parts, after cutting down the petals only.


 (7)   Repeat the above with the other 3 smaller flowers (but cutting away the extra parts on one flower only, so only the petals and the centre are still in tact).   This flower is to be glued to the centre of the large flower.   Glue these, one at the top.........


and  one at the bottom of the large central flower, under the large petals.


(8)   Add silicone glue under each petal of all the flowers.


(9)   Glue an iridescent gem to each corner of the grey matt.


 Punch a hole in the centre top of the tag and thread some silver ribbon through the hole and tie.


Using some cerise card to match the tag, make a simple stand and secure to the back of the tag, so the tag can be stood up if desired and that is the tag finished.


Thank you once again for taking the time to visit my blog, hope you have enjoyed your visit.   Stay safe and well my Lovelies.   I will catch you all again soon.

                                                                    Love and rainbows,

                                                                    Hugs   Jennifer xx


Thursday, 5 November 2020

'Bluebird of Happiness.'

Hello Everyone,

I have another card to share with you all tonight.   This was made for one of the Imagination Craft's shows on the Create & Craft T.V. Channel in 2019.   I used one of the beautiful stamp sets from the 'Birds and Blossoms' collection, plus  Cadence finger waxes and metallic paints and spray inks.  

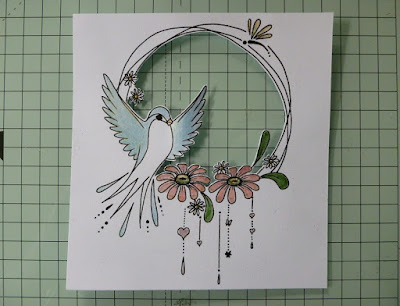
Take a piece of white card approximately five and a quarter inches by five and a half inches and stamp the main image in the centre, using a black Versafine pad and whilst still wet, add some black embossing powder and heat emboss.

Carefully cut away the centre of the circle, cutting around the bird and the tops of the flowers.   Next take a piece of white card and colour the sky with a wash of the light blue spray ink, dry it with the heat gun, then flick some green wash onto the bottom of the card, using an old toothbrush.

Stamp the word 'Happiness' on the top using the black Versafine pad.


Paint the bird with the watered down gold Aqua paint, leaving the breast white and  the beak with watered down gold finger wax.


Fix the piece of painted card with the word 'happiness' on it,  to the back of the cut out circle, so it shows through the circle.


Paint the wings of the small dragonfly at the top right of the circle, with watered down gold finger wax, adding a touch of light blue spray ink to the base of each wing.

Paint the large flowers with the gold rose and the blue rose paints, adding some watered down green and gold finger waxes to the flower centres.   Paint the leaves with green finger wax.

Paint the small hearts with a mixture of the blue rose and green blue paints.   Paint the small flowers and the tiny butterfly with some blue spray inks.


 Matt this onto a slightly larger piece of dark green card.


Take a 7" x 7" white base card and using the hanging hearts, butterfly and drops stamp, stamp 2 of these connecting them together in each corner, making a corner stamp, using Versafine pad


 Matt and layer the main image onto the base card.

Glue three small blue gems to the top left and bottom right corners.   Add a little silicone glue under the cut out wing and the card is now finished.   I do hope you like it.


Thank you so much for taking the time to visit my blog.   Take care and stay safe everyone.

                                                                  Love and rainbows, 

                                                                   Hugs    Jennifer xx.