Hello Lovelies,
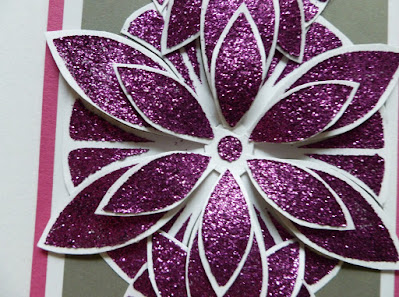
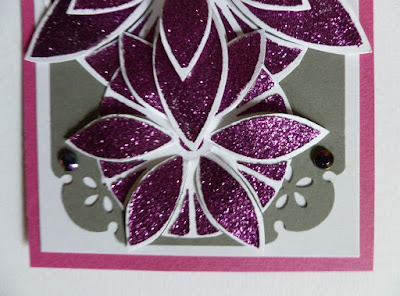
Hope you are all staying safe and well and are coping during this challenging time for us all. Today I would like to share a tag I made in April 2016 using an Imagination Craft's stencil called 'Large Petal Tile,' and the smaller' Open Petal' stencil. I do hope you like what I have created using these stencils in a different way. I have to say I was quite pleased with the way it turned out. I did make a similar tag some time ago using a different colourway. When making this tag I didn't take any stage photos, sorry! but I did take close-ups at various angles.
Below is a photograph of the 'Large Petal Tile' stencil and the small open petal stencil. I looked at them and thought to myself....how can I use these in a different way ? and the photo above is the outcome.
(1) Make a large tag shape from some cerise card.
(2) Make a smaller tag shape from white card and matt onto the cerise tag shape.
(3) Cut a smaller rectangle from grey card and punch all four corners, with the Woodware corner punch, Matt this onto the white tag.
(4) Take a piece of white card and lay the Large petal tile stencil onto it, then spread the Old Rose Sparkle Medium (now known as Sparkle & Twinkle), over the flower only, using a metal spatula.
(5) Take the small open petal stencil and repeat the above a total of three times. Remove the stencil and leave the images to dry.
(6) When dry, cut out the large flower, carefully cutting each petal nearly down to the centre but not quite. Glue this to the grey matt but do not glue down the petals. Glue the centre and the remaining parts, after cutting down the petals only.
(7) Repeat the above with the other 3 smaller flowers (but cutting away the extra parts on one flower only, so only the petals and the centre are still in tact). This flower is to be glued to the centre of the large flower. Glue these, one at the top.........
and one at the bottom of the large central flower, under the large petals.
(8) Add silicone glue under each petal of all the flowers.
(9) Glue an iridescent gem to each corner of the grey matt.
Punch a hole in the centre top of the tag and thread some silver ribbon through the hole and tie.
Using some cerise card to match the tag, make a simple stand and secure to the back of the tag, so the tag can be stood up if desired and that is the tag finished.
Thank you once again for taking the time to visit my blog, hope you have enjoyed your visit. Stay safe and well my Lovelies. I will catch you all again soon.
Love and rainbows,
Hugs Jennifer xx


Just stunning Jennifer, love the sparkle and colors of your glorious tag.
ReplyDeleteHugs Diane
Absolutely gorgeous tag Jennifer, such a pretty floral stencil and the colours are lovely, Kate x
ReplyDeleteA stunning tag Jennifer. Hope you have a great week xx
ReplyDelete