Followers

Sunday, 27 December 2020

'Pansy Balcony.'

Good afternoon Lovelies,

Hope all is well with you and you have had a good Christmas whatever you had arranged, despite the restrictions, which were necessary to keep everyone safe and well.    We had a quiet one, like most people I suspect but a good one nevertheless.   

Thank you all for your comments and visits to my last blog post, they are very much appreciated.

Today I would like to share a  card I made for the Imagination Craft's shows on the Create & Craft T.V. Channel on the 10th. December 2020.   I have used 2 sheets of the same design rice paper from Imagination's USB.   Vol. 3,   Cadence Decoupage glue and Imagination Craft's Diamond Blue Sparkle & Twinkle.


Cut out the chosen design from the sheet of rice paper and cover a 7" square piece of white card, using the Cadence Decoupage Glue and a brush. and leave to dry.


From the second sheet of the same design rice paper, cut out the same section and as previously, fix this to another piece of white card using the decoupage glue.

When this is dry, trim away a portion down the right-hand side of this second sheet, so it corresponds with the first design.

Trim away any spare white card.   Next trim around the pansies, the arches and the balcony rails, this does take a little time but I think very worth while,  discarding the background text.   


As you can see by the above photo, I accidentally tore a small piece of the rice paper on the right of the design.....oh no!  having carefully done all the cutting....I couldn't begin all over again....besides I didn't have the time before my samples had to be in the post!!!!  ........O.K. let me think....what can I do to correct this mistake?.......I know, I could cut out one of the pansies which was left on the piece I trimmed from the second image.......phew!   will it work I wonder?......well much to my amazement, it worked!    I cut the pansy out and fixed it to the torn part of the card, using silicone glue.  ( By trimming around the arches etc.,  will make the design stand out more when 3D onto the original image).


Next I spread some Diamond Blue Sparkle & Twinkle onto the pansies, using my finger but you could use a piece of cut 'n' dry foam, if you prefer not to use your finger.


Matt and layer the first image with the text background onto a slightly larger piece of light blue card.    


Matt this onto an 8" ivory base card, using double sided sticky tape, adding a touch of glue to make sure it sticks well.   Fix the cut out arches on top of the original arches image using sticky foam pads.


I then used my computer to print out 'Happy Birthday' in black ink onto a piece of cream card.   I then trimmed around the sentiment and matted it onto a slightly larger piece of light blue card.   I then glued this to the top of the card and the card is finished.


Thank you so much for sticking with me to the end of this post lol!   Hope you like my card.  I know it is quite long but it is mainly photos rather than text lol!      I would like to wish you all A Very Happy, Healthy 2021.    Take care and stay safe and well.   Catch you all again in 2021.

                                                                  Love and rainbows,

                                                                  Hugs   Jennifer xx.


Monday, 21 December 2020

'A Moment In Time.'

Good evening Lovelies,

How are you all,  safe and well I hope.   Tonight I would like to share another card which I made using  rice papers from Imagination Craft's  USB Vol. 3, along with some Cadence decoupage glue.


Cover a seven and a quarter inch square of white card with the design from the rice paper, using the Cadence decoupage glue.

When dry, matt and layer this onto a slightly larger piece of dark brown card, then onto an eight inch square ivory base card.

From the second sheet of the same design rice paper,  roughly cut around the clock face, plane, the top half of the tag,  plus the larger set of cog wheels.   Glue these images onto some spare white card. using the decoupage glue.   Trim around the images, removing the excess  rice  paper and card.

Fix these in position on the card front, over the original images, using silicone glue or sticky foam pads.


The large set of cogwheels I tucked under the bottom of the clock face on the left of the card where the rice paper was plain.   I used sticky foam pads to fix them in place, adding a dot or two of Imagination Craft's Mixed Media Glue, just to make sure they were stuck down well.


I used my computer to print out   'A MOMENT IN TIME' and 'TIME FLIES' onto some ivory paper, then I glued them onto some white card, trimmed them to size  and glued the 'A MOMENT.... to the top right of the card and the  'TIME FLIES' onto the top of the tag.   


The photo below shows the card at an angle so the 3D effect can be seen.   This makes a great card for a male recipient.    Hope you like it.   I have to say I'm out of my comfort zone making cards for men...I much prefer flowers, butterflies etc., lol!!


Take care, stay safe and well and if I don't manage another blog before Christmas,  I wish you all a Very Happy Christmas.

                                                                    Love and rainbows,

                                                              Christmas Hugs  Jennifer xx.


Thursday, 10 December 2020

'Serenity.'

Good evening Lovelies,

Hope you were able to tune in to Create & Craft this afternoon and this evening, to see  Mandy launch Imagination Craft's  new USB vol 3 rice paper designs.   Wow! such a fabulous variety of designs and as usual Mandy's demonstrations were great.   Hope you enjoyed the shows.

Tonight I would like to share one of my card samples with you which was shown on the programme.


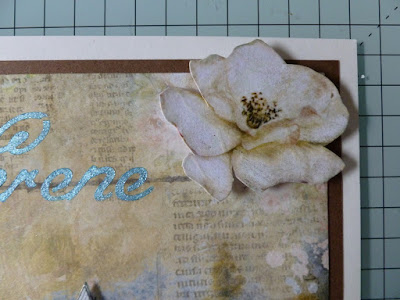
Cut the design from the rice paper and using the Cadence decoupage glue, fix it to a 7" square of white card.

When dry matt and layer this onto a slightly larger square of brown card and then fix this to an 8" square ivory base card.

Add the word 'Serene' using one of the stencils from the 'Destiny' Collection, by laying the word 'Serene' over the  rice paper background, near to the top and stippling some Cadence Mediterranean Sky metallic paint through the word, using a stencil brush.


From the second sheet of rice paper of the same design, cut out the barrels, flower and the sailing boat.   Fix these to some white card using the decoupage glue.   When dry, cut them out.

Decoupage  (3D) them onto the original images using sticky foam pads.


Die-cut some ivy using the die from the 'Secret Garden Collection.  from white card.   Colour this with the Cadence Dora metallic green paint, adding a little rich gold paint on top of the green.


Glue this to the bottom left of the card, placing some ivy on top of the barrels, using Sue Baker's mixed media glue.


Add some watered down Cadence platinum metallic paint to the flower, sun and the sunlight on the ripples of water.


The photo below shows the dimension of the card.


Thank you all as ever, for your lovely comments and all your visits to my blog, I do so appreciate each and every one.

Well that is all from me for now, take care and  stay safe.   Happy crafting.

                                                               Love and rainbows,

                                                               Hugs   Jennifer xx.


Sunday, 6 December 2020

'Balcony View' Card from Imagination Craft's 'Masquerade' Collection.

 'Hello Lovelies,

Hope you have all enjoyed a peaceful relaxing weekend.    Tonight I have another of my cards, which was made for the Create & Craft T.V. shows on the 26th. Nov. 2020,  using Imagination Craft's beautiful 'Masquerade Collection.'

Take a 7" square of white card and lay the rice paper with the balcony on it, onto the white card and using a pencil , lightly mark where the edge of the cut  away rice paper is.   (This part of the rice paper was left- over from cutting out the mirror,  when I made my previous card  'Through the looking glass,'  I quite liked the shape of the edge, so decided to use it on this card).  


Next colour the section on the left, which will be showing, once the rice paper is fixed to the right-hand side,   using the Taffy, Purple and the Fuchsia Cadence Hybrid Acrylic paints.   Then lay the background design from the stencil on top of the painted card and dab  the ultramarine paint through the design, then go over the top with a little more Taffy, to tone down the colour a little.


Using the decoupage glue, fix the rice paper to this piece of card but not covering over the paint on the left side of the card.

Next lay the fireworks part of the stencil, including a few musical notes, to the left of the balcony and spread the black structure paste over the design using a metal spatula.   Remove the stencil and leave to dry. 


In the meanwhile, using the small feather,  small mask and handle and the harlequin dies from the collection, die cut them from some black card. 


Colour these with the rich gold finger wax


Re-position the stencil over the firework images and using a stencil brush, stipple the rich gold metallic paint over the black images, adding a little wine paint in the centre of the images.   Remove the stencil.


Matt and layer this card onto a slightly larger piece of wine coloured card and then onto the 8" ivory base card.   


Fix the mask and handle in position in the bottom right corner using sticky foam pads.


The harlequin diamonds to the top right corner, again using sticky foam pads.


Glue the feather to the bottom left.


Phew lol!! nearly there if you're still with me lol!...... .10 out of 10  if you still are ha! ha!   The only thing left to do is to add a large red sequin to the centres of both fireworks, finishing off by adding a dot of the rich gold metallic paint to the sequin centres.


Thank you all for bearing with me, thankfully more photos than text lol!   Thank you also for your comments and visits to my last blog post,    Please take care and stay safe.   I will be back quite soon with another card to share with you.

                                                                    Love and rainbows,

                                                                    Hugs   Jennifer xx.