Followers

Monday, 27 December 2021

'Serenity.'

 Hi there Lovelies,

Happy Christmas !   hope you are enjoying this festive season.   Today I have another card, made for the Imagination Craft's show when the beautiful 'Earth Born' collection was launched by Mandy Taylor on the Create & Craft T.V. Channel a few weeks ago.

This card is made using only the stamp set from this collection, plus paints etc.,   I have used the main image from the stamp set as I did in my previous card  but the overall effect is totally different, hope you like it.


Matt and layer a 7" square piece of deep red metallic card onto an 8"x8" white base card.   Stamp the world stamp from the stamp set, eight times onto some spare white card, using a Versamark pad, then heat emboss them with copper embossing powder.


Use the smaller of the 3 sized dies to cut the worlds out and put these to one side for the moment.

Die-cut a medium sized circle from white card and stamp the main image onto it, using the Veramark pad and heat emboss it using the copper powder as previously.


Stamp the word 'Serenity' to the bottom of the circle using a black ink pad.   Paint the image with watered down cherry, yellow, clover green, plum and white Cadence acrylic hybrid paints.


Add a little shading to the mice and to the edges of the main image using a light grey alcohol pen.

Die-cut a large circle from the red metallic card.   Glue the eight worlds to the back of the red circle, leaving half of each world showing above the edges of the red circle.


Next, fix  the white circle with the main image onto the red circle.


Glue the circle with the worlds onto the red matt on the white base card, using silicone glue or sticky foam pads.   Below are a couple of photos which show the dimension.


 That's all from me for the moment,   Thank you for stopping by my blog.   I would like to take this opportunity to wish you all    A Very Happy, Healthy New year for 2022.   Take care of yourselves and stay safe.

                                                                    Love and rainbows,

                                                                     Hugs   Jennifer xx.                                                                                                                                                               

Tuesday, 21 December 2021

'All Wrapped up for Christmas.'

 Good morning Lovelies,

Hope all is well with you and you are nearly ready for the Christmas Festivities.    Thank you so much for your visits and lovely comments, as always, on my last blog post.   

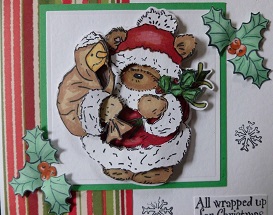
Today I have a Christmas card I made for a family member last Christmas and did not put it on my blog so,  I thought I would share it with you today.    Whilst tidying my craft room I found this rather cute Christmas bear in my stash, if I remember correctly the bear's name was Popcorn and it was a Crafter's Companion stamp.   Hope you like it.


Using some papers which were given free with a craft magazine some time ago, I added a panel of striped paper down the left-hand side of a square white base card.

Using a black ink pad, I stamped the bear onto some spare white card, I then coloured him in with Promarker alcohol pens.    Then I trimmed around the bear, leaving a tiny border of white showing.   I glued the bear onto a square of white card using some silicone glue , then glued the square onto a slightly larger square of green card..   I fixed this to the centre of the white base card with double sided sticky tape.

I stamped and cut out  the bear a further 3 times and 3D the parts onto the original image on the white square, using silicone glue.


Using my small set of letter punches purchased many years ago, I punched out the letters 'MERRY' from white card and then the letters 'CHRISTMAS' from  red and green  card.   I then glued them across the top of the card.

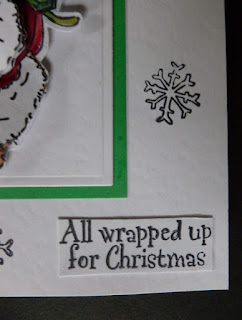
  I used a  holly  stamp also given free with a craft magazine and   I stamped 2 onto white card and coloured them with Promarker pens and cut them out.   I glued one to the bottom left and the other to the top right of the square, using silicone glue.   I stamped two snowflakes in black ink on the right of the card.    (the snowflake and the 'All wrapped up for Christmas'  stamps were also free with a magazine).

I stamped the 'All wrapped up for Christmas' onto some spare white card using black ink, then  trimmed around it and glued it to the bottom right corner. 


Well that is this card finished, I hope you like it.   I would like to take this opportunity to wish you all a Very Merry Christmas, despite the restrictions we are under at the moment due to the Covid 19 virus but please stay safe.   I will be back again quite soon with another card.   Take care of yourselves.

                                                                      Love and Hugs  

                                                                        Jennifer xx.


Saturday, 11 December 2021

'Serenity.'

 Hello there Lovelies,

How are you all ?   well I hope and enjoying your weekend.     Thank you for your encouraging  comments and visits on my last blog post,.   Today I have another card which was made using products from the stunning 'Earth Born' Collection by Imagination Craft's and was launched on the Create & Craft T.V. Channel in November by Mandy Taylor.    If you were lucky enough to secure this collection, I do hope you are enjoying using it.   The card below is made primarily using the stamps from the collection, which I think are beautiful.


Die-cut a large white circle.   Stamp the Mother Nature onto the centre of the circle using a black ink pad and colour her with watercolour pens.   Stamp the word 'Harmony' below the main image, using a black ink pad.

Stamp this same image  another three times using the black ink pad and colour them with the watercolour pens.   Cut out and 3D them onto the original image on the circle, using silicone glue.

Put this to one side for the moment.   Colour a piece of white card with the Cadence acrylic paints,  amber, clover green, plum and cherry, blending the colours together.   When dry, stamp the largest leaf stem from the stamp set nine times onto the coloured card, using the black ink pad.   When dry, fussy-cut  them out.   


Glue these leaves to the back of the white circle, leaving three of the leaves on each stem showing above the edge of the circle. 

Cut a 7" square of white card and colour the edges with a brilliant yellow watercolour pen, onto this, matt and layer  a slightly smaller square of dark red card, then,   onto that,  matt a slightly smaller square of lime green card.  


Matt and layer this onto an 8"x8" white base card.

Stamp the word 'serenity' in the top left corner of the green card using the black ink pad. 


Glue the circle of leaves onto the centre  of the green matt.   Stamp the word 'harmony' below the main image on the white circle, plus one of the small mice from the stamp set, using black ink.

Colour a piece of white card with the brilliant yellow watercolour pen and stamp one more large leaf stem onto it in black ink.   Cut out and glue to the bottom left of the circle, using silicone glue.

Stamp two butterflies in black ink onto a piece of white card and cut out the wings with the flowers on only and colour with  light blue and  lilac watercolour pens.    

 Glue one on top of the yellow leaf stem and the other, to the right-hand side of the circle.

Add a small amount of silicone glue under some of the leaves around the edge of the  white circle to give them a little dimension.   Below are a couple of photos taken at an angle to show the overall dimension of the card.   


Well Lovelies, that's all from me for the moment.   Hope you have enjoyed your visit to my blog.   I will be back soon with another of my cards to share with you.   In the meantime, please stay safe and well.   

                                                                  Love and rainbows, 

                                                                 Hugs   Jennifer xx.


Friday, 26 November 2021

'Emerald Butterflies.'

Good evening Lovelies,

Hoping this post finds you all well.   Tonight I would like to share another of my sample cards, which was made for the Imagination Craft's shows, on the Create & Craft T.V. Channel yesterday and today when Mandy launched the gorgeous new 'Earth Born' collection.

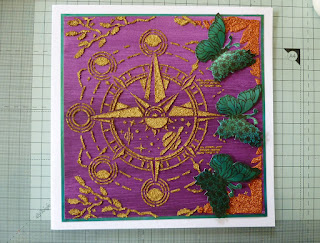
Cut a piece of white card 7"x7" square and paint it with the Cadence plum Hybrid Acrylic paint.


When this is dry, lay the design from the 'Look to the Stars' stencil onto the painted card and spread the Cadence Dora Perla  gold Relief Paste, through the design using a metal spatula.


Remove the stencil and leave the image to dry.


Lay the corner design from the stencil in the top right corner of the painted card and spread the Cadence Dora Perla orange oxidized Relief Paste through the design using the metal spatula.  .  Repeat this in the bottom right corner.   Remove the stencil and leave the image to dry.


Cut a piece of white card seven and a quarter inches square and paint all four outer edges with the Cadence Emerald Dora Metallic Paint.   No need to paint the whole card as only the edges will be seen   When dry, matt the plum card onto it, then matt that onto an 8"x8" white base card.


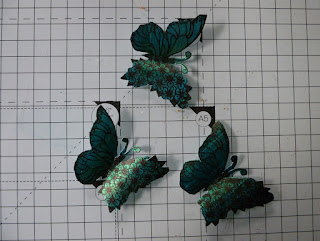
 Paint a square of white card with the emerald metallic paint and using a black ink pad, stamp the butterfly from the stamp set onto it, three times.


Cut out each butterfly and shape their wings a little with your fingers, then glue them to the right-hand side of the coloured card using mixed media glue, adding some silicone glue under each of the wings.


Below are a few more photographs taken at different angles.


Thank you for taking the time to visit my blog,  which  is much appreciated.    I do hope  you have enjoyed your visit.    That is  all from me for the moment but please pop back soon, as I will have another card to share with you, which was made using the same gorgeous collection.   Take care and stay safe.

                                                                     Love and rainbows,

                                                                     Hugs   Jennifer xx.


Thursday, 25 November 2021

'Bouquet Butterfly.'

Good evening all,

I hope you managed to tune in to Create & Craft T.V. Channel today to see Mandy launch Imagination Craft's beautiful 'Earth Born' Collection.   Gorgeous rice papers, stencils and stamps and of course some fabulous Cadence Relief Pastes and Decoupage glue etc.,  plus  some Imagination Craft's Sparkle & Twinkle   .

I would like to share one of my sample cards which was shown on the show today.   I hope you like it as much as I enjoyed using this collection.   I think this is definitely one of my favourite collections.


Cut a 7" square of white card.   Cut out the section of rice paper of your choice, cutting it a little larger than the 7"  square piece of card.   Using the decoupage glue, fix the rice paper to the 7" square piece of card, bending the extra rice paper to the back of the card and securing with the glue.

When this is dry, lay the stencil design onto the right-hand side of the rice paper background card, masking off the design, then using a metal spatula, spread the Cadence Orange Oxidized Relief Paste over the design.   Remove the stencil and leave the image to dry.  

Matt the background card onto a slightly larger piece of black card.


Matt and layer this onto an 8"x8" white base card.

Roughly cut out the world, the large flower butterfly and the larger of the two brown butterflies from the second sheet of the same design rice paper.   Using the decoupage glue, fix these to some spare white card.


When dry, trim around the images, cutting away any excess white card, then 3D them onto the original images on the background card, using silicone glue and sticky foam pads.   Last of all, spread a little Imagination Craft's Bright Copper Sparkle & Twinkle over parts of the world with your finger as I did, or with a piece of cut n, dry foam and a tiny amount on the centres of the flowers on the butterfly's wing. 


Below are a couple of photos taken at angles to show the dimension of the card.


Hope you have enjoyed your visit to my blog. .  Please pop back soon as I will have another card to share with you, which was made using this fabulous collection.   In the meantime, take care and stay safe.   

                                                                Love and Rainbows,

                                                                  Hugs   Jennifer xx.