Hi there Lovelies,
Hope you are enjoyed your weekend, despite the freezing temperatures. Thank you for your visits and comments on my last blog post. Today I have another card to share with you, which was made for the Imagination Craft's show on the Create & Craft T.V. Channel on the 11th. Feb. 2021 and was made using Imagination's new 'Into the Wild' collection. Such a cute image, I understand it is a red panda.
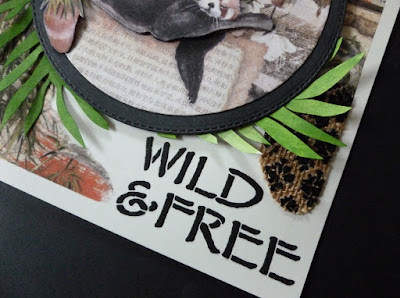
Die-cut a six inch black circle. Next die-cut a five and a half inch circle from white card. Lay the stencil from the collection on the bottom right corner of an 8" ivory base card and spread the black Structure Paste through the words 'Wild & Free.'
Remove the stencil and leave the images to dry.
From the first sheet of rice paper, cut out a five and three quarter inch circle with the red panda in the centre.
Fix this rice paper circle to the white die-cut circle, using the Cadence Decoupage Glue, bending the excess rice paper to the back of the card circle, using the decoupage glue, put this to one side for the moment.
From the left-over rice paper after cutting out the main image of the panda, keeping the top and left-hand edges straight, feather the rest by wetting the edge with a little water and gently pulling, which will feather the edge.
Fix this to the top and left-hand sides of the 8" ivory base card, using the decoupage glue and leave to dry.
Roughly cut out the red panda from the second sheet of rice paper and using the decoupage glue, fix the panda to a spare piece of white card and leave to dry.
Cut out the panda, trimming away any excess white card. Cut off the panda's left arm and fix the panda to the original image on the circle, using silicone glue. Fix the circle to the larger black circle using Imagination's Mixed Media Glue.
Lay the smaller pot design from the stencil onto a piece of hessian and using a metal spatula, spread the Cadence Textile Crackle - step 1. through the design and dry with a hairdryer. Next re-lay the stencil back in position and spread the step 2 crackle paste. Remove the stencil and heat with a hairdryer as previously and it will begin to crackle. Have one edge rounded and the other edge straight and glue to the right-hand side of the base card, using Imagination Craft's Mixed Media Glue.
Lay the bamboo leaf design from the stencil on to some spare white card and stipple the light sage and the clover green acrylic paints over the design. Stencil 2 of these leaves. Remove stencil and leave image to dry. Cut out and colour any white areas with the green paint.
Glue these leaves to the base of the card and fix the circle (main image) in the centre of the base card, near to the top using Sticky foam pads or silicone glue.
Below are a couple of photos showing the dimensions of the card.
Well that's this card finished, hope you like it and thank you for stopping by my blog. I hope you have enjoyed your visit. I will be back again soon. In the meantime, please stay safe and keep well.
Love and Rainbows,
Hugs Jennifer xx.


Greetings Jennifer, wow what a awesome card design and tutorial.
ReplyDeleteHugs diane
Another super card on the Wild and Free theme. Love and hugs xx
ReplyDelete