Hi there Lovelies,
Thank you all for your comments and visits on my last blog post, I really love to read your comments, plus I love to visit your blogs and see your beautiful creations too.
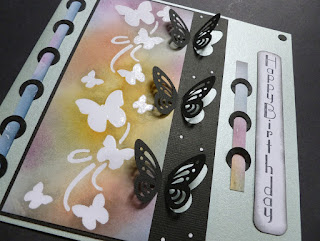
Today I have another card to share with you which was made because I had some spare time (a rare commodity lol!) between shows, so thought I would use one of Imagination Craft's pretty panel stencils. I have also used Cadence transparent relief paste, a few distress inks and a punch I have had in my craft stash for many years. Hope you like it, I think most people like butterflies, they're just so pretty and delicate fluttering around the Buddleia bush.
Take some white card and lay the butterfly panel stencil from the 'Tumbling Blossoms' set onto it and spread the transparent relief paste through the design, using a metal spatula. Remove the stencil and leave the image to dry.
I have held this piece of card on an angle so the transparent relief paste can be seen.
Using the Victorian Velvet, Fossilized Amber Weathered Wood, Seedless Preserves, Shaded Lilac and Dried Marigold distress inks, colour the card using a blending tool.
Using some black soot distress ink and a blending tool, rub the ink around all four edges of the coloured card.Using a piece of kitchen roll, gently rub away any ink from the butterflies ( the relief paste acts as a resist and allows the ink to be rubbed away, leaving the butterflies white). Trim this to a rectangle approximately three inches by six and a half inches.
Take a rectangle of black card four inches by six and three quarter inches and using the butterfly punch, punch three butterflies evenly down the right-hand side of the black card.
Matt the coloured card onto the left-hand edge of the black rectangle, then matt and layer this onto a seven inch square blue pearl base card. Glue some very small white circles (leftover after punching some other shapes previously, I don't throw anything away lol! they usually come in useful at some time! ) in between each butterfly.
Using some of the coloured card, leftover after trimming the butterfly rectangle, glue some black rings onto the coloured strips. (I used a hole strengthener die from a tag die set I have in my craft stash). Glue the longer length to the left-hand side.
Glue the shorter length to the right of the butterfly rectangle.
Take a strip of white card and stamp 'Happy Birthday' using a black ink pad, down the strip. Use a corner rounder punch to round off the corners and add a little black soot distress ink to the edges Glue this to the right-hand side of the base card. Glue two small black circles to the top and bottom right-hand corners and the card is finished.
Below is a photo taken at an angle to show the dimension of the card. Thanks for stopping by my blog, I do hope you've enjoyed your visit. Please pop back again soon.
Love and rainbows,
Happy Crafting! Hugs Jennifer xx.


A gorgeous card Jennifer love the design and a very clever idea to use the hole strengthener die. Have a great weekend, love and hugs xx
ReplyDeleteYet another beautiful card Jennifer, lovely colours and design. The texture and butterflies are so pretty. I hope you have a lovely weekend, Kate x
ReplyDeleteLovely butterflies, techniques and tutorial Jennifer.
ReplyDeleteHugs Diane