Followers

Monday, 30 August 2021

'Russian Dolls.'

 Hello there Lovelies,

Hope you have all enjoyed your Bank Holiday weekend, despite the dull damp weather lol!   Thank you for your lovely comments and all your visits to my last blog, each and everyone, much appreciated by me.   I have another card for you, made using the 'Glorious Women' collection by Imagination Crafts.   I have used the gorgeous rice paper and stencil from the collection and Cadence gold relief paste, finger wax, decoupage glue,  metallic paint, Acrylic paint and  Rose pink and Light purple colour mists.   Apologies for the shape of the card in the photo, I can assure you, it is a square card lol!    I no longer have the card so I cannot take another photo of it.


Begin by cutting a seven inch square of white card.   Cut out the section of rice paper with the Russian Dolls on, cutting it slightly larger than the white seven inch piece of card.   Add some water with a brush, around the top of the design, ie;  around the trees, building and  tree branch and feather the edges by gently pulling away the paper above the trees etc.,  as the photo below.

Colour the top edge of  the card where there will be no rice paper with the  Rose pink and Light purple Colour Mists.   Using the White Acrylic paint, spatter some dots of paint from a toothbrush, by flicking the bristles over the coloured sky.


Using the decoupage glue, fix the rice paper to the piece of card, bending the other three edges to the back of the card  and secure using decoupage glue.   Add some Inca Gold Finger Wax to the edges of the background card.


Add a little gold finger wax to the building behind the fir trees.

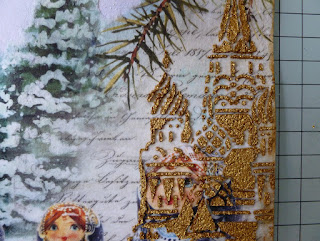
Lay the building from the stencil onto the right-hand edge of the background card and using a metal spatula, spread the Cadence Gold Dora Perla Relief Paste over the image.   Remove the stencil and leave the image to dry.   This paste sounds crunchy when you spread it and it gives a fabulous risen texture to your card.   Just love that crunchy sound...very satisfying lol!


Do not worry that the relief paste will cover over the largest doll, as this will be covered with a decoupaged image of her later.

Lay the script from the stencil on the left-hand side of the background card  and spread the gold relief paste over the script, again using a metal spatula.   Remove the stencil and leave the image to dry.


From the second sheet of the same design rice paper,  cut out the three dolls and glue them to some spare white card, using the decoupage glue.   When dry, cut them out, cutting away any excess white card.


Fix the dolls to the original images on the background card using sticky foam pads or silicone glue.   Add a little Versafine  ink from the Majestic blue ink pad around the edges,  alongside the gold finger  wax.


 Add some Dora  Rich Gold metallic paint to the dolls.   Glue this background card to the 8" white  base card and the card is finished.   Hope you like it.   


Well that's all from me for the moment, I'm busy working on  samples for the next shows coming up very soon........another super collection, which I'm sure you will all like,  I know I'm having fun playing with it lol!    Catch you all again very soon.   Take care of yourselves and stay safe.

                                                                 Love and rainbows,

                                                                Hugs   Jennifer xx.


Saturday, 21 August 2021

'From Russia wth Love and Best .'Wishes

Hello Lovelies,

I'm back again with another card I made using Imagination Craft's beautiful 'Glorious Women' Collection.   I have used rice paper, stamp and stencil from the collection and Sparkle & Twinkle.   For. the border around the main design I used  Cadence Dora Metallic paints..  The woman was coloured with alcohol pens.


Using the stone wall/pathway design from the stencil, the rich gold and the emerald green Dora Metallic paints, create a border around all four edges of the 8"x8" white base card stippling the paint through the stencil, using a stencil brush.


Take a 6"x6" piece of white card and paint the bottom third with the Cadence white acrylic paint  adding a little  watered down Dora sky blue metallic paint to create the look of sparkling ice.   Rub tiny amounts of the diamond Sparkle & Twinkle over the dry paint.


 Stamp the words 'Best Wishes' in the centre at the bottom of the card using a black ink pad.

Cut out the section of rice paper with the buildings on, cutting it slightly larger than the 6" square card.   Keep the top and side edges straight but feather the bottom edge by wetting with a little water and gently pulling the rest of the paper away.   The leftover paper can be used on another project.

Using the decoupage glue, fix the rice paper to the piece of card, bending the edges to the back and securing with the glue.   Make sure the feathered edge is securely glued in position. just on top of the painted card.


Glue this card onto the 8"x8" white base card with the border.


Stamp the woman onto a spare piece of white card using a black Versafine ink pad and heat emboss with clear embossing powder.    Colour her.  I used Le Plume alcohol marker pens.    Cut her out and fix her to the bottom left of the base card using silicone glue.


The card is now finished.   Thank you all once again for taking the time to stop by my blog.  I will be back again quite soon.  Look after yourselves until next time.     Have a good weekend.

                                                                  Love and rainbows,

                                                                  Hugs   Jennifer xx.


Thursday, 19 August 2021

'Post Card From India.'

Hi there Lovelies,

Hope you are all well.  Today I would like to share one of my cards made using one of Imagination Craft's beautiful collections - 'Glorious Women.'   I have used stamps, rice paper and one of the stencils from the collection.   I have also used  Cadence paints and sculpture paste.


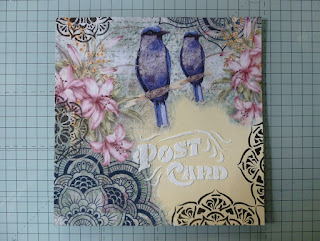
 Cut a seven and a half inch square of white card.   Cut out the section of rice paper with the birds and flowers etc.,   on it, cutting it slightly larger than the square of white card.    Using a paintbrush and water, wet around a section of the rice paper below the two  birds, then gently pull away from the rest of the paper, leaving a pretty feathered edge.

Lay the ice paper onto the piece of white card and lightly draw a pencil line where the feathered edge will be, when it is glued to the card.   


Using the Cadence Acrylic paints, pure white and light yellow, mix them together to create a lighter shade and paint just below the pencil line.


Using the decoupage glue, fix the rice paper to the piece of  card so that the paint shows below the rice paper, bending the top, the left and right-hand edges of the rice paper to the back of the card, using the glue to secure it to the card.   Leave this to dry.


Using both sizes of the mandala from the stencil, stipple the Dora black metallic paint through the designs in four places around the edge of the card.   


 Lay the words 'Post'   'Card' from the stencil, onto the painted part of the card and spread some white sculpture paste over them, using a metal spatula.   Leave image to dry.


 Place the stencil back in position over the words and stipple some Dora amethyst metallic paint on top of the sculpture paste using a stencil brush.   


When that is dry, rub a small amount of the Inca Gold finger wax over the top of the amethyst, adding a tiny amount of the watered down gold finger wax to the breasts of the the birds.


Matt this card onto an 8"x8" white base card.   From the second sheet of the same design rice paper, roughly cut out the flowers and the birds on the branch and glue them to a spare piece of white card, using decoupage glue.   When dry, cut them out adding some watered down gold finger wax to the breasts of the birds.  


Shape them a little with your fingers then, fix these to the original images on the base card using silicone glue.


Well that's all from me for the moment my Lovelies, I will be back soon with another card, made using this same collection.   Take good care of yourselves and stay safe.

                                                                 Love and rainbows,

                                                                 Hugs   Jennifer xx.


Sunday, 15 August 2021

Little Cherub.

 Good evening Lovelies,

Hope you are well and have enjoyed your weekend.   Thank you once again for your Lovely comments and visits to my last blog post.

Tonight I would like to share another of my cards which was made for Imagination Craft's shows on the  Create & Craft T.V. Channel when our Mandy launched her beautiful new signature collection - 'Always  &  Forever.'

Cut a piece of white linen effect card to a seven and a quarter inch square.   Paint all four edges with the Dora metallic white gold paint.  

Cut a piece of white card six and a quarter inches square.  Cut out  the section of rice paper you want for your background, cutting it larger than the six and a quarter inch square piece if card.   Using the Cadence decoupage glue, glue the rice paper to the piece of card, bending the extra rice paper to the back of the card and glue it,  using the decoupage glue.   Matt this onto a slightly larger piece of dark green card.


Matt this onto the white gold painted card and then onto an 8"x8" white scalloped base card.

Die-cut a circle border from white card and paint it using the Cadence Dora Metallic white gold  paint.   

Stamp the cute little cherub onto some white card, using a black ink pad, three times.   Cut these out and 3D  the cherub using sticky foam pads or silicone glue.   


Fix the cherub to the back of the gold circle border at the bottom of the circle,  with glue.


Stamp the plaster decoration onto a piece of spare white card using a black ink pad.   Cut this out and fix it to the top of the circle border, using sticky foam pads or silicone glue.

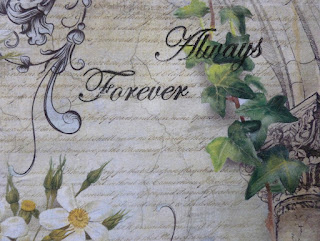
Using a black ink pad, stamp the words 'Always' ad 'Forever' onto the background on the base card, making sure they will be inside the circle when it is fixed to the base card.


Next glue  the circle border to the base card.


That is this card finished.    The photos below are taken at an angle to show the dimension  of the design.   I love this little cherub, just so cute.   I was initially, going to paint the cherub and the plaster decoration with the gold paint but decided to just leave them black and white, which I think looks fine.


 Thanks for taking the time to stop by my blog,  much appreciated by me.   I will be back again soon with another card.   In the meantime stay safe and be happy.

                                                                   Love and rainbows,

                                                                   Hugs   Jennifer xx.