Followers

Friday, 29 October 2021

A Touch of Gold.

Good morning Lovelies,

Hoping this post finds you all well   Thank you for your visits and lovely comments on my last blog post.  I appreciate the time you take and I hope you enjoy your visits.   Today's card was made using  a beautiful new collection, called    'Beautiful Blooms.'   -  gorgeous A3 rice papers, some of which have gold foil added in places, just stunning.   I have also used one of the stencils from the collection, along with  Cadence decoupage glue and their Shabby Chic Relief Paste.

I cut out the section of rice paper that I wanted, cutting it out slightly larger than a seven inch square,   I then cut out a seven inch square of white card.

The rice paper was fixed to the seven inch square of white card, using some Cadence decoupage glue, bending the extra rice paper to the back of the card and securing with the glue, making sure there were no air bubbles under the rice paper.

I cut out the most prominent pink flowers and the golden butterfly from the second sheet of the same design rice paper.   Fixed them to some spare white card using the decoupage glue.   When dry, I trimmed away any excess white card.

The  butterfly was fixed  to the original image on the rice paper background card, using silicone glue.

Using the scroll squares design from the 'Grunge' stencil from the collection, I spread the Cadence Shabby Chic Sage Relief Paste through the design onto a two inch deep piece of vellum, using a metal spatula.   

The stencil was removed  leaving  the image to dry.   When this was dry, I  fixed the vellum to the bottom of the background card and then fixed this onto an 8" x 8" white base car

The  flowers were then fixed on top of the vellum on the left-hand side of the card, using silicone glue.


The  photos below show the dimension and beautiful effect  the gold foiling has.


Thanks for stopping by my blog.   I will be back soon with another card made using this gorgeous collection.   Take care of yourselves and above all, stay safe.   Cheerio for now.

                                                               Love and rainbows

                                                                Hugs  Jennifer xx.


Wednesday, 20 October 2021

'Peace at Christmas.

 Hi there Lovelies,

Thank you for all your visits and lovely comments on my last blog post, I really appreciate each and every one.

Today I would like to share one of my cards with you, which was made for the Imagination Craft's  shows on the Create & Craft T.V. shows on the 19th. October.   This was made using Imagination's USB Vol. 5 which has some gorgeous rice paper designs.   Today's design rice paper is taken from 'Deck the Halls' collection on the USB.  

I have used Cadence Dora Metallic Paints and Decoupage glue,  A little of Imagination's Sparkle & Twinkle, stencil design flourish  from their 'Glorious Women' collection and the word 'PEACE' from their   stencil collection 'Flower Power,'  which were both launched some time ago.    


Matt a seven and a quarter inch square of red mirror card onto an 8" x 8" white base card.   Cut out a square of white card 7" x 7".   Cut out the section of  rice paper you want, cutting it slightly larger than the 7" card.


Using the Cadence decoupage glue, fix the rice paper to the 7" square  white card, bending the extra rice paper to the back of the piece of card and fixing with some glue.


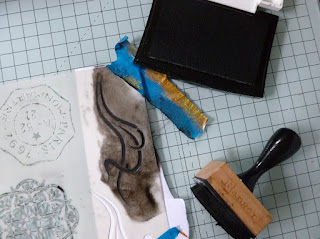
Lay the flourish design from the 'Glorious Women' collection onto a piece of white card and rub some black ink through the design.   Remove the stencil and clean it, then relay the stencil back in position but off-setting it a little then, using a stencil brush, stipple some rich gold metallic paint through the flourish.


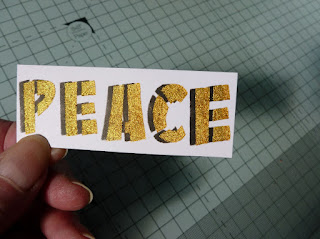
Repeat the above but with the word 'PEACE' from  Imagination's stencil from their 'Flower Power' collection. 


 Cut out each letter, leaving a tiny border of the white card showing.

Next cut out the poinsettia and the Christmas rose from the second sheet of the same design rice paper.   Glue these to some white card using the decoupage glue. 


Cut these out and fix to the original images on the main background card using silicone glue.


Add a little Imagination's Sparkle & Twinkle to the poinsettia with a piece of cut n' dry foam,

Matt the background card onto the 8" x 8" white base card on top of the red mirror card, leaving a tiny border of the red card showing and the card is finished.   Hope you like it, such beautiful papers on this USB.   I will be back with another card from this fabulous USB.

Take care of yourselves and stay safe and well as the Winter approaches.

                                                                Love and rainbows,

                                                                 Hugs   Jennifer xx.


Thursday, 7 October 2021

'Cosmic.'

 Hi there Lovelies.

Hope you are all keeping well and safe.   Thank you for all your comments and visits to my last blog.   I haven't blogged for a while, so thought it was about time I did lol!   This card was made for Imagination Craft's 'Flower Power' Collection  show on the Create & Craft T.V. Channel in September of this year. I have also used Cadence paints, glue and Finger Wax.


Die-cut a circle from white card to fit the circular shape on the sheet of  rice paper from the 'Flower Power' collection, cutting it slightly larger than the white circle.   Using the Cadence decoupage glue, fix the paper to the circle, bending the excess rice paper to the back of the circle and securing with the glue.


Cut out the two corner designs from the rice paper, a little larger then you need.   Cut out two shapes from white card, to fit the corner shapes from the rice paper.   Using the decoupage glue, fix the rice paper shapes to the card shapes again, bending the excess paper to the back of the card.   


Roughly cut out the word 'Believe' from the rice paper.   Cut out a shape from white card to fit the word and then glue the word onto the piece of card, again bending the paper to the back as previously.   Put these to one side for the moment.


Cut out a 7" square of white card and lay the floral spray design from the stencil onto the bottom left.   Using the Cadence Dora Antique Gold paint and a stencil brush, stipple the paint through the stencil.   Remove the stencil and repeat this once again in the top right corner of the card.


Rub a little of the antique gold paint around all four  outer edges of the 7" square card 

Lay the word 'Peace' from the stencil onto the circle you prepared earlier, then stipple the gold paint through the stencil, using the stencil brush. 


Take the 8" x 8" white base card and lay the word 'Cosmic' on the centre top and stipple the antique gold paint through the stencil   Repeat this on the centre bottom, the left and right hand sides of the card.

Glue the 2 corners you made earlier, to the 7" square  stenciled card, one in the top left and the other in the bottom right, then fix it  to the 8" x 8" white base card.

Fix the circle to the centre of the card using sticky foam pads.   Glue the word 'Believe' in the top right corner, using sticky foam pads 

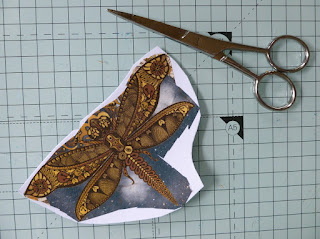
Cut out the dragonfly from the second sheet, of the same design rice paper and glue to a spare piece of white card, using the decoupage glue.  


Cut out the dragonfly and fix to the original image on the circle, using silicone glue

.

Colour 2 pieces of white card, one with the cobalt blue finger wax, plus  a little white paint and the other with a mixture of  Cadence yellow with a touch of orange acrylic paints.   From these die-cut some flowers and arrange them around the circle.    Punch out 21 small yellow circles and add them around the inside of the circle and also in the flower centres,


Well that's this card finished, it does take a little more time but I do hope you think it is worth it.   That's all from me for the moment, I'll catch you all again soon.   In the meantime, keep well and stay safe.

                                                                 Love and rainbows,

                                                                  Hugs Jennifer xx.