Followers

Wednesday, 21 September 2022

'Special Moments.'

Hello Lovelies,

Hoping you are all keeping well.   The weather today definitely has that touch of Autumn in the air.   Autumn is one of my favourite seasons of the year, the other being Spring.   The leaves are all beginning to fall from the trees and the Rowan berries are turning red.    The red squirrels in our garden are dashing around burying nuts in the lawns and our window boxes.   

The card I have to share with you today, is more of a Spring/Summer card.   The children and the cat stamp I have had in my stamp box for many years and is a Sarah Kay stamp, (not sure if it is still available).   The creeping vine is a Lavinia stamp.   The circle stencil is a Crafter's workshop stencil.   I do hope you like my card, I think this is such a sweet little stamp.


Make a base card from white cardstock, five and three quarter inches square and put this to one side for the moment.

Cut another piece of white card measuring four and three quarters inches square.   Using a black ink pad, stamp the children onto the piece of card.   Then stamp the children once again but this time, stamp them onto some white copy paper and cut it out,  in order to use it as a 'mask.'     Spray the back of this copy paper image with a little stencil spray and cover up the image on the piece of card.

Lay the large circle from the stencil over the image.   Cover around the circle with low tack masking tape, as we only want to use the large circle and don't want ink on the rest of the card through the smaller circles on the stencil.

Colour the top three quarters of the circle with the Scattered Straw and the Fired Brick Distress Inks, using a blending tool.


Leave the mask and the stencil in place and colour the grass below the setting sun  with the Shabby Shutters  the Peeled Paint Distress Inks, using the blender tool.   Add some tufts of grass using the Peeled Paint D.I. and a tuft of grass stamp.    I used a small stamp I had in my stamp box.

 Remove the tape and stencil.   Using the small stem with leaves,  stamp  five stems only around the seat, using a black ink pad. 

Colour lightly around the the top edges of the card  with the Tumbled Glass D.Ink,  then using the Peeled Paint Distress Ink,  stamp the 'clinging vine' by Lavinia Stamps. in the top left and right-hand corners.   Remove the mask.

Colour the image with Promarker Alcohol Pens.   Matt this card onto a slightly larger piece of black card, leaving a small border of the black card showing and then matt and layer this onto the white base card.

Stamp the daisy head stamp 13 times onto some spare white card, using the black ink pad.   Colour each daisy centre with a yellow pen and cut out each daisy.   

Using silicone glue. fix three daisies in the grass beside the boy and two next to the girl


Fix the other 8 daisy heads evenly around the black card

Stamp out one more whole image of the children cat and ball of wool using a black ink pad onto some spare white card.   Colour this with the alcohol pens, cut out and glue to the original images using silicone glue and the card is now finished.

Below are a couple close up photos of the finished card,   I would like to thank you all for your continuing  visits and lovely comments on my last post, I hope you have enjoyed your visit.


Take care and stay safe my friends and I will be back again with another card, then I think I will share some of my Christmas card designs, so catch you all again then.   Thank you once again, your lovely comments mean a lot.

                                                                    Love and rainbows,

                                                                      Hugs Jennifer xx..


Sunday, 4 September 2022

'Fairy Rose Birthday Wishes.'

 Hi there Lovelies,

Hoping you have all enjoyed your weekend.   It has been quite dull here today but the sun has popped out whilst I'm writing this post.   It has turned out to be a beautiful evening.   Lots of red admiral butterflies in our garden today,    Woody woodpecker has been on the nut dispenser amongst other beautiful birds.   The Heron was in the river outside our kitchen window and the red squirrels getting nuts from their feeders, so beautiful to see, we are so lucky to have them in our garden.     

I have another card to share with you and this is a very quick, easy card to make, especially if you happen to be short of time.   I have used products I have had in my craft stash for some years.   The 'Flower Fairy' topper from 'Fairies of Summer'  was given free with the  Cardmaking and Papercraft Magazine some years ago I think, not sure which issue - sorry.   The large corner die is  by Sweet Dixie - floral border & corner set.    The Happy Birthday and smaller corner dies are by Creative Expressions.   O.K. let's get down to some card making lol !


 My ready made base card is a 7" square blue pearlised card.   Using the small corner dies, die-cut 4 corners from some red pearlised card and glue one in each corner of the base card.


Using the large corner die, die-cut two corners, again from the red card.   Fix these corners to the left and right hand sides of the back of the fairy topper, hooking the scrolls onto the front of the topper..   Glue this to the centre of the blue base card.


Die-cut the words 'Happy Birthday' from the  red pearlised card.   Glue 'Happy' above the fairy and 'Birthday' below the fairy.   and that is the card finished, as I said a very quick card to make.


The topper is already edged with gold but it does not show up very well in my photograph.


Just a quick post from me today as must get our evening meal ready lol !   Have a good week  my friends and I will be back again soon.   Think I will share another couple of cards then I will begin sharing the Christmas cards I have been making recently.

Take good care of yourselves, keep well and stay safe, catch you all again soon.

                                                                  Love and rainbows,

                                                                  Hugs   Jennifer xx.

Monday, 29 August 2022

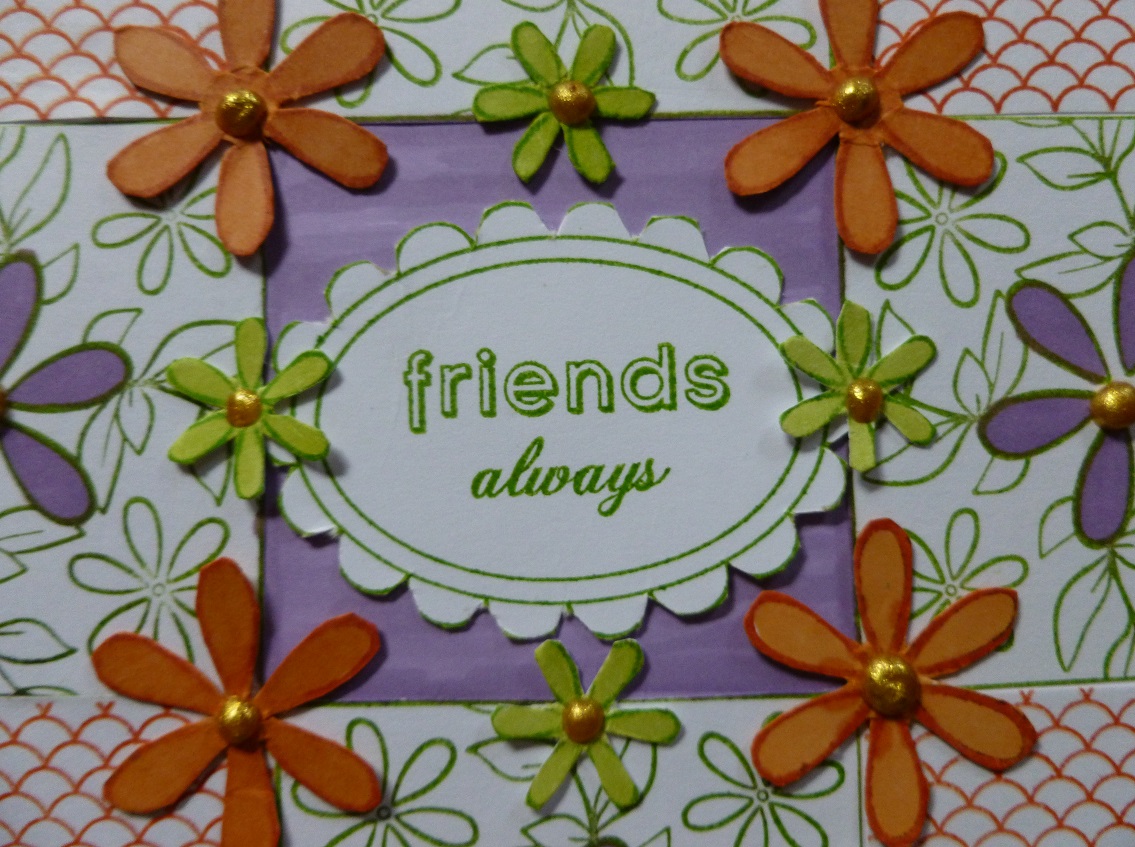
'Friends Always' Card.


 Hello Lovelies,

Hoping you all enjoyed your weekend.   We had a quiet but a good one.    Did some tidying up in the garden and spent some time in my happy place, my craft room, making some Christmas cards.

Today I have another card to share with you which I made using a free A4 stamp set which was given free with the Creative Stamper craft magazine issue 109 - called 'Versa Tiles Patchwork Set -26 pieces.   I think this is a great set of stamps as they can be used in many different ways.   Hope you like it.

 Make a  five and three quarter inch square   base card from some white card stock.   Using the shell square stamp from the A4 set and the rusty brown Stazon ink pad, stamp the square 4 times onto some white paper.

Using the leaf/flower square stamp and the cactus green Stazon pad,  stamp this onto some white paper 4 times.
 

Cut out all 8 squares.   Colour the middle section  of the white base card with the  Amethyst Promarker alcohol pen.


Glue the squares around the front,  outside edges of the base card, leaving the coloured section uncovered.


Stamp the 'Friends Always' tag  (which was also free with a craft magazine and has been in my craft stash for quite some time)   onto some white card, using the cactus green ink pad and cut it out. 


Colour the large flower in each of the green stamped squares with the amethyst alcohol pen and glue the tag to the centre amethyst square.   Add some gold liquid jewellery to the centre of each amethyst flower.


 Stamp more squares of the same design as the squares on the card front,  using the rusty brown and cactus green ink pads, from these, colour 4 small green and 4 large rusty brown  flowers with the orange and green brush pens, then cut them out.


Glue these around the centre of the base card and add some liquid gold jewellery to the centres of the flowers.


Below is another photo taken at an angle.


Thank you all for your lovely comments and visits to my last blog post, they mean a lot and are very much appreciated.   I will be back again quite soon with another card, so see you all then.   In the meantime, take good care of yourselves and enjoy the week ahead.

                                                                 Love and rainbows.

                                                                 Hugs   Jennifer xx.


Sunday, 21 August 2022

'Purple Zinnia.'

 Hello Lovelies,

Hope this post finds you all safe and well.   Thank you once again for all your lovely comments and visits to my blog,  I really appreciate each and every one.

I have another card made using one of my favourite Stampendous stamps, the ' Zinnia' cling stamp, on   my previous card, made using this stamp, I coloured the  Zinnia green and as this flower  also comes in purple, I decided to use that colour this time.     Hope you like it.

Make a five and a quarter inch square base card from white card stock.   Matt and layer a smaller square of patterned background paper from Chloe's bumper pack, onto the base card.


Colour around all four edges of another piece of white card,  cut smaller than the background paper, using  the Spectrum Noir alcohol pen no. LV2.  ( No need to colour the whole of this card, as only the outer edges will be seen ).  

Cut a slightly smaller square of white card and colour with the distress inks -Tumbled glass, Milled lavender, Weathered wood and Dusty concord and a blending tool.   Light colours in the centre and darker colours towards the outer edges.   Matt and layer this onto the lavender edged card,

Matt and layer this coloured square onto the patterned paper on the base card.

Using a black Finesse alcohol proof dye pad by Spectrum Noir,  stamp the 'Zinnia' flower 4 times onto some spare white card,   Colour the flowers  with the Promarker alcohol pens - Amethyst, Powder blue, Orchid, Cool aqua and Tulip yellow.   Cut them out, then 3D them using silicone glue, making one beautiful bloom. 


                                  When this is dry, glue the flower to the centre of the coloured card.


Die-cut 2 corners from spare white card, using the Creative Expressions die set and a die-cutting machine.
                          Glue one in the top left corner and the other in the bottom right corner.


Glue 2 lavender gemstones to the top right of the  inked card and 2 to the bottom left.   The card is now finished.   Below are a few close up photos.


Well that's all from me for now, I do hope you've enjoyed your visit to my blog.   Have a good week ahead and stay safe and well.   I will be back quite soon with another card, so catch you all then.

                                                                     Love and rainbows, 

                                                                     Hugs   Jennifer xx.