Good evening Followers, Friends and Visitors,
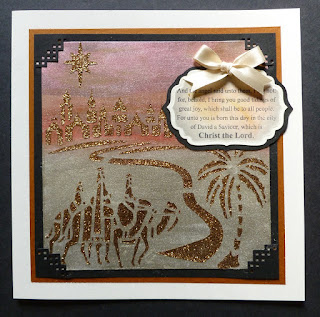
Hope you've all had a good weekend. Well, it's not long now before Imagination Craft's first show on the new crafting channel, Hochanda. This will take place on Thursday 10th September at 1pm. and again at 5pm. Please be sure to tune in, or if you can't, set your recorders. Our lovely Sue will be demonstrating some new techniques using the fabulous new Starlight paints and some beautiful new products, which I know you are just going to love lol!! Tonight I am sharing one of my cards, made for the show, using one of the new stencils called 'Road to Bethlehem.'
Fold the light cream card down the ready creased centre line, making a 7" x 7" base card. Onto this, matt a smaller piece of sticky backed copper paper.
Cut a smaller black square and punch each corner using the EK Success corner punch. Put this to one side for the moment and we will concentrate on the main image. Take a smaller piece of white card and colour with the Starlight paints. I used a brush but you could also use a brayer if you have one, I have one but prefer to use a brush.
When this is dry, which will not take long as these fabulous paints dry very quickly but stay slightly tacky for a short time, lay the 'Road to Bethlehem' stencil onto it and using the metal spatula, spread the cinnamon Sparkle Medium over the design on the stencil. Remove stencil and leave the image to dry.
Fix this card into the four punched corners of the black card, then glue this to the base card.
Stamp the text stamp, using a black ink pad, onto a piece of cream card. Die- cut this using the Spellbinder's label die. (sorry I cannot remember whose die this is). Colour with distress inks, then matt onto a slightly larger piece of black card. (The next size die would have been too large, so I drew around the outside of the die and cut it out by hand, making it just the right size label ). Glue the cream label onto the black, then glue to the top right of the base card.
Add a cream ribbon bow to the top of the label. Well that's this card finished, hope you like it. I'll be back again very soon with another project. Many thanks for stopping by and taking the time to look at my blog, I do love to read your comments. Have a great week.
Love and rainbows,
Happy crafting, Hugs Jennifer xx.


This is fabulous Jennifer! Love the gorgeous background and sentiment.
ReplyDeleteHugs
Linda xxx
Hi Linda, thank you so much for your comment, I do
Deleteappreciate it.
Hugs Jennifer xx.