Followers

Thursday, 30 November 2017

Shadow Grunge Elements.

Hi there fellow Bloggers, Friends & Visitors,

Hope you are all well and for those who may not be feeling on top of the world, for whatever reason - here's a big hug from me, hope things change for you soon.

Thank you for visiting and commenting on my last blog, I really appreciate it.   Tonight I would like to share a card with you  which was made in July this year.   I have used one of Imagination Craft's great Steampunk stencils - 'Grunge Elements,'  Mixed Media Spray Inks and Starlight Paints.

     
Using the border stamp, stamp around all four edges of a 7" x 7" white base card, using a black ink pad.   (this stamp was part of a set which was given free with a craft magazine, sorry cannot remember which magazine).

    
Matt some black shiny card onto the base card .  Cut out a slightly smaller square of white card and colour with the Sunshine, Red and Light blue Mixed Media Spray inks.   Add some water droplets and blot with some tissue or kitchen paper.   This takes some of the colour away.


When dry, lay the stencil onto the coloured card and, using a piece of cut 'n' dry foam, rub the black ink through the design on the stencil.   Remove the stencil and wash it, as you will be using the stencil again.  

    
Next, lay the stencil back in the correct position but this time, slightly off-set it.   This gives a shadow effect.


Using the large stencil brush, stipple the  Rich gold, Green, Red, Bright orange and  Mediterranean sky Starlight Paints through the stencil design.    Remove the stencil and wash it as soon as you can, as this paint dries really quickly.   Matt this onto the base card.

   
Stamp 'Hello' in black ink in the centre of the 'broken circle.

   
Die-cut, 1 small, 1 medium and 1 large roses from white card, using the Sizzix dies.   Glue these down the right-hand side of the card, using Imagination's Magi-bond glue.

                      
Well, that's my card finished,  thanks again for visiting my blog, I do hope you have enjoyed your visit.   Catch you all again in a few days.   Enjoy the rest of your week.

                                                             Love and rainbows,

                                                              Hugs   Jennifer xx.


Sunday, 26 November 2017

Flower Power Getaway.

Hi there Fellow Bloggers, Friends and Visitors,

Well, we've had our first taste of the white stuff this weekend, first of the season, although it didn't last long I'm pleased to say.   It does make for picturesque scenes but I don't like the problems that come with it lol!   I think it has been quite cold everywhere but hope you escaped the snow.

Thank you so much for visiting and commenting on my last blog.   Tonight I have another card to share with you, which was shown on Imagination Craft's latest shows on the Hochanda T.V. Channel on 17th.  18th. & 19th. Nov. 2017.   This was such a fun card to make.   I used Imagination's fabulous 'Flower Power' stencil.   I just felt it was calling out to be made using some sparkly pink lol!   So here we go!!    

    
Matt a square of green card onto the 7" x 7" white base card, leaving a small border of the white showing.  

Take a smaller piece of white card and lay the Mixed Hexagons Art stencil onto it, positioning the shapes to look like hills.   Colour through the design with the Peeled paint,  Tea dye, Mowed lawn and Frayed burlap Distress inks, using a piece of cut ' n' dry foam.   Move the stencil slightly and repeat.   Remove the Art stencil, then lay the narrower tree from the fir trees stencil onto the right-hand side of the hills.


  Using the stencil brush, dab the green Starlight paint over the branches and the Topaz over the base of the tree.   Remove the stencil.

   
Cut around the top of the hills and carefully cut around the tree branches which are above the top of the hilltop.   Using the top of the narrow tree on the fir trees stencil, create three more trees on and between the hills, making the smallest tree appear in the distance.

Colour another piece of white card with the Stormy sky and Tumbled glass Distress inks.   Fix the hills to the sky using sticky foam pads along the back of the hilltops.   Use double sided sticky tape down the sides and bottom, then fix to the base card.

   
Stamp 'On the Road' along the top of the base card,   'Lets Go' and 'Getaway'  at either side, using a black inkpad.

   
Stamp ' Enjoy the Journey' onto a piece of white card using a black inkpad, then cut out and glue to the centre top of the card.

   
Lay the flower Power stencil onto a piece of pink card and spread the Old Rose Sparkle Medium over the design, using the metal spatula.   Remove the stencil and leave the image to dry.

    
Punch out 9 tiny flowers from pink card and colour with diluted Cyclamen Starlight pain.   Glue 2 to the 'Enjoy the Journey' sentiment,  2 to the caravan,  3 to the roof of the Camper van and 2 to the wheels of the camper van.

    
Add small dots of green pearl liquid to each flower centre.   Fix a piece of acetate behind the van windows.   Cut out the van and caravan and glue to the base card using sticky foam pads.

  
That's it finished, hope you like this one, it really was was fun to make, reminds me of the Flower Power in the 60's lol.   I forgot to mention, the sentiment stamps are by Hero Arts, which I've had in my crafty stash for some time.

Thank you all as ever for visiting my blog.   Have a great week and I'll be back soon.

                                                               Love and Rainbows,

                                                                 Hugs   Jennifer xx.


Thursday, 23 November 2017

Flight of the Butterflies.

Good evening Lovelies,

Hope everyone is well and if you are not  or are  struggling for any reason at the moment, here are some (((Hugs))).   Hope things improve for you very soon.    This is a busy time of the year and can sap up your energy with so many things to think about and do.    Take some time to check out my blog tonight, feet up and hopefully relax a little.

My card tonight is made using Imagination Craft's beautiful  'butterfly Flight' stencil and of course one of my favourite Imagination Craft's products  - the very effective Starlight Paints.   This is an easy and effective card to make and takes no time at all.

   
Matt a  slightly smaller black square onto the white 7" x 7" base card.   Next matt a piece of blue card onto the black, leaving a small border of the black matt showing.


Cut a square of black card, smaller than the blue and lay the butterfly stencil onto it.   Fasten your piece of card down to your work surface, using masking tape,  around the edges,  so the card and stencil stay in position whilst you work.

                  
Stipple the Mediterranean Sky Starlight paint over the larger butterflies and the Rich Gold paint over
the smaller butterflies, using the large stencil brush.


Add small amounts of the Gold and Amethyst paints on the large butterflies.                           
      
          
Remove the masking tape and the stencil .   Wash the stencil and the stencil brush, as this paint dries very quickly and if you leave it, it will be difficult to remove.   If you can't wash them immediately, just drop them into a bowl of water until you have time. 

Matt this onto the base card, the card is now finished, really quick to do.    That's it from me for the moment.   I would just like to thank everyone for visiting and commenting on my last blog,  I do love making my cards and your lovely comments really give me encouragement, thank you.    Please pop back as I will be back very soon with another project.

                                                                        Love and rainbows,

                                                                        Hugs   Jennifer xx.


Tuesday, 21 November 2017

Happiness Hexagons.

Hi there Friends, Followers and Visitors,

Thank you so much for your comments and visits on my last blog, they are much appreciated.   Tonight I thought I would share another of my cards, made for Imagination Craft's shows on Hochanda T.V. last weekend.

For this card I have used their fabulous, very useful 'Mixed Hexagons' large Art stencil no. MA-48,  Starlight paint and Mixed Media Spray Inks.

   
Matt a smaller  square of black card, onto a  7" x 7" white  base card.   Cut a square of white card, smaller than the black.   Lay the mixed hexagon stencil onto the white card, having decided which part of the stencil you want on your card.  

   
Spray the Fuchsia, , yellow, sunshine and light blue Mixed Media Inks through the design on the stencil.   When this is dry, matt it onto the black card.  

   
Die-cut three black butterflies using the  White Rose Studio die.   Paint a piece of white card with the rich gold Starlight paint, using a brush or a brayer if you have one,  Imagination Crafts have a great set of three different sized ones, which can be very useful.   From this card, die-cut three butterflies.

    
Glue the gold butterflies to the black ones adding glue to the body section, then glue the butterflies in position on the base card using Magi-bond glue, adding a tiny amount of silicone glue under each gold wing.

   
Stamp the 'Happiness' sentiment onto some white card, using a black ink pad.   Trim to size and matt onto a slightly larger piece of black card.   Fix this to the top right of the base card.

   
Well that's all from me folks, have a good week and I'll be back again very soon.   Happy crafting lol!

                                                                Love and rainbows,

                                                                  Hugs  Jennifer xx.


Sunday, 19 November 2017

'Teardrop Flowers.

Hi there fellow Bloggers,

Many thanks for your lovely comments and visits to my last blog.

Hope you've had a great weekend, it has been so.....cold here, a thick white frost brrr.   I think it is due to get a bit warmer over the next few days.   Did you watch the Imagination Crafts shows on the Hochanda T.V. Channel Fri. Sat. and Sun ?   if you did I do hope you enjoyed all the demonstrations.  For my card tonight I used Imagination's large Art Stencil - 'Droplets.'   I love the beautiful shapes on this stencil.   When I receive a stencil, I look at it and try to see what else I can see in it for   ie:  not just how it was intended to be used.    I think outside of the box lol!   I do this with stamps too.   I saw various sizes of flower petals in this stencil and just as I saw flowers, Mandy J. found little bird shapes!     So tonight's card was shown on Hochanda T.V. over the weekend and  is flower filled.


Mask off the edges of a white 7" x 7" base card with masking tape to make a white border.   Lay the droplet stencil onto the base card, fastening down with masking tape.   Using the Weathered wood, Faded jeans, Stormy sky, Mustard seed & Scattered straw Distress inks and a piece of cut 'n' dry foam, colour through the a section of the droplet stencil you wish to use.     Remove the stencil and wash it.   Remove the masking tape from around the base card edges.

   
Glue a blue satin ribbon bow to the top right corner of the base card.

    
Make five flowers of varying sizes by using the different sizes of the droplets, by drawing around the different sized droplets on the stencil, onto some  white card.   Cut these out and put into the daisies embossing folder and emboss.

   
Paint the petals of the large flower and one small flower with the Banana Yellow Starlight paint.   Colour the medium sized flower petals  and two small flower petals with the Mediterranean Sky.

    
Rub the Cobalt Alchemy Wax over the yellow petals and the Inca Gold Wax over the blue petals.   To make each flower,cut out a small white circle and glue the pointed ends of the petals to the circle, making a six petal flower.   I used Imagination Craft's Magi-bond glue to do this.

   
Glue these in position on the base card, adding a white die-cut  stamen to each flower centre.   Add some silicone glue under each of the petals to add some dimension to the card.  

   
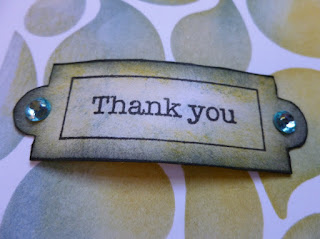
Stamp the 'Thank You' label, (which was given free with a craft magazine, sorry cannot remember which one)  onto a piece of white card, using a black ink pad.   Cut this out and colour with the distress ibnks, adding a little Black Soot Distress ink around the edges.  

     
Glue this to the bottom left of the card, adding some silicone glue under the label.   Glue a blue gemstone to each side of the label.

Well that's this card finished.   I do hope you like it.   Please pop back soon, when I will have another card to share with you, which was also shown on the Hochanda T.V. Channel.   Take care of yourselves and have a good week.

                                                                 Love and rainbows,

                                                                  Hugs   Jennifer xx.


Wednesday, 15 November 2017

Time to Celebrate. (A 'Sneaky Peek.')

Hi there Everyone,

It's me back again with another card, a sample made for Imagination Craft's T.V. shows on the Hochanda Channel this weekend.   The dates and Times are as follows:-   Friday 17th. Nov. 2017 at 10am.   3pm. & 7pm.        Saturday 18th. Nov. 2017 at   12noon  &  3pm.      Sunday 19th. Nov. 2017 at 7am.    I do hope you can watch some of the shows, as I understand Sue has a great many demonstrations planned.   I can see, not a lot of work  will be done in our household this weekend lol!     I'll be sat on the sofa, with a cup of tea, glued to the screen.   Really looking forward to these shows.

Well, my card tonight is a more usual design for me but I did enjoy designing last night's card.   So much fun to do.     Tonight's card  is a more elegant,  simple card., which would be ideal for a wedding or indeed, any celebration.   I just love this chandelier stencil.

  
Using a black ink pad, stamp 'Congratulations' at the top, bottom and both sides of  a 7" x 7" ivory base card, close to the outside edges.

 
Take a square of black card,  smaller than the ivory base card and lay the chandelier stencil onto it.   Stipple the Clotted Cream Starlight paint over the design, using a large stencil brush.

   
Remove the stencil and wash it.   Matt this black card onto the base card using double sided sticky tape.

  
Die-cut four corners from black card using the Tattered Lace corner die  and glue one in each corner, using Imagination Craft's Magi-bond glue.

 
Glue a cream satin bow to the top of the chandelier image.   Well that's this card finished, a quick and easy card to make.   I really like the simplicity of this stencil design and the gorgeous clotted cream Starlight paint is so beautiful when the light catches it, as in the photo below.

 
Thank you all so much for your visits and lovely comments on my blog, I do enjoy reading your comments and I do try to reciprocate, by visiting and commenting on your blogs.   Catch you all again very soon with another 'Sneaky Peek.'    Take care of yourselves.                     

                                                                  Love and rainbows,


                                                                   Hugs   Jennifer xx.


Tuesday, 14 November 2017

A Little Creative Art.

Hi there Followers, Friends and Visitors,

How cold has it been today lol!   brr....a thick white frost here this morning, Jack Frost sure had a busy night lol!   The weather forecast says it will be getting warmer again soon I'm pleased to say,  although, I do like these fresh sunny mornings, brushes the cobwebs away ha! ha!    Tonight I would like to share one of my sample cards made for Imagination Craft's shows on the Hochanda T.V. Channel, this coming weekend.   The dates are 17th.  18th.  & 19th. November 2017, wow!  that's me, sat in front of the telly all weekend lol!  so many shows yeah!    I understand Sue and Mandy will be demonstrating and they have many demos planned, hope you can watch some of the shows.    For this card I have used the large Art stencil no.MA48 (mixed hexagons) and their small  'Inspire Art Create' stencil,    Sparkle Medium, Gold Spray & Gilt, Mixed Media Spray inks, Jade Starlight paint and Inca Gold Alchemy Wax.   Please bear with me, as there are quite a few photos as I wanted to show the different aspects of the design.

  
Matt a square of black card onto the white 7" x 7" base card, leaving a small border of the base card showing.   Take a smaller square of white card and using the large Art stencil, decide which part of the design on the stencil you want to use, then spray the fuchsia, yellow and light blue inks directly onto the stencil itself.   Lay the square of white card onto the inks and press down, smoothing your hand across the card.   Remove the card and leave it to dry.   Wash the stencil.

 
When the inks are dry, lay the stencil back in position over the design on the card.   Spray the gold gilt over the design.   Remove the stencil and leave the image to dry.

 
Cut away parts of the design, then glue to the square of black card.   Lay the small stencil onto the design and spread the Black Stars Sparkle Medium over the words  'Create'  and 'Art,'   using a metal spatula.   Remove the stencil and leave the images to dry.

 
Cut out some hexagon shapes from the cut- away pieces and glue to the card front, layering some of them, using silicone glue.


Die-cut 1 large, one medium and one small  flowers from white card using the Creative Expression's flower die set and glue them in position.


Stamp the watch face from Imagination Craft's 'Time Flies' stamp set onto a spare piece of white card using a black ink pad.


Paint the watch case with watered down Jade Starlight paint.   Cut this out and glue to the right hand side of the card, using silicone glue.

   
Die-cut a hexagonal  frame from black card and glue the hexagonal centre (left over after die-cutting the frame) to the card front and glue the frame to the large hexagonal original image on the card front.

    
Die-cut a butterfly from black card, using the Memory Box die and put into a small flower patterned embossing folder and emboss.   Colour the embossed flowers with a little Inca Gold Alchemy Wax.    Glue the butterfly to the card front, using silicone glue under each wing.

Glue some black circles to the three flower centres and onto a couple of the hexagons.

 
Lastly, (you'll know doubt be pleased to hear lol!!)  draw some black lines around some of the hexagons, using a black fine liner pen, next to the word 'Create.'    Phew! well that's this card finished at last.   I know it is a wee bit fiddly but I really enjoyed creating this card and I  think it is worth the time in the end lol!   I hope you do too, a little different to my usual cards lol!

Thank you all for your visits and lovely comments on my previous blog, they are much appreciated.   I will be back soon with a 'sneaky peek' at another of my creations.   I will let you know the timings of the Hochanda T.V. shows as soon as I know.   Take care of yourselves and happy crafting.

                                                                 Love and rainbows,

                                                            Crafty Hugs    Jennifer xx.