Hello Everyone,
Hope you have all had a great day, whatever you have been doing. Here we are once again at the beginning of another month, how this year is flying by! Thank you all for your lovely comments and all your visits to my last blog post, much appreciated.
Tonight's card is another sample I made for the Imagination Craft's shows on the Create & Craft T.V. Channel last month, using the beautiful 'Voila Collection.'
Matt a square of black card onto an 8" square ivory base card, leaving a small border of the ivory showing.
Take a slightly smaller square of ivory card and lay the A4 stencil from the collection onto it.
Spread the Shabby Chic sage relief paste over the design, using a metal spatula.
Remove the stencil and leave the image to dry.
Matt this onto the base card.
Stamp the lovers with the umbrella onto some white card five times, using a black ink pad.
Colour them with the Fuschia and light purple mixed media spray inks, using well watered down orange ink for their skin. Cut the stamped images out.
Colour his suit with watered down Black soot distress ink.
Cut out and 3D the images onto the original stamped image, using silicone glue.
Glue the lovers to the left-hand side of the base card. Stamp the sentiment on the right-hand side of the card using a black ink pad.
Stamp the Amour heart and arrow onto some ivory card, using a black ink pad, cut out and fix just above the heads of the lovers using silicone glue.
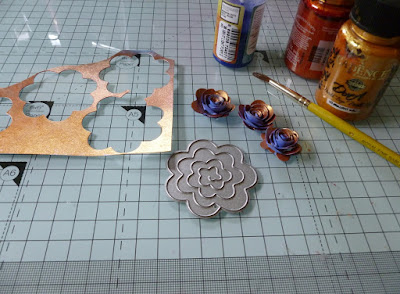
Paint a piece of white card with the Brilliant Gold and Zinaber Gold metallic paints, blending them together. When this is dry, paint the back of this card with the light purple spray ink. From this, die-cut three roses ( I used a rose die which was given free with a craft magazine a few years ago). Roll them up adding a dot of glue to stop it unwinding (like quilling). Roll so the gold is on the inside of the rose and the purple underneath each petal..
Glue these roses to the bottom right corner of the card.
The card is now finished. I have really enjoyed using this beautiful collection and I hope my cards may have just inspired you to have a go at this fabulous hobby. The card below is taken at an angle to show the dimension of the card.
That's all from me for the moment. Take good care of yourselves and stay safe. I will catch you all again quite soon.
Love and rainbows,
Hugs Jennifer xx.


Such a beautiful card Jennifer, beautifully designed. I love the stencilled scene in the background and the lovely couple and the decoupaged element to them. As always Jennifer your cards are so creative, Kate x
ReplyDeleteJust awesome, wow love the way you created the background and the dimension with the beautiful colored people.
ReplyDeleteHugs Diane
Fabulous step by step Jennifer. I love this card and your layers are delightful.
ReplyDeleteHugs
Linda xxx
This card is fantastic! And enjoying seeing your process.
ReplyDeleteAmalia
xo
Just absolutely beautiful. Love the colours. You are such a talented lady xx
ReplyDelete