Hi there Lovelies,
Thank you for visiting my blog, I hope you enjoy your visit and thank you also for your visits and lovely comments on my last blog post, much appreciated by me.
Today I have a 'sneaky peek' at one of my sample cards for you, made for the Imagination Craft's show on the Create & Craft T.V. Channel tomorrow Thursday 20th. Jan. 2022 at 12 noon, when our lovely Mandy Taylor will be launching this beautiful collection. I do hope you can tune in. Now onto my 'sneaky peek' lol .
Matt and layer a seven and a quarter inch square of dark green card onto an 8"x8" white base card. Cut a 7" square of white card and the section of the rice paper design, cutting the rice paper, slightly larger than the 7" white card.
Using the Cadence Decoupage plus glue, fix the rice paper onto the piece of card, bending the excess paper to the reverse of the card and securing it with glue.
Lay the design from the A4 'Garden Diary' stencil onto the right-hand side of the rice paper background and secure to the card and worktop, using the blue mixed media tape, to stop the stencil moving (or you could use Cadence stencil spray).
Using a metal spatula, spread the Cadence Shabby Chic Chocolate Relief Paste over the design. .
Remove the stencil and wash it and the spatula and leave the image to dry.
When dry, rub some walnut stain distress ink around all four outer edges of the background card, followed by some white gold Dora metallic paint.
Lay the stencil back in position over the relief paste and using a stencil brush, stipple some white gold paint over the stem, leaves and the flower heads in the glass jar. Remove the stencil and leave to dry.
Fix the background card onto the dark green matt on the 8"x8" white base card.
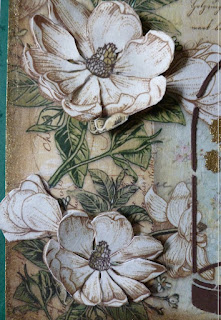
From the second sheet of the same design rice paper, roughly cut out the large and small flower heads and the bud, then fix them to some spare white card, using the decoupage glue.
When they are dry, cut them out, cutting away the excess white card. Cut and shape the petals, then fix them to the original images on the base card, using silicone glue.
The card is now finished. I do hope you like it. Below are a couple of photos taken at an angle so the dimension of the design can be seen.
That's all from me for the moment, I will be back soon with another card, made using this lovely collection. In the meantime, stay safe and well. Please don't forget to tune in to see our Mandy launch this lovely collection tomorrow Thurs. 20th. Jan. at 12 noon.
Love and rainbows,
Hugs Jennifer xx,


A beautiful card Jennifer. Can't keep up with all these shows! Love and hugs xx
ReplyDeleteAnother stunner Jennifer, I love the paper and your design and colours are gorgeous, a beautiful vintage look, Kate x
ReplyDelete