Followers

Thursday, 29 November 2018

Warm Birthday Wishes.

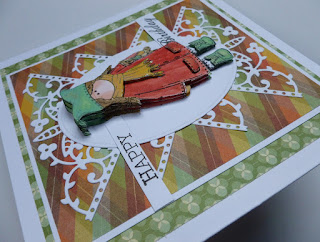
Hello, there, how are you all today?  well I hope.    Thank you for your kind comments on my last post, much appreciated.     Today I have a card to share with you which I have made, using a stamp I came across whilst tidying my craft room and just had to have a play with it.   If I remember correctly, I think this was a Sugar Nellie stamp.   Hope you like it, I just love her cute little hat, out grandson had a hat just like this one when he was small.


Make a square base card using white cardstock.   Matt the green patterned paper (which was given free with the Simply Cards & Papercrafts magazine and is a We R Memory Keeper's pad, (along with the red patterned paper), onto the base card, leaving a border of white showing.

Matt and layer a square of white card onto the green paper, then the multi coloured paper onto the white card.

Using the Intricut Flourishes corner die set,  die-cut four corners from spare white card and glue them down the centre of the card.  
    
   
Die-cut a white oval and glue to the centre of the  base card.   Stamp the girl four times onto spare white card, using a black ink pad.   Colour these images with the Marvy le Plume pens.   Cut them out and 3D them, using silicone glue.

   
Glue her to the centre of the  oval.     Stamp 'Happy' & 'Birthday' onto spare white card, using a black ink pad, trim to shape and glue the 'Happy' to the top left and 'Birthday' to the bottom right of the oval.  


The card is now finished, hope you like her, I just think she is such a cute image.

     
That's all from me for the moment, stay warm and safe in this wet, windy weather.

                                                              Love & rainbows,

                                                              Hugs   Jennifer xx.


Sunday, 25 November 2018

Get Well Soon.

Hi there Lovelies,

Happy Sunday,   thank you for stopping by my last post and for your lovely comments, much appreciated.    A dull dreary, damp day here today, mustn't grumble though, as it is almost December.   Hate these  nights when it gets dark so early lol!   another 3/4 weeks and they will start to lengthen once again thank goodness.

Today I would like to share another of my cards with you.   Whilst tidying my boxes of  stamps, I came across this one which I had forgotten about.   It is really a stamp, which when cut out, can be made into a box.   This flower design is from the centre of what would be the box.   I have this stamp in two sizes, this is the larger stamp.  It is quite old now and is a Creative Expression's wooden stamp.   I have tried to keep this card quite simple and not too fussy but as you probably know by now,  I'm not very good at leaving white space lol!    Ok, enough chit chat from me, let's begin this step by step.

   
Begin by making a square base card from white cardstock.   Die-cut four corners from white cardstock, using the Tonic die.   Glue one in each corner of the base card, approximately half an inch in from the card edge.


Cut a white square 2" x 2" and edge with a dark green Promarker pen, then glue this to the cenre of the base card.

Stamp 'Get Well Soon' in black ink around the outside edge of the square.

   
Stamp the flowers from the centre of the box stamp onto some spare white card and repeat again.   Trim the edges.   Colour these with the Promarker pens, then cut out and 3D the flowers and leaves onto the original image on the white square, using silicone glue.

      
Glue this to the green edged square and the card is finished, quite a quick card to make.


Thanks for stopping by my blog, hope you have enjoyed your visit.   Until my next post, be happy and take care of yourselves.

                                                              Love and rainbows,

                                                         Crafty Hugs,  Jennifer xx.


Wednesday, 21 November 2018

By the Pond.

Hello Lovelies,

How are you all today, well I hope.   Sending  some hugs to you  if you are not feeling too well and I hope you will soon feel much better.   Boy has it  turned colder today!  a very cold wind, needed my scarf and gloves on today whilst out shopping.

Thank you once again for your lovely comments and visits to my last post.   Tonight I have a card for you which I made using free stamps from various craft magazines.   I have also used Imagination Craft's Rich Gold Starlight paint to create highlights on the dragonflies and flower centre.   The flower die is a Spellbinder's Shapeability die which I have had in my craft stash for some time.   The Starlight paint can be purchased from Imagination Crafts on the Crafter's Companion website.

   
Make a square blue base card.   Take a smaller piece of white card and stamp some bulrushes across the card, using a black inkpad.   Matt and layer this onto the blue base card.

Die-cut an oval from white cardstock and colour the oval with the Weathered wood Distress ink and a blender tool, leaving the centre white.

Stamp some bulrushes onto the oval using a black inkpad.   Glue this to the centre of the white card.

 
Stamp the dragonfly three times in black ink onto some spare white card.   Colour them with watered down Hibiscus and  Rich Gold Starlight paints.


When dry, cut out and glue them to the oval using silicone glue.   Glue the oval to the white card, using silicone glue.

 
Glue three star gems to the top left and bottom right corners of the white card.


Stamp Happy Birthday to the bottom of the blue base card, using a black inkpad.

Die-cut two flowers using the Spellbinder's die from white card.   Colour the petals and centre with a little Bundled Sage Distress ink.   Glue one on top of the other.


Add some 'Just Pearls' pearl to the centre of the flower,  then dot around the outer edge of the  just pearls with the Rich Gold Starlight paint.

   
Glue the flower to the bottom left of the blue base card.

  
Well that's all for the moment my Friends.   Enjoy the rest of your week and I will be back again soon.   Thanks again for visiting my blog, hope you enjoy your visit.

                                                              Love and rainbows,

                                                          Crafty Hugs    Jennifer xx.


Sunday, 18 November 2018

Happy Little Cricketer.

Hi there Friends, Followers  Visitors,

Hope you've enjoyed your weekend whatever you have been doing.   Thank you all once again for your visits and lovely comments, I really do appreciate them.

I have been sorting out my boxes of stamps, quite a job as I have quite a lot.   I have purchased them over many years.   Going through the boxes I just couldn't resist having a play with a few well loved stamps.   My card tonight is made using one such stamp, I just love this cute little guy.   This is a stamp I bought many years ago and is a  Creative Stamping stamp from about  2005.

    
Make a square base card using white cardstock.   Matt  and layer a square of white card onto the blue base card, leaving a small border of the blue showing.

Matt and layer two different patterned papers (which were given free with the Simply Cards & Papercrafts magazine) onto the white matt.  

Stamp 'Happy Birthday' onto white card using a black ink pad.   Separate  the two words, and trim around them.

   
Glue the 'Happy' to the top left corner of the base card and the 'Birthday' to the bottom right.

   
Die-cut an oval from white card and colour inside the edges of the oval with stormy sky distress ink, leaving the outer edge white.

Stamp the boy twice onto white card using a black ink pad.   Colour with the Marvy le Plume pens, then cut out and 3D him, using silicone glue or sticky foam pads.

   
Glue the boy to the centre of the  oval and glue the oval to the centre of the base card.   Make an insert to go inside the card and the card is finished.   Quite a quick card to make.   Hope you like it.  

  
Thank you all once again for your visits.   That's all from me for the moment, see you all again soon as I have found  many older  stamps I want to have a play with lol!    I didn't of course, finish my tidying up of my boxes of stamps, that's for another day in the future lol!    Have a good week.

                                                                 Love and rainbows,

                                                              Crafty Hugs  Jennifer xx.


Thursday, 15 November 2018

My 'Flower Trellis' Tutorial.

Hello there Friends, Followers and Visitors,

Wow! isn't this weather amazing.   Sun has been shinning today and it is still quite mild for the time of year.   The leaves  have almost all fallen from  the trees in our garden, just a few hanging on by a thread lol!   all very beautiful but quite a job  to clear them all up, there must be thousands  lol!   Thank you all for your visits and comments on my last post, much appreciated.   At the beginning of the year, I was asked by  a closed group if I would do a tutorial for them as a guest designer.   I was thrilled to be asked, so I of course said yes.    I thought I would share it with you today.    Here is that tutorial, hope you enjoy it.   Please bear with me as there are quite a lot of photos showing the different stages.   The card below is what we are aiming for.   Some of the products used in this tutorial can be purchased from Imagination Crafts on the Crafter's Companion web site  www.crafterscompanion.co.uk

    
(1 )   Matt a smaller square of red card onto the white 7" x 7" base card.

(2 )   Take a smaller square of white card and lay the flower trellis stencil onto it and dab the white   
         Gesso through the design, using cut 'n' dry foam.   Remove the stencil.

   
(3 )   When dry, colour over this with Peacock feathers, Dried marigold and Ripe Persimmon Distress
          inks, using a blending tool.


(4 )   Put some Peacock feathers ink through part of the large flower design on the stencil, onto the
         top right hand corner.   Remove stencil.

     
(5 )   Add some extra circles to the design using the Bubbles stencil and Peacock feathers D.I.

   
(6 )   Lay the Spider's web stencil onto the bottom right corner and blend some Dried marigold D.I.
         through the stencil.

    
(7 )   Add a few water splashes using your fingers and blot off with some kitchen roll, to remove
         some of the ink.

(8 )   Using water and a paintbrush, take away some of the ink from the Gesso images as in the
          previous step.

     
(9 )   Lay the trellis stencil back in position on the card and using the 'foiling' technique, rub the red
         Sparkle Medium over the large flower flourish in the bottom left corner, using our finger.  (You
         could use a piece of cut 'n' dry foam should you be allergic to glitter) but I prefer to use my
         finger.    This takes the medium to the edges of the stencil design.   Remove the stencil and
         leave to dry.

     
(10)   Using small scissors, cut away the design from the centre of the large flower flourish, leaving
          the Sparkle Medium edges in tact.   Draw around the outside edges of the Sparkle Medium
          with a black pen.

     
(11)   Fix some red card behind the cut out flower, then fix this onto a piece of white card, leaving
         a tiny border of white showing.   Matt and layer this onto the white base card.

    
(12)   Stamp the distressed circles to the top left and bottom right corners, using a black ink pad.
          Next stamp the word  'SMILE' to the card front using black ink once again.

    
(13)   Add a red ribbon bow just below the word 'SMILE' and a red gem to the large flower flourish.

(14)   Using a white pen, add a few groups of white dots to the design.

     
Below is the finished card shown at an angle.   This card does take more time to make but I feel
that extra time is worth it lol!   what do you think, I do hope you like it.


Thank you for visiting my blog, hope you may have gained a little inspiration from my tutorial.   Take good care of yourselves and I will be back again quite soon.  Happy crafting!

                                                              Love and rainbows,

                                                         Crafty Hugs,   Jennifer xx. 


Monday, 12 November 2018

To My Friend.

Good afternoon Lovelies,

Hope you all enjoyed your weekend.   The weather here today began by being very promising.   The sun did shine for a short time but it has since clouded over, turned quite chilly and it is now raining!  I suppose we mustn't grumble it could be worse, like snow lol!

Today I have another card to share with you, which is very similar to the card in my last post.   I have changed the colours and added different greetings.   This was made for a very special friend and I hope you like this one.   It s quite a quick card to make.   The Imagination Craft's products used to make this card can be purchased from Crafter's Companion .


Trim approximately a quarter inch from one long edge of a piece of white A4 card and fold in half landscape style.

Cut a smaller rectangle of white card and colour with the pink, navy blue and white Fashion sprays and leave to dry.

In the meantime, die-cut the butterflies from some teal coloured card, using the Crafter's Companion die.   Colour the butterflies by rubbing the silver Alchemy Wax over them.

 
Using the Black Soot Distress ink and a blending tool, colour the outer edges of the coloured rectangle to frame the the design.   Matt and layer this to the base card.

Using a black ink pad, stamp 'To My Friend....' in the top right corner.


Stamp 'Wishing You...... in the bottom right corner.


Next  glue the butterflies die-cut  to the left-hand edge of the coloured rectangle, gently lifting up the wings of each butterfly.


Stamp the three flower heads onto a spare piece of white card using a black ink pad.   Colour them with watered down Fashion Sprays.

 
Glue the flowers to the card front, between the two greetings,  adding a little silver Starlight paint to each flower  centre,


Last but not least, add some 'Just Pearls' pearl dots to the bodies of each butterfly and the card is finished.

Thank you all so much for your lovely comments and visits on my last post, I do hope you enjoy your visits.   I'll be back soon with another card.   Keep well, stay warm  and be happy.

                                                                 Love and rainbows,

                                                          Big Crafty Hugs   Jennifer xx.