Hope your weekend has been good. Tomorrow is the beginning of a whole new week! We've had a quiet weekend and I have forced myself to tidy my craft room, instead of crafting lol! It is not finished yet, still quite a lot left to do, it may take some time but I will get there lol!!
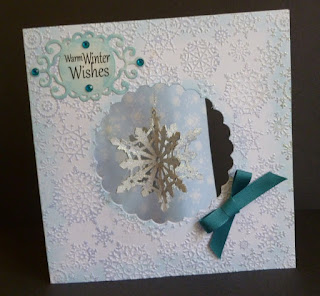
Tonight I would like to share a card I made for Imagination Craft's last shows on the Hochanda T.V. channel, last month. My card was shown but unfortunately the free hanging snowflake was tucked inside the card, so I thought I would put it on my blog so you can see the whole card lol!

(1) Die-cut a circle from the centre front of a 7"x7" white base card, plus another, from a piece of white card, the same size as the card front, so as to cover up the thread on which the snowflake hangs, on the inside of the base card.
(2) Put the card front only into the Vintage Christmas embossing holder and emboss.
(3) Using the Aqua Sea Sparkle Medium and a brayer, run over the raised, embossed design on the card front, then leave this to dry.
(4) Blend the Tumbled Glass distress ink around the card edges and around the edge of the aperture.
(5) Die-cut the tag and colour with the distress ink, then stamp with 'warm winter wishes,' using a black ink pad, then glue this to the top left of the base card. Glue four emerald green gemstones to the tag.
(6) Glue a turquoise ribbon bow to the bottom right of the aperture.
(7) Cover the inside back of the base card with the snowflake rice paper, so this will show through the aperture when the card is closed.
(8) Take two of the Art Cutz larger snowflakes and paint them with white Gesso, then brayer with diamond Sparkle Medium, then some aqua sea, dabbed on top with your finger. Fold each snowflake in half and glue together down the centre. Thread some silver thread through the hole in the top of the snowflake and glue the thread to the inside of the card front.
(9) Glue the white card with the die-cut aperture to the inside front of the base card, in order to hide the thread. The snowflake should now swing freely.
Below are pictures of the finished card, standing open.
The card is now finished, it is just a pity the beautiful sparkle on the embossed areas does not show up well on the photo, it looks really cold and frosty!
Thanks for stopping by my blog, I do hope you enjoyed your visit. I will be back in a day or so. Have a good start to the new week.
Love and rainbows,
Crafty hugs Jennifer xx.


Beautiful card Jennifer and loving the snowflake.
ReplyDeleteHugs
Linda xxx
Thanks very much Linda.
DeleteHugs Jennifer xx.
Love it Jennifer, thanks xx
ReplyDeleteHi there Alison, many thanks for your nice comment.
DeleteHugs Jennifer xx.
Beautiful icy card, love the hanging snowflake, Kate x
ReplyDeleteHi there Kate, thank you very much, so pleased you like it.
DeleteHugs Jennifer xx.