Hope you are keeping safe and well during this difficult time in all our lives. Today I would like to share a card I made for Imagination Crafts Shows on the Create & Craft T.V. Channel, which featured the fabulous 'Dark Angel Collection.' I happen to love owls and this one is no exception, just slightly different from the norm lol! he's just so cute! love him! Please bear with me, as there are quite a few photos but I do want to show you the different stages, this card is a bit more time consuming but I think, well worth that extra time....hope you're still with me at the end of this post lol! Lots of photos but not much text you'll be pleased to hear!
Trim a piece of white card to five and three quarter inches square. Colour the card with the light sage and bordeaux Cadence acrylic paints, brushing in a vertical manner.
When dry, matt this onto the 7" x 7" white base card. Add some small amounts of copper metallic paint brushed on in one or two places.
Colour a piece of white card with a mixture of the brilliant gold and the cameo metallic paints.
When dry, stamp half of the hinge 4 times onto the coloured card using a black ink pad. (Put a piece of masking tape over the half hinge you don't want stamped, then remove the tape after inking up the stamp).
Cut out the hinges and glue one in each corner of the base card.
Cut out a 4 inch circle and paint it with the light sage paint, then a few brushstrokes of watered down malahit metallic paint.
When dry, matt this onto the centre of the base card. Paint some white card with the malahit and die-cut 4 cogs from this using the dies from the collection. Cut each cog in half and glue 4 of the halves to the outside edges of the pink/green matt. Using the left-over coloured card after cutting out the hinges, stamp 12 nail heads onto it, cut each one out and glue them evenly around the inside edges of the matt.
3inch scalloped circle from it. Glue this to the larger green circle.
Die-cut l small and l large set of leaves from the left over coloured card after cutting out the hinges and add some peridot finger wax to each leaf.
Stamp the owl onto some grey metallic card, 6 times using a black ink pad.
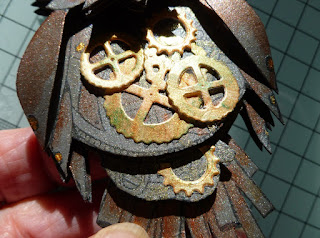
Paint the owls with watered down brilliant gold and copper paints. Cut out the owls and 3D him.
Die-cut a variety of small cogs and paint them gold. Glue to the owls chest and glue one on top of each eye.
Stamp the beak once and colour gold, cut out, then glue onto the owl using silicone glue. Fix the owl to the scalloped circle on the base card, adding the two leaf stems behind him, adding some silicone glue beneath each leaf.
Well I think that's everything covered lol! phew! if you are still with me...thank you for your patience, I do hope you think it was worth it lol! Below is a photo showing the 3D layers of the image.
Thank you for visiting my blog and for your lovely comments, much appreciated as always. Take good care of yourselves, stay safe and well. I'll be back again soon.
Love and rainbows,
Crafty Hugs Jennifer xx.


Wow Jennifer, absolutely fantastic piece of artwork. Your colours are amazing as is the owl. Love how you've decoupaged and coloured him. Gorgeous card, Kate x x
ReplyDeleteFabulous card Jennifer, I do love this steampunk owl. Gorgeous colours and wonderful depth.
ReplyDeleteHugs
Linda xxx
My gosh Jennifer what a stunning design and love the tutorial. I know with all the steps and cutting you spent a lot of time and love on this design. The Owl 3d effect is fabulous.
ReplyDeleteHugs Diane