Thank you so much for your lovely comments and all your visits on my last blog post, you are all so kind. I read each and every one and appreciate the time you have taken to visit.
Today I would like to share another card made for Imagination Craft's T.V. shows on the Create & Craft Channel on Tuesday 19th. May, when the 'Serene Chic' Collection was launched. I have used stencils and rice paper from the collection, Cadence Relief paste, Finger waxes and Acrylic paints and Sue Baker Sparkle and Twinkle.
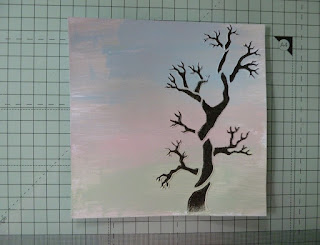
Cut a 6" x 6" piece of white card and lay the tree design from the stencil onto the right-hand side of this card. Spread the white relief paste through the design, using the metal spatula. Remove the stencil and leave the image to dry.
When dry, paint the acrylic paints across the card from left to right, including over the tree. beginning with the blue at the top, followed by the pink and finally with the light sage. Leave to dry.
Lay the stencil back in position over the tree and using a stencil brush, stipple some black finger wax over the top of the relief paste on the tree.
When this is dry, lay the stencil back in position and add some Sparkle and Twinkle through the stencil onto the black finger wax, just enough to add a little sparkle to the edges of the tree trunk and branches, ( I used my finger but a fine spatula will have the same effect if you prefer not to use your finger.) Remove the stencil once again.
Next tear some rice paper from the collection, by wetting around the section you want to use, with a paintbrush, then gently pull away from the sheet. Using some decoupage glue, fix a piece to the top left and a smaller piece to the bottom right corners.
From the second sheet of the same design rice paper, cut out the two butterflies and glue them onto some spare white card, using the decoupage glue.
Paint them with well watered down Cadence Malahit finger wax and cut them out.
3D them onto the original rice paper images using glue, adding some silicone glue under each wing.
Using the left-over card covered with the rice paper, punch out approximately 13 tiny flowers and glue them to the tree. (This is a punch I have had for many years and I use a lot). I think it was a freebie with a craft Magazine lol!
Matt this card onto a slightly larger piece of black card.card
Colour a piece of white card with the Camelot acrylic paint and from this die-cut 6 flowers and stamen, using up any left - over rice paper covered card too. Layer up the flowers and glue together. Paint each petal and stamen with well watered down Malahit Finger wax, to add a pretty sheen. I used a set of flower dies from my craft stash.
Glue 4 flowers to the bottom left,
and 2 to the bottom right corner.
Lay the word 'dreams' from the stencil onto some white card and stipple some black ink through the design. Lift up the stencil and re-lay it, off-setting it slightly and stipple the camelot paint through the word.
Cut out the the word dreams leaving a white border around the word and fix this to the top left.
That's all from me for the moment but I will be back again quite soon. Take care of yourselves.
Love and rainbows,
Happy Crafting. Hugs Jennifer xx.


Really gorgeous design Jennifer.
ReplyDeleteHugs diane
A gorgeous card Jennifer, those butterflies are stunning. Hope you are well xx
ReplyDeleteWhat a stunning card Jennifer, wonderful texture and images, I love those tiny flowers, Kate x
ReplyDeleteGorgeous card and beautiful design Jennifer. I do love Cadence products too.
ReplyDeleteHugs
Linda xxx